CORE’s Alexander Voß on endurance sim racing and the use of VRS

alex1
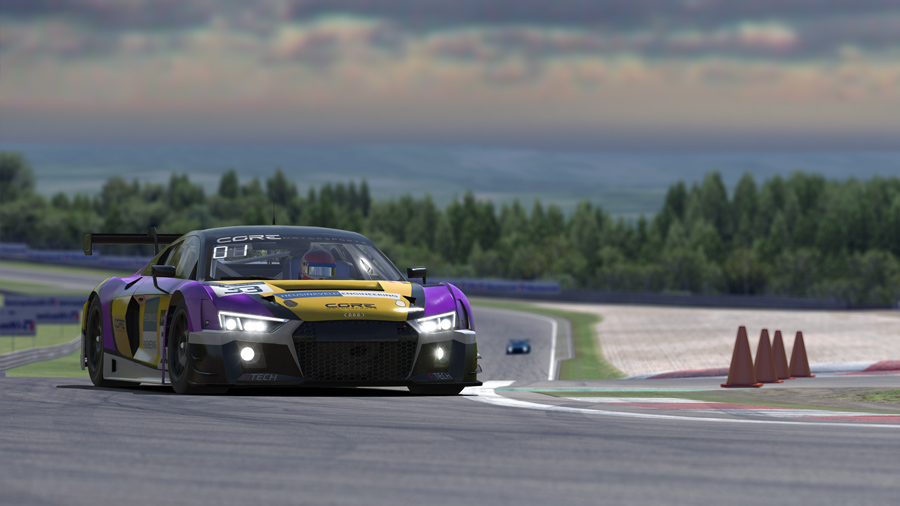
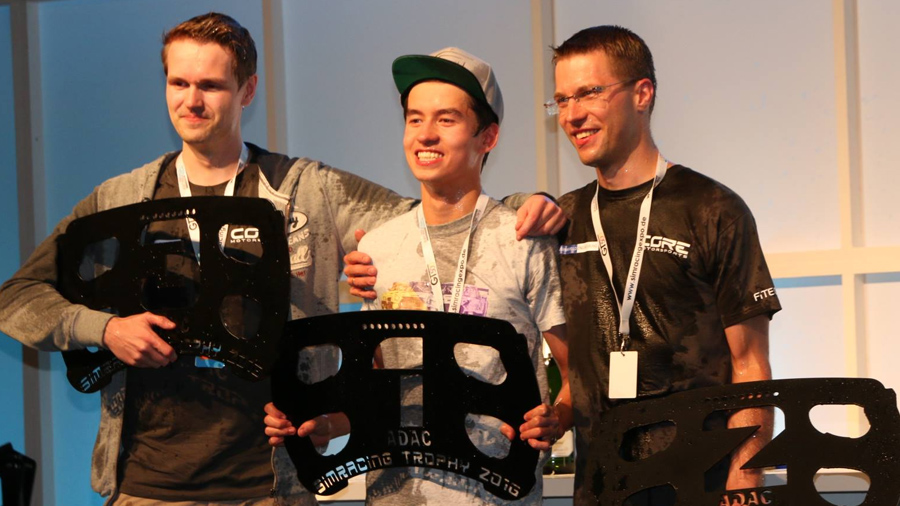
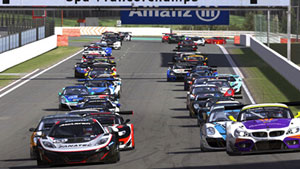
Meet Alexander Voß: one of the top drivers in endurance sim racing, and driver of CORE Motorsports, a sim racing team that uses VRS, and a team that is making inroads in iRacing’s competitions, coming second in last year’s Blancpain Endurance Series, and winning the iRacing VLN championship, as well as the ADAC Sim Racing Trophy.

Can say you something about yourself?
My last name Voß often leads to confusion, thanks to the traditional German ‘ß’ capital. Basically this is a ‘sharp s’ and means no more than double s, not a b. I’m a 27-year-old IT specialist, and I live in Paderborn, Germany. In my spare time I’m usually watching Borussia Dortmund, doing weight training, and obviously sim racing.

How did you get started in sim racing?
I started sim racing in my early childhood, with titles like Geoff Crammond’s Grand Prix Series. From there I moved to GTR, GTR2, rFactor, Race 07, and I almost raced every single sim out there, except Live for Speed.

I was always fascinated by comparing myself against other players, as I’m searching for competition. Even when online sim racing was in its early stages (at the end of the 90’s), offline leaderboard competitions gave that opportunity. I wanted more and more, and that’s how it’s like today at iRacing!

When did you start to use telemetry?
I started to use telemetry in rFactor and GTR2. Even then it was to get some kind of advantage over the competition. As a team we helped each other and tried to find ways to compare racing lines, and to improve the setup, especially on tyre degradation.

How did CORE Motorsports form, and where you part of it? Or how did you join?
I joined CORE Motorsports in 2013, when the team had huge success in the German competitions of rFactor. Since then the team had a lot of breaks, changes and new management, but since last year we’re an associated non-profit organisation, and have built a very strong relationship over the last years, which makes us very proud!

alex2

How does CORE use VRS?
VRS evolved to a very important tool for our team. For already a year now there hasn’t been a single race where we didn’t use it. After talking to some VRS coaches, it was clear to me that VRS takes care of the data which the telemetry logger is capturing. That gives us security in terms of setup data and related stuff not everybody should maybe get their fingers on.

Since we’re using VRS it’s a lot easier for us to be aware of other drivers problems within the team, to find weaknesses and to see where you can improve yourself. For now VRS is indispensable in our daily use, as it’s a lot easier to handle than telemetry Tools like MoTec and Atlas. Due to real life commitments we usually start with preparation a few days before a race, which leads to the point that telemetry usage is a huge factor for us to be time effective. Gone are the days when ‘hotlapping’ was the only method to improve your laptime.

Are there different driving styles within the team?
For sure the driving styles in our team varies from driver to driver. For example, a huge factor in endurance races is fuel usage. I’m known as someone who’s always burning lots of fuel, but by using telemetry it was easy for me to copy Nils’ (my teammate) driving style and let the car roll more, brake less, and therefor reduce fuel consumption and tyre wear when necessary.

Core Motorsport finished 1-2-3 at the 2016 ADAC Sim Racing Trophy. From left to right: Alexander, Angelo, Kay.

What are your hopes on the 2017 season?
Sim racing is always about competition and success. But as a team we don’t want to lose the focus to the most important thing, which is clearly the fun we have to race against other competitors and top-tier teams. We don’t do sim racing to earn prize money, although it’s certainly a nice propulsion to invest more effort than we’d normally do. But in general, our focus is to strengthen the team spirit, continuously improve our racecraft and compete in the WCS Series and other highly competitive endurance races.

We’re looking forward to the next years, and we surely hope that sim racing itself will also continue to grow as an eSport!

5.3: Anti-roll bar basics (Skip Barber F2000)

Untitled-1After the tyre pressures, which we handled in 5.2, another significant setting to tweak on the Skip Barber is the anti-roll bar (ARB) in the rear. First of all, you need to understand what an ARB is and what it does to the car.

The red component in the illustration below is an anti-roll bar, which nearly every racing car has on its rear and/or front axles. The ARB connects the suspension elements of two wheels on the same axle. As a result, as soon as one wheel moves up or down, the other wheel is forced to follow that motion. However, the ARB is essentially a torsion spring which stores some of the energy when twisted, so not the entire movement of one tire is transferred to the other.

arb3

To give an example of an ARB’s importance: When a car without an ARB installed goes through a fast right-hand corner, the inertia forces the car to lean to the left side, which is on the outside of the corner. This is because the mass of the chassis is not willing to change direction, while the tyres that grip to the surface are. Relative to the chassis, the left tyres move upwards, the right tyres move downwards, causing body roll. Try to visualise this in your mind.

  1. The main purpose of the ARB is to change the roll stiffness of the axle it’s installed on, which has two important implications:
    The more horizontal a car goes through a corner, the better the chassis is at creating downforce. We’ll cover this in a later article, since here we’re covering the low downforce Skip Barber car.
  2. The ratio of roll stiffness between the front and rear axles affect the balance of the car, especially its tendency to under- or oversteer. Unlike downforce, this is highly relevant for the Skippy.

To understand how balance is affected, we need to understand that as vertical load on a tyre is increased, the coefficient of friction of that tyre decreases. You still get more grip, but proportionally less. This is known as load sensitivity.

graph

Let’s work through an example, using the chart above. At 400 kg of vertical load on a tyre, the coefficient of friction is 1.25. By multiplying the two numbers, you get the amount of friction force provided by the tyre:

400 x 1.25 = 500 kg (single tyre)

If we have a perfectly balanced axle where each wheel is loaded with 400 kg, the total available grip at that axle is:

(400 x  1.25) + (400 x 1.25) = 1000 kg (axle)

Cornering causes lateral (left/right) load transfer at each axle. Vertical load will increase on the outside tires and will decrease on the inside tires. Continuing our example, let’s assume that due to lateral load transfer the vertical load on the left tyre becomes 500 kg, while the load on the right side becomes 300 kg. The coefficient on the left tyre decreases from 1.25 to 1.11, while on the right tyre it increases from 1.25 to 1.35.

500 kg x 1.11 =550 kg (left tyre)
300 kg x 1.35 = 405 kg (right tyre)
550 kg + 405 kg = 955 kg (axle)

So while the total load on the axle remains the same (800kg), the total available grip is now only 955 kg. Just when you need grip the most!

Now we understand how an axle can lose grip under cornering, and is this precisely what causes handling issues. When the available grip of the rear tyres is exceeded first, the car goes into oversteer; when the grip of the front tyres is exceeded first, the car goes into understeer. An ARB can balance this out.

Using the ARB to balance the car
A softer ARB causes less lateral load transfer on its axle, compared to a stiffer ARB. This can improve the balance of the car, and increase overall grip on the axle as shown in the earlier example. The ARB stiffness can also determine the lateral load transfer between the front and rear axles, even if a car only has one ARB, like the Skippy, which only has one on the rear.

A stiffer rear ARB causes more of the lateral load transfer to be distributed to the rear axle. Softer rear ARB means more of the lateral load transfer is distributed to the front axle. A stiffer rear ARB thus reduce available grip at the back while increasing it at the front, hence, making the car more oversteery and less understeery. Conversely, softening the rear ARB increases available grip at the back while decreasing it at the front, hence, making the car less oversteery and more understeery.

Controlling how much lateral load is transferred on the front versus rear axle is a balancing act, to optimise how much grip is available at each axle. Tuning the rear ARB on the Skip Barber car is mostly a question of driver preference: If you find the car too unstable for your liking, you can try reducing rear ARB stiffness. If you find the car unwilling to turn, you can try stiffening the rear ARB.

It’s important to note that tuning the ARB will only make a difference if you are utilizing the traction circle, as explained in 3.1. If you ask too much of the car (overall G’s), the ARB won’t help. If you ask too little, you won’t notice any difference in handling.

Up to you

Get the Skip Barber out for a spin, and see if you can adjust the ARB to your liking! See if you feel the effect of it, and try to visualise the forces working on the car as you go through the corners.

For further explanations on the matter of ARBs, please see the more advanced chapters of this guide, which we’ll publish soon.

5.2: Tyre pressures basics (Skip Barber F2000)

tyres
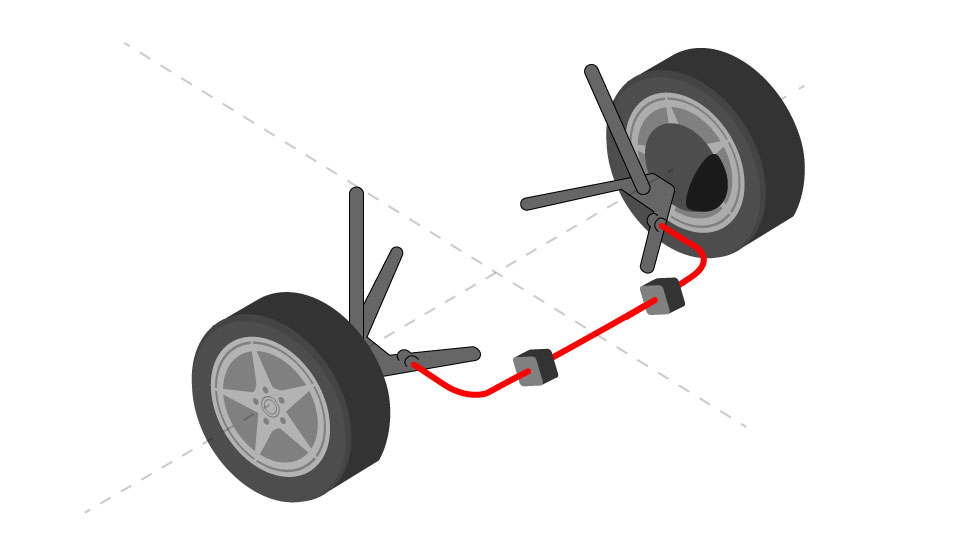
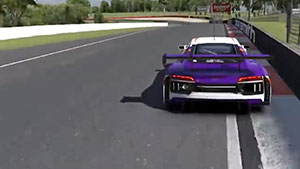
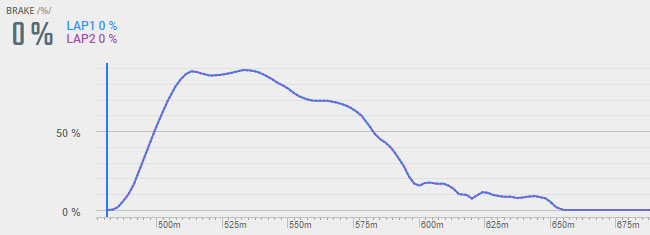
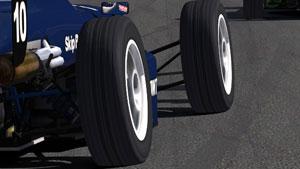
One of the few setup options available to the Skip Barber car is the pressure in the tyres. It’s also one of the most important things to get right on every single car. To find the ideal tyre pressure, it’s important to know what to look out for.

Tyre pressures influence a number of factors in the performance of the car, and both high and low tyre pressures have their drawbacks.

Factors: Deflection, contact patch, vertical and lateral stiffness
A tyre is a spring and damper unit after all, and becomes stiffer with higher tyre pressures. A higher tyre pressure also changes the curvature of the tyre, from a flat shape to like that of a bicycle.

Lower tyre pressures lower the vertical stiffness, which in turn causes a bigger contact patch (flatter tyre), and in theory sounds promising. Yet a bigger contact patch also increases the rolling resistance of the car. An even lower tyre pressure will cause the shoulders of the tyre to bare the grunt of the load, less than ideal (see illustration).

untitled-3

type2
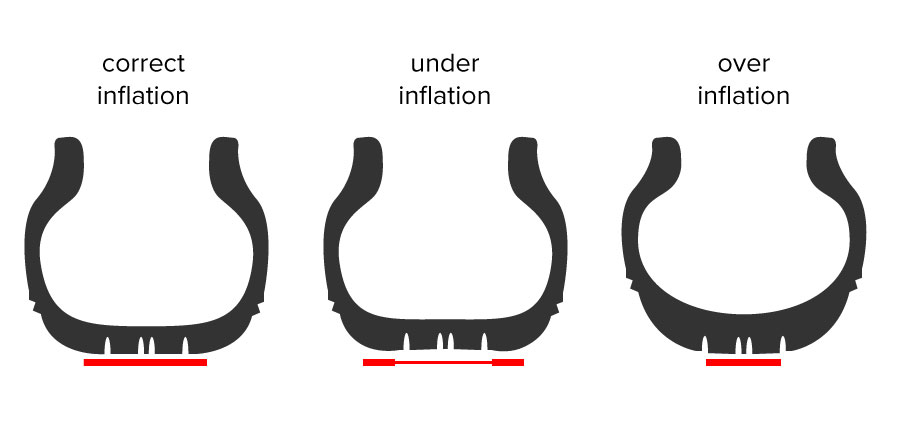
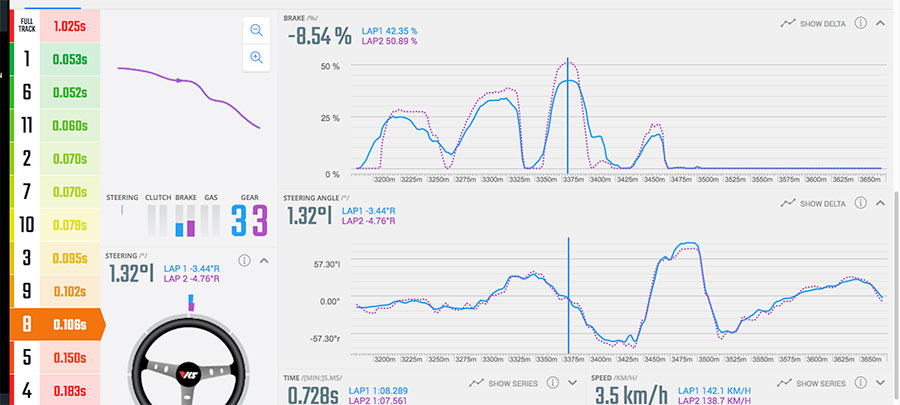
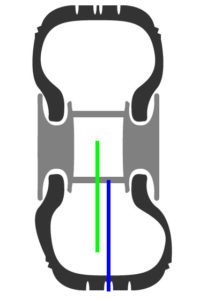
Moreover, lower tyre pressures also affect the lateral stiffness, and when running very low pressures, it’s possible that the middle of the tyre is no longer at the centre of the rim while cornering. It can cause the sidewalls of the tyres to nearly fold. This is also not ideal (see image).

This effect is most noticeable on the McLaren MP4-30 or Williams FW31, as they’re running on wheels with very tall sidewalls relative to their width. We recommend you take either of these for a spin on low tyre pressures, so you get familiar to the feeling of too-low tyre pressures.

Finding the balance
So, running low pressures has it’s drawbacks, as does having too high a pressure. As with almost every setup option that will be covered later on, some compromise is needed.

Fortunately, for the Skip Barber car and its tyres, finding the ideal pressure is fairly easy and does not depend on the track or weather conditions too much. We suggest you select a track, default weather and start a test session. Use the baseline setup, and drive a few laps to get the heat into the tyres. When the pressures stabilize, you have reached the stable operating temperature of the tyres. You have to use telemetry to find out after how many laps this takes. Let’s say that number is 4 laps. You’d need to drive 4 + 5 laps (4 laps to get the tires warmed up, then 5 clean laps within a few tenths of each other). Observe the car and check your laptimes.

Then increase the pressure a bit, and check behaviour and laptimes again. If the car is nicer to drive and/or quicker, go into the same direction with the pressure another time. If it’s worse and/or slower, go back to the original setting and then lower the pressure. Repeat this step until the improvement stops or the car becomes worse again.

The Skip Barber, as a non-downforce car, can be driven with the same pressure at practically every track. However, with higher end cars, especially those with high amounts of downforce, finding the right tyre pressure becomes a little more complex. A given tyre pressure is ideal for one specific amount of load on the tyres, yet this load varies greatly because of the different amount of downforce generated through high and low speed corners.

As a general rule of thumb, on tracks with lots of low speed corners such as Okayama, you’ll want to run relatively low pressures, because compared to high speed circuits like Spa, the downforce generated by the car is fairly low on Okayama, and therefore the loads on the tyres are lower. At a track with lots of high speed corners you may want to run higher pressures to increase grip in high-load situations.

When playing with the pressures you should be able to notice differences in traction in slow corners between higher and lower pressures. Likewise, you should notice a difference in grip in higher speed corners, although this might be more difficult to notice. Use the delta-bar to keep track of time gained or lost in individual corners.

Up to you:

The process of finding a good tyre pressure, at least for short runs, is the same iterative process as with the lower end cars. As you can already guess, for long runs it’s a little different and this will be covered later on in a more advanced section. Later on, we’ll also focus on temperature and weather differences.

For now, start your setup crafting career by finding the right tyre pressure. Continue with anti-roll bars, in 5.3.

5.1: To setup or not to setup?

vrsAs you progress through your iRacing career, competition is fiercer and you’ll need to use all the tools in the box to find the edge over your rivals. One of these tools is car setup. And while most beginner series have friendly communities with lots of setups being shared on the forums, the willingness to share setups significantly drops off at more competitive series. Especially at the top level of sim racing, setups are seen as highly guarded intellectual property. Thus, having a basic understanding of car setups becomes a very useful asset in your sim racing career.

But before you start, here are few questions you should answer to ascertain whether diving into setups is the best use of your time:

  • Are you willing to study and learn how to create a setup from scratch?
    This is not an “if this, then that” kind of guide. Setting up a car is about trade-offs within the limits of physics. Gaining proficiency in car setup is a process that requires you to experiment and analyze a lot.
  • Are you able to consistently hit lap times within 0.2s of your fastest lap?
    If not, then your biggest gains might not come from setups. In road racing, if you’re 3 seconds off the pace on a road track, probably only 0.3s is down to the setup. In oval racing, it’s much easier to learn the tracks, so car setup is a quite significant factor in open setup series.
  • Can you tell whether time loss was due to car or driver?
    You should be able to distinguish driver errors causing understeer, from a car setup change causing understeer. This means you should already be a driver capable of in-the-moment driving analysis.
  • Have you fully developed your driving style?
    Especially in road racing, driving style is typically a much more significant factor in lap times than car setup. Unless you are within 0.2-0.5s of your fastest teammate, or a VRS datapack, you are probably better off working on your driving style. On the flip side, if you have deeply ingrained old bad driving habits, it may be more efficient for you to tune the setup to your driving style. But still, we’d recommend that you try fixing your driving style first.
  • Are you used to driving the car which you want to setup?
    If you hop in a new car, it usually takes a bit of time getting used to it first. Pick up a decent setup (from the forums or a VRS datapack) first and focus on driving style until you are able to turn competitive lap times in the chosen setup.  

If you can answer all these questions with a definitive yes, then this guide is for you.

We’ll get started with the basics that apply to any car and we’ll progress to more advanced setup topics, which are only applicable to high-end cars. We’ll start with the Skip Barber RT2000, as it is the first open-setup car for most road racers, and also a car that’s understandable and sensitive enough to observe setup differences with. Then we’ll move on to the Formula Renault 2.0 which offers a lot more setup options. Also, the trade-offs between different adjustments become quite interesting in the FR2.0. Finally, we’ll look at a high-end, high-downforce car in the HPD ARX-01c.

Ready to get started? Head on to 5.2 where we focus on tyres.

3.4: Fundamentals: Braking technique

Having learned about the traction circle, the optimal racing line, and car control, the next chapter in this series looks at braking technique. Your brakes serve two purposes. The first is pretty obvious: to slow the car down. The second is more subtle, which is that brakes offer a method of controlling weight transfer and balance from corner entry to apex.

Straight line threshold braking
To brake as late as possible, you want to reduce the time spent slowing the car to a minimum. Achieving this requires you to exploit nearly 100% of the available grip from the tires in a straight line. This is known as threshold braking. It’s the brake pressure required to reach the point at which the tires are just on the edge of locking up, and no more.

We’ll divide braking technique up into non-downforce cars, such as the Mazda MX-5, Skip Barber, Porsche/RUF and Lotus 49, and downforce cars, such as the Formula Renault 2.0, the HPD, and the McLaren MP4-30. Even if you drive a downforce car, read the non-downforce section first.

Non-downforce cars
Don’t be afraid to brake too hard when you first hit the pedal from high speed. This is when the wheels have the most energy and are least likely to lock up. From this moment on, reaching threshold braking is a case of delicate modulation, and very much a feel thing, requiring practice.

With the above in mind, there are a couple of sources for feedback which can help out in the “feel” department. Firstly it’s a matter of listening to the tires, or in the case of open wheelers, visually seeing them lock up. It’s also possible (but more difficult) to feel changes in load through force feedback and rpm changes in the case of rear locking. Learn how the tires sound just before they lock up, and avoid braking harder than that (to help, you can raise the tire volume in the options menu). The required pressure will be consistent and repeatable regardless of speed assuming tire wear is discounted and the circuit is flat. This is therefore something which can be trained into your muscle memory over repetition. It’ll be obvious in iRacing when you’ve locked up, the tires will screech, the car won’t turn in the case of a front lock up, and you may see visible smoke.

VRS app telemetry braking trace before T5 at Okayama in the MX-5:braking trace - T5 Okayama

Downforce cars
Fundamentally the same rules apply to downforce cars, but it’s key to understand that the level of grip is speed-dependent. At high speed the car will produce more downforce and therefore the tires will have more grip when compared to travelling at low speed. When you start braking therefore, your speed is obviously greater than when you finish, and the grip level in turn decreases as you continue to brake. This of course means the required threshold braking pressure will decrease in connection with your speed.

How this typically works in practice: Slam the brakes to reach threshold braking quickly, then “bleed” off the brakes at the same rate as the car slows down and the downforce comes off.

Turn 1 at COTA with Martin Krönke in the MP4-30:
braking trace - T1 at COTA

A common mistake in racing downforce cars is not braking hard enough initially. Drivers tend to brake with an initial force which causes the tyres lock up at the end of the braking zone, failing to take full advantage of the extra grip early on.

ABS
Many modern race cars such as the GT3 class now feature driver aids such as traction control and ABS. Whilst ABS prevents locking of the wheels under heavy braking – especially when turning at the same time – it shouldn’t be relied on. Correctly carried out threshold braking is still more efficient, as ABS tends to work in a pulsating manner meaning the tyres lock up very briefly, reducing the braking performance and causing additional tire wear and heat. However, threshold braking is much easier to achieve in ABS equipped cars, as you get additional feedback – when engaged the ABS causes significant vibration which can be felt through the wheel with force feedback. Reduce brake pressure so you only have a subtle hint of this.

Understanding threshold braking while steering
Braking is further complicated when turning into a corner, and if you refer back to article 3.1 “The traction circle” you will know that in order to stay within the limits of the available grip at the tyres, you must reduce brake pressure as you steer, and eventually come off them at the point at which 100% of available lateral grip is being exploited (typically the apex of a corner).

Trail braking
The earlier paragraph is often termed “trail braking”, and is why you’ll see a fast driver bleed off the brakes as they turn into a corner even in cars without downforce. Proper trail braking technique however takes this a step further, and involves continuing to hold onto the brake pedal very deep into corners, typically right up to the moment at which the driver starts to apply throttle. This form of trail braking isn’t so much used to slow the car down but instead as a control method to maintain load on the front tires and reduce understeer from corner entry to apex. You can see evidence of this in Martin’s telemetry from the trace earlier in this article in his reluctance to fully release the brake pedal.

Here we can see David trail braking into T1 at Zolder with the BMW Z4. We have divided the braking phases as shown:
braking trace - T1 at Zolder

A: Threshold braking – bleeding off with downforce level
B: Exploiting the traction circle – reducing brake pressure with increasing steering angle
C: Trail braking – continuing to hold the brakes at 5-10% until applying exit throttle

Up to you:
These techniques will take a lot of practice and repetition before they start to become natural, and initially you may be worse off. Focus on one technique at a time and refer back to the VRS app for telemetry to review your efforts.

3.3: Fundamentals: Car control

A fundamental skill required to drive around a race track as quickly as possible, along with following the optimal racing line, 3.2, is having the ability to carry the maximum speed on that line. This essentially boils down to one thing: car control.

To have good car control means you are comfortable driving a car on the limit of its grip (and sometimes a little bit over it), where the behaviour of the car is very different to that of driving below this limit.

Below the limit, a car will steer to follow exactly the cornering path and radius to which you demand. Yet driving on the limit presents a much bigger challenge, and is where a competent racing driver operates.

How do we know when we’ve reached the limit of grip?
Two behaviours can occur when we exceed the maximum speed for a particular cornering radius. One of these is known as understeer, the other is known as oversteer.

Understeer
Understeer occurs when the available grip at the front tyres is less than at the rear tyres, and as a result the front of the car begins to push wide of the desired cornering radius when the limit of grip is exceeded.


Oversteer
Oversteer is the opposite and occurs when the available grip at the rear tyres is less than at the front tyres, and as a result the rear of the car begins to slide wide and the whole car rotates in the steered direction more than desired. When left uncorrected, this typically results in a loss of control and a spin.


Typically a car will exhibit very mild understeer or oversteer just below the limit of grip and the maximum possible speed for a given cornering radius. This is usually accompanied with a slight scrubbing sound from the tyres. In a simulator it’s difficult to feel the onset of under or oversteer, but it’s definitely possible to hear how hard you are pushing the tyres, and therefore how close you are to the limit of grip.

If you avoid exceeding the speed which results in these subtle cues from the car and tyres, you will also avoid putting yourself in the situation where you are forced to make a correction for either pushing wide from understeer, or over rotation due to oversteer. However, achieving this without ever exceeding the grip limit is an unrealistic expectation, and as a result it is very important to learn how to make corrections to deal with excessive understeer or oversteer to regain control of the car and bring it back within the limit of grip.

Generally a car will have an inherently built in bias towards either understeer or oversteer, but even a perfectly setup and balanced car can exhibit either characteristic depending on how it is driven.

Correcting for understeer
Understeer is certainly the easiest over-the-limit behaviour to make a correction to. The most effective method is to simply reduce throttle input, and if understeer persists, gently press on the brakes until the car ceases to run wide of the desired cornering line. The most common mistake a driver makes when experiencing understeer is to steer further into the corner. This will never reduce understeer (since you’re already over the limit of grip) and most of the time further reduce the grip at the front tyres, which in turn worsens the understeer.


Correcting for oversteer
Oversteer is significantly more difficult to deal with. If it’s felt or observed early enough, it can be fully corrected by doing the opposite to that which created the oversteer in the first place. For example, oversteer can be caused by using too much throttle in rear wheel driven cars, overwhelming the rear tyres and robbing them of lateral grip. Clearly, reducing throttle input in this situation will help reduce the oversteer.


There are however, other ways in which oversteer can be induced. There’s so called “lift off oversteer” whereby a driver abruptly lifts off the throttle whilst the car is loaded up mid corner, which causes a sudden deceleration due to engine braking and the car experiences a forward weight transfer shift, which adds grip to the front tyres whilst simultaneously reducing it at the rears. This effect can be even more severe if the driver squeezes on the brake pedal. The best method to correct for this is to quickly reapply some maintenance throttle to shift the weight transfer back to its original balance.


Opposite lock or countersteer
Generally, when oversteer occurs, it very quickly escalates beyond the point at which the above methods offer an effective correction, and a further measure is required.

This is known as countersteering, but also goes by the name of opposite lock, or steering into the slide. It is the act of steering in the opposite direction to that which the car is rotating.


Common mistakes
One of the most typical situations experienced by drivers who attempt to countersteer when presented with oversteer is overcorrecting. This happens when the correct amount of steering input is applied to begin to reverse the rotation of the car, but the driver is too late at straightening the steering wheel and as a result the car continues to rotate beyond the desired direction and continues into a “spin”.


Snap oversteer is another problem inexperienced drivers tend to suffer with, and is characterised by a sudden transition from understeer to oversteer. Typically when the car is understeering, the driver makes the mistake of applying more steering lock, further reducing the front grip. In this situation if the car loses rear grip (which could be caused by an abrupt throttle change, braking or a change in track surface), the car may begin to transition to oversteer whilst the driver maintains steering input. At this stage, if the driver attempts to countersteer, he/she must first unwind the extra steering lock which momentarily results in even more front grip before they can countersteer. Unsurprisingly, this almost always results in a terminal spin before the driver can react properly.

Drifting – sustained oversteer
Oversteer can be deliberately sustained in many cars, and the act of doing so is known as drifting. Drifting involves intentionally provoking oversteer, and then modulating the throttle and steering corrections in a way which prevents the car from spinning out of control but doesn’t fully arrest the slide. It can be a very helpful technique to learn, as it forces you to very quickly learn excellent car control which can help balancing the car on the limit of grip and saving potential spins and / or crashes. Of course we don’t recommend intentional drifting as a means for driving fast!


Balance
The ultimate goal here is a word you hear often in top level motor racing circles such as Formula 1, and that is balance. When the car has good balance, it means that you’re equally likely to experience either under or oversteer above the limit, resulting in the most neutral cornering behaviour which is usually the most efficient – and the fastest.

Up to you

We recommend taking the MX-5 out to the centripetal circuit within iRacing and having a play with the car at and over the limit, much in the same way as the demo videos in this article. We’re sure it will help you handle the car better at the limit and improve your overall car control. Aim to sense early cues for under and oversteer, both visually and aurally through tyre noise to recognise when they are nearing their limit of grip. Then apply that to the racetrack!


3.2: Fundamentals: The optimal racing line

Let’s apply the traction circle from 3.1 to the racing line, and combine it what we learned in 2.4, Driving Basics. Simply put, we want the tyres as close to the limit of grip as possible, and we want to carry the largest possible radius through a corner. See the following illustration.

The maximum speed we can carry through a corner is dictated by the size of the radius of the line taken, and as such, in the above corner, the green line will allow for the highest cornering speed for a given grip level.

racing-line

Sequences
Corners vary greatly in shape and style, and often tracks contain closely connected sequences. A good example are turns five to eight at Summit Point Raceway, where the ideal exit of turn five isn’t at the edge of the circuit because you want a wide entry into turn six, where you tighten up before running wide and bringing the car back in again for turn seven and finally turn eight. Notice how when treated as an interconnected sequence, the ideal line still follows the largest radius possible at all times, whilst being a compromise at an individual corner scale.

summit-point

Chicanes are treated in the same way: a combination of two corners with the route of straightest line through both, as seen here at Donington Park National.

donington

Entry vs exit
The ideal line isn’t always symmetric. Driving around a track isn’t a corner-by-corner thing. With each one you should consider what comes before and after. It’s worth, for example, compromising the entrance of a corner for a faster exit if you have a long straight after, as more time can be gained since exit speed is carried for the duration of the straight.

To achieve this, your turn-in point will be later and from a wider position, and therefore the radius of curvature is going to be tighter before returning to a late apex, resulting in a straighter line on exit, allowing for earlier throttle application as a result.

The reverse is also true. If you have a slow corner immediately following the one you’re taking, you can sacrifice the exit for a faster, more direct entry. The slow exit of the corner doesn’t matter, because you’ll spend very little time before the next one which requires a slow apex anyway.

Each corner requires prioritisation between entrance and exit, based on what comes before and after.

Here’s an example. The first corner of the Nürburgring Grand Prix layout has an early apex, where you compromise the exit because a slow corner follows.

nurb-gp

A good example of a late apex is the last corner at Road America, where the straight follows. Keep the car wide on the brakes and have a late turn-in. Your minimum speed should be well before the apex. Once you’re there, the car is already accelerating hard, carrying more speed onto the straight.

rd-america

Other factors
A final thing to note about the optimum racing line is that there are often exceptions caused by track and corner specific characteristics, such as bumps, camber (positive or negative), and curbs. Consider the racing line F1 cars use at Monaco after “Casino”, where they jink to the right then left to avoid the bump which would otherwise unsettle the traction and balance of the car, costing time. The racing line as described above assumes a circuit where grip levels are uniform throughout the racing surface, but when these other factors come into play, it’s worth modifying your line to where the extra grip is provided and vice versa.

Up to you

Analyze your lines carefully, keeping the biggest radius in mind and the sequence of corners and straights. Combine it with the knowledge of the traction circle, for the fastest way through corners.

If you’re struggling, remember you can compare your lines at any time with telemetry from datapacks on the VRS app. Follow it up with reading 3.3, on car control.

3.1: Fundamentals: The traction circle

untitled-3
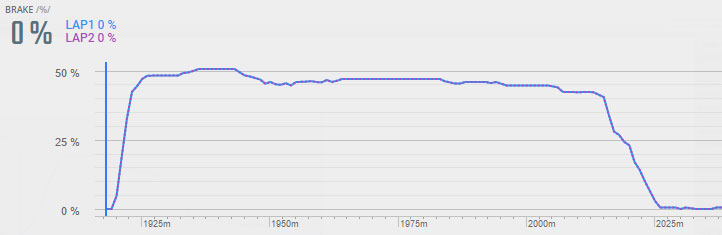
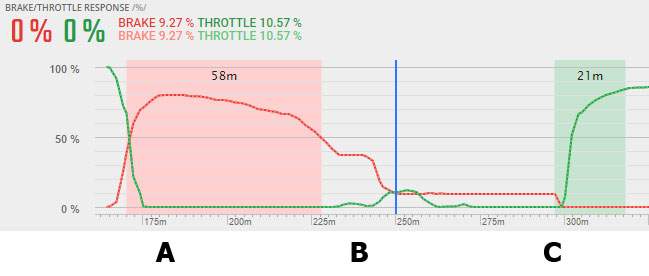
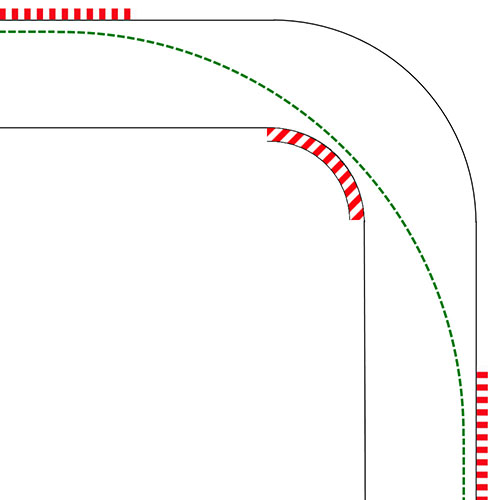
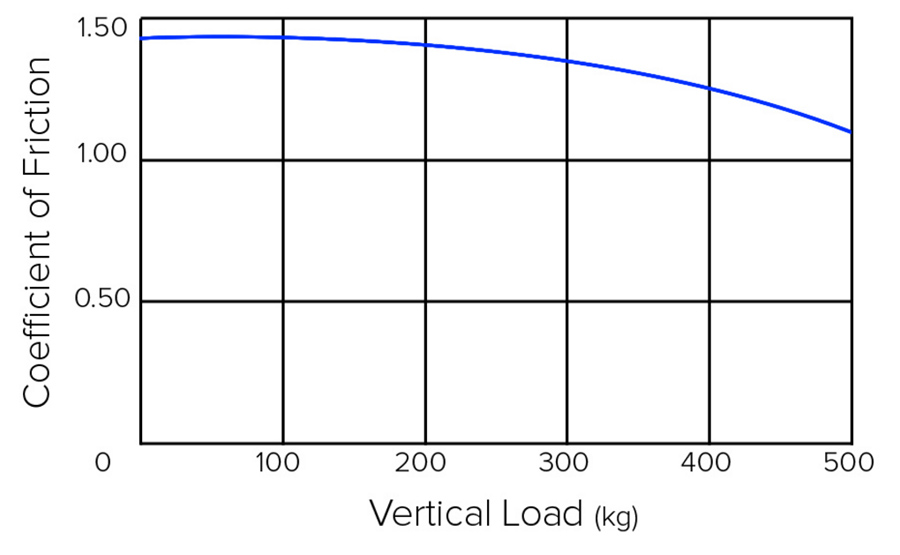
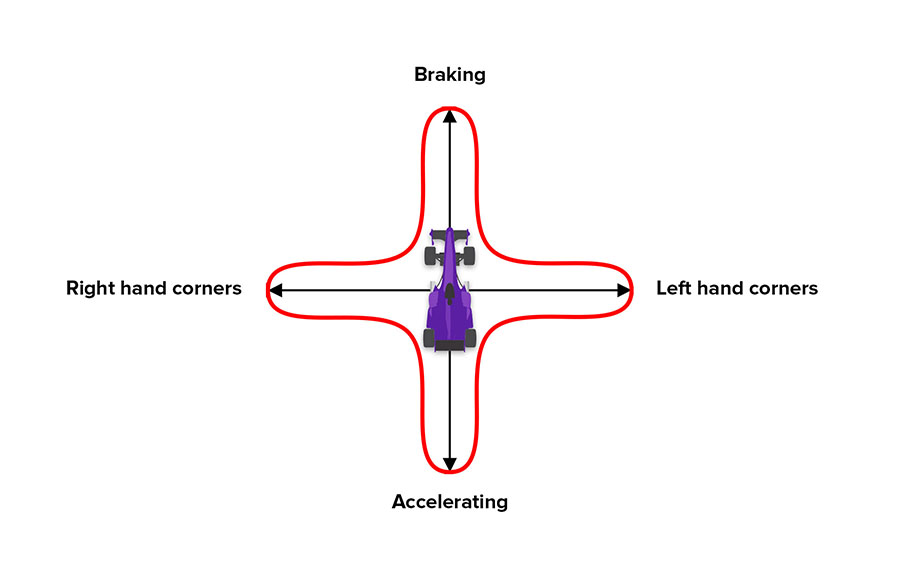
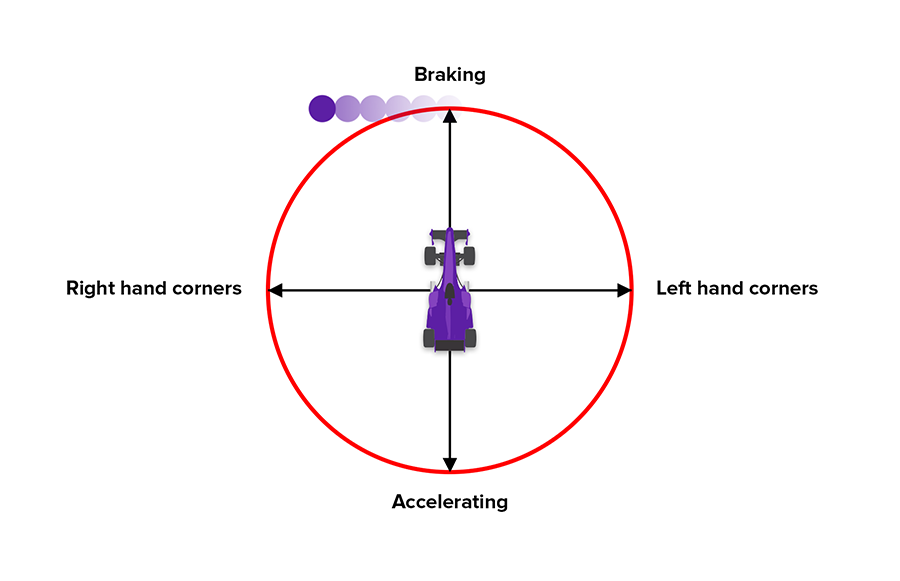
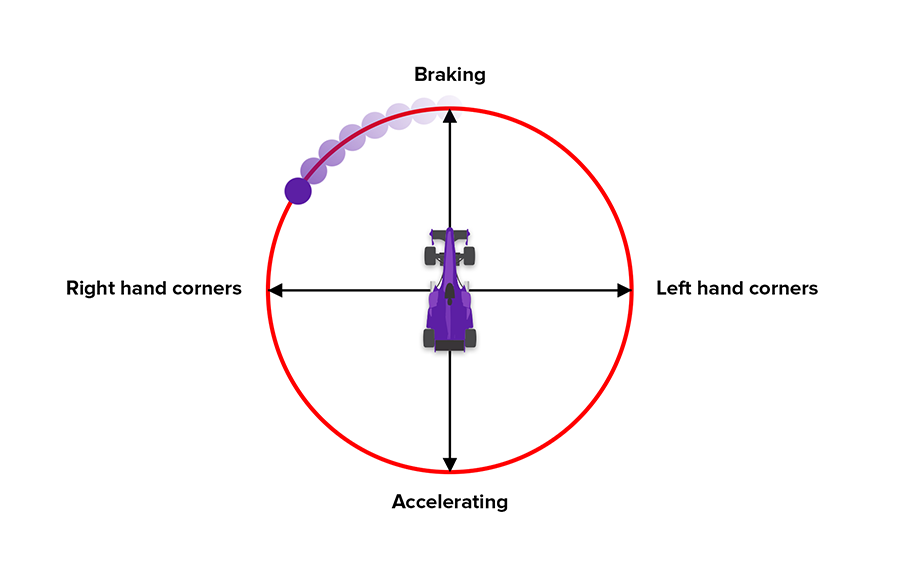
Welcome to season two of the VRS Academy — let’s dive into racing on a more technical level. We’ll start off with the traction circle, which is a key element used to understand the grip available from the tyres.

Back in article 2.4 Driving basics, we summarised how the optimal lap is a combination of carrying the maximum speed on the best racing line. The best drivers can achieve this by understanding how to fully exploit the grip available at all times during a lap.

The traction circle
Tyres are responsible for providing a connection between the car and tarmac, and it’s through this connection that the driver is able to accelerate, brake and corner. The most important thing to recognise is that there is a finite limit to the amount of grip or force which can be produced in any direction.

To define this, we can visualise a diagram called the traction circle.

traction-circle-copy

The axes represent g-forces experienced in the car as a result of tyre grip in a single direction. At rest and when coasting in a straight line, the resultant forces are effectively zero and thus we are in the centre of the traction circle. During acceleration, the tyres produce grip in a forward direction, translating into a rearward g-force and propelling us along, whilst the opposite happens under braking when the tyres produce rearward grip, slowing us down. It’s a similar story when cornering, and this is when we see the tyres produce lateral (side) forces.

The limit of force the tyres can produce is defined by the red circle in the diagram which represents 100% of grip available. It is the goal of a racing driver to operate as close to this as possible, but to never attempt to go beyond it.

Looking at the circle, it’s very easy to understand that wheelspin in a Formula 1 car is caused by reaching the red line in the acceleration direction. It’s also easy to see how braking too hard would cause the wheels to lock up trying to exceed the red line, and finally obvious to visualise how going too fast for a given corner would cause us to demand more than 100% from the tyres in a lateral direction and cause understeer or a slide.

It’s more difficult however to understand when on track how the combined relationship between braking or acceleration, and cornering at the same time works, and this is where the traction circle helps us.

Using the full traction circle in all directions
Again back in 2.4 Driving basics, we recommended that the beginner driver entirely separates their braking, steering and throttle inputs. Whilst this is a good approach for the novice, it is clear that this driving style does not fully exploit the full limits of the traction circle and the diagram instead will look more like the following.

2

We can see here that the driver reaches the outer limit under braking, but then comes off the brake fully before then steering, once again reaching the outer limit but this time laterally.

A driver can better exploit the grip available at the tyres by combining braking, steering and acceleration, however first picture the following scenario. You’re approaching a right-hand corner, and you’re braking to 100% of the available grip, on the edge of the circle. You begin to turn into the corner whilst maintaining the same brake pressure, the front tyres then lock up and you immediately begin to run wide.

traction-circle-1


Looking at the diagram, we can see that since you were already on the red line in the braking direction, as soon as you turned the wheel you tried to demand some lateral force from the tyres, which would put your car outside the circle (if it were possible).

traction-circle-2

The correct technique is to reduce braking pressure as you begin to steer, so that you remain inside the outer extent of the red line. As you reach the apex (middle) of the corner, you should be using 100% of the lateral grip available with little to no pedal input. From this point onwards you can feed in the throttle so you remain on the outer circle up until you reach full throttle (and are no longer limited by the grip available).


Using telemetry within the VRS software
The driving analyzer on the app includes a traction circle which can be displayed by choosing the “driving style” tab, which reveals the following diagram:

This diagram represents “g force” in the direction in which the driver feels it. Braking is at the top, acceleration at the bottom and lateral g force at the sides. The above data is from turn 4 at Okayama with the MX-5, and we can see that the full extent of the grip available is well used throughout braking, transitioning to cornering, and finally acceleration – until full throttle. The MX-5 only has 2 driven wheels and isn’t very powerful which is why the car has so much more braking potential when compared to acceleration.

Up to you

Continue reading with 3.2, where we explain the ideal racing line, which you can combine with your knowledge of the traction circle!


2.8: Mapping your career

untitled-1Written with the expert advice from driver coach Martti Pietilä.

With your first season about to begin or underway, it’s good to know what you may want to expect from yourself, both short and long term. This will help you stay motivated and progress on a clearly defined path.

Two ways to progress
There are two ways to move forward in your iRacing career. ‘Vertically’, so to say, you can move to a new series, which is enabled by a promotion to the next license class (there’s Rookie, D, C, B, and A). You can also stay within a series and progress ‘horizontally’, based on iRating.

Both, to an extent, have the same effect, meaning you move up the ladder and will be drafted in with quicker and more experienced drivers.

First season
Regardless of where you go, your first season should be spent in the Production Car Challenge or the MX-5 Global Cup. Attendance is probably highest in the latter, as it’s seen as iRacing’s equivalent to karting. In the sense that it’s the ultimate grassroots series, so we highly recommend the MX-5 Global Cup.

The goal of your first season in one word: mileage. Try to focus on enjoying the races and getting to the finish with all the parts still on your car. There’s no point in trying to overdrive the car and getting demotivated from the struggle and lack of pace, nor is it useful to risk getting involved in a crash.

There isn’t a championship at stake here, you need mileage and seat time most of all, as that’ll make you a better driver. Don’t make a name for yourself as a wrecker. Key points (for any season in a new series): enjoy the driving, get to the finish and slowly build up your speed.

If you feel you’re on the pace and driving well, you can progress up the ladder of motorsport. If not, just do another season of the same series and see what else you can learn. Progressing only makes sense if you’ve learned enough. If you’re advancing too quickly, you’re going to get in cars above your skill level and you’ll lose iRating, Safety Rating and eventually, motivation. It’ll only get tougher. This advice applies to any season end, not just your first season. It is not advisable to change series mid-season. It takes time to get used to a car.

Progressing vertically (to a new series)
If you’re wanting to move on from the MX-5 Global Cup, it’s a good idea to plot out your ‘end-game’. Where do you wish to go? There are a few series which make claim to being the most prestigious in iRacing, such as the Grand Prix Series (and its World Championship Grand Prix Series), and the Blancpain Endurance Series (and its World Championship version).

Because of iRacing’s rating mechanism, competition is high in any series, so don’t look for competitiveness. Ask yourself: do you prefer to race open wheelers, road cars, touring cars, endurance or GT3 sprint races?

Open wheeler drivers, your route should be like this:
Skip Barber -> Star Mazda or Formula Renault 2.0 -> MP4-30

For endurance races:
Grand Touring Cup > VLN Endurance Championship > Proto GT Series > Blancpain Endurance Series or Neo Endurance Series (a very well-run unofficial iRacing series)

For GT3 sprint:
Grand Touring Cup > VLN Endurance Championship > Proto GT Series (don’t use the HPD) > Blancpain Sprint Series

Multiclass series:
VLN Endurance Championship > Proto GT Series or Kamel GT > IMSA or Neo Endurance Series (a very well-run unofficial iRacing series)

Progressing horizontally (within your series)
If you like a series, for instance the MX-5 Global Cup, you can stay within the series and climb the iRating ladder, to compete against better drivers.

Since rookies start with 1300 iRating, you’re not going to come across many rookies if your iRating is above 2000, unless there are no ‘splits’.

When more people sign up for a race than the grid can handle, the race ‘splits’, and the half with the highest iRating gets drafted in together, and the same for the half with the lowest iRating. A single race can be split multiple times. If your iRating is high, that’s better, because you’ll be with more drivers equal to your iRating. It’s a great way to learn and see if you can progress. During the weekends, there will be plenty of races with an average participant iRating (or SOF – strength of field) of at least 3000.

Yet we believe that if you’re new to iRacing, you probably want to progress to a higher class series. We’d also recommend this if you want to race at an elite level eventually, because you’ll develop much more as a widely skilled driver by driving different vehicles. You can always return to racing series like the MX-5 Global Cup on a higher level, once your iRating has increased.

Motivational goals
Goals should keep you motivated, but keep them realistic. Do you want to be the best in iRacing? That means a multi-year commitment of several hours per day, no slacking (this is only for a rare few).

Everyone should have a long term goal, specific for them. Maybe you want to practise for real life racing, maybe you want to win a Blancpain Sprint championship. Whatever you want, it’s important to realise that iRating and especially License / Safety Rating are not necessarily great end goals (there are way too many ways to game the these ratings).

A good short-term goal is reaching the top twenty in your division of that season in a particular series. Divisions are basically rankings within series, determined by your iRating at the beginning of the season. This means your division consists of people at your level, and as a result this is almost always an achievable goal.

The division ranking takes your best result (out of 4) from the week and uses that in the series standings. Perhaps at first it may feel like you have no chance, but as the weeks go by, your pace will increase, others will drop off, and drop weeks come into play, so only your best 8 weeks out of the 12 weeks count. Try to become champion of your division as an ultimate goal.

Up to you:

Think about where you want to go, and let this all motivate you, let it push you harder!

2.7: Using datapacks

untitled-1

Data Packs are bundles for a specific car and iRacing series combination, and contain data for tracks in the series for that season. That data includes a hotlap replay file, setup files and telemetry data inside. You can use them as a reference for learning the track and to compare your own telemetry input with that of world class sim racers.

On a weekly basis, VRS coaches spend time to put these files together. For this article, we look at the Data Pack for Week 4 of the Blancpain series, at Mount Panorama, also known as ‘Bathurst’. David Williams is driving the Audi R8, with Olli Pahkala driving the McLaren MP4-12C. Both datapacks are available in the VRS software.

Using datapacks
You can load the replay file in the sim to learn the line around the track and general technique, and you can load the telemetry data in the VRS software to see the driver inputs, such as throttle, steering and braking. You can subsequently load your own data to find out where you’re losing or gaining time. For example, you can see two lines in the graph below, which show David’s braking inputs at ‘The Dipper’, during separate laps.

screen-shot-2016-10-09-at-19-05-58

Make sure your lap is run in the same conditions though (Default Weather).

Telemetry data from world class sim racers
Olli and David are both very experienced sim racers, with slightly differing approaches. Olli tweaks the setup of the car early on and pushes the car hard immediately quickly finding the limit. If you have the experience and skill to match, this is probably the most efficient method of practice.

You can check out Olli’s session onboard here:

In contrast, David has a more conservative approach which works better for him and we certainly recommend it for sim racers of all levels excluding perhaps the very elite.

Choose a base setup which you think will work well for the circuit, and with the exception of something very obvious (such as low downforce at Monza), avoid making early adjustments if you can. Treat the session like the real deal, putting in several laps of fuel so you can focus on settling into a rhythm, avoiding crashes and making continuous, gradual improvement.

Be self critical as you drive, and try to have self awareness for where time may have been lost or gained in the moment (the delta bar displayable with the tab key can help for instant feedback). If you do have a crash, big slide or lock a wheel, take a moment to review the replay until you’re satisfied with what was the cause, so you can learn from it and take measures to prevent future occurrences.

Once you reach consistency with your laptimes and your driving is repeatable, then go to the garage screen and make adjustments based on how you think the car could perform better. When you next go out, your driving should be consistent enough to have reliable feedback for the results of the setup changes.

David’s onboard is below:

Up to you:

Head into the sim and see if you can replicate Olli’s or David’s laps. To access the datapack, click here to go to the VRS software, and click the Datapacks icon on the left. From there, navigate to your season, series and car.

screen-shot-2016-10-09-at-19-35-29