3.8: Practising efficiently: Setting targets & tracking performance

Welcome to the final segment in this four-part series on how to practice efficiently. In this article we will look at the benefits of setting targets for yourself and monitoring your performance.

We’ve already discussed the importance of self-analysis in detail, and it’s an excellent idea to make notes during your practice sessions, so you don’t forget things and can give yourself clearly defined targets to work towards. Ideally you should be keeping a log of your progress in various areas, be it braking, concentration, smoothness etc. Perhaps having a rating from 1-10 for how satisfied you are in each area with some optional comments would make sense. This way you could also track your daily / weekly / monthly progress. You could even make reference to specific telemetry session laps and replays you may have saved.

Beginners vs advanced drivers

The types of goals and targets you should be giving yourself will vary based on your current experience and skill level. For beginner and intermediate level drivers, your focus should be on more of a driving fundamentals, objective approach. This means choosing categories such as braking points, braking consistency, apex speed, exit speed, line, for which to evaluate your performance.

As your driving becomes more advanced through experience with self-evaluation and analysis, the aforementioned categories should no longer be something you have to consciously focus on in order to understand where you can reduce your laptime. Your focus should instead shift to more abstract goals and targets, such as your breathing, concentration level and vision. We will cover these specific topics in future articles.

Your first self-assessment

Let’s start from the beginning. Before you’ve carried out any kind of analysis on your driving, it is not sensible to give yourself any targets. It is, however, a good idea to have an evaluation form with a list of performance criteria for which you can rate yourself on after your session. We have provided a template for you:

Self-assessment

Here we have divided up the driving components for each of the top three auto-generated sectors from VRS, which usually represents a single corner per sector. They are ordered to match the display of opportunities vs target on VRS, where the first one presents the biggest time opportunity to make up and so on.

Each component has a score out of 10 which you give yourself, based on how the session felt. Next to that is the same score, but this time it’s based on what you’ve seen in your driving having carried out some analysis using the tools on VRS. Additionally, each criterion has a field for entering any comments you feel are worth mentioning.

From this information, you should be able to narrow down a few targets to give yourself to work on for your next session, as shown in the example. We recommend keeping this list fairly short so you’re not overloading your brain with thoughts the next time you drive. In the example provided I’ve actually chosen just one target to focus on, which is to have a better exit, and I’ve broken it down into some important and related points.

The immediate benefits of documenting your practice like this are that it provides you with a clearer understanding for where you’re performing badly, and what you should be concentrating your efforts on. Any time you feel like you’re getting lost, or driving without intention, you can just refer yourself back to the notes you’ve given yourself and get back on track.

This document is just an example and a recommendation. By all means feel free to come up with your own version. More advanced drivers may find more value in scoring themselves with different or additional criteria, such as breathing or concentration as touched upon earlier. You might perhaps wish to create a new document for evaluating your performance over a full week, or even a month if you feel like you’ll get better value from doing so.

Tracking progress

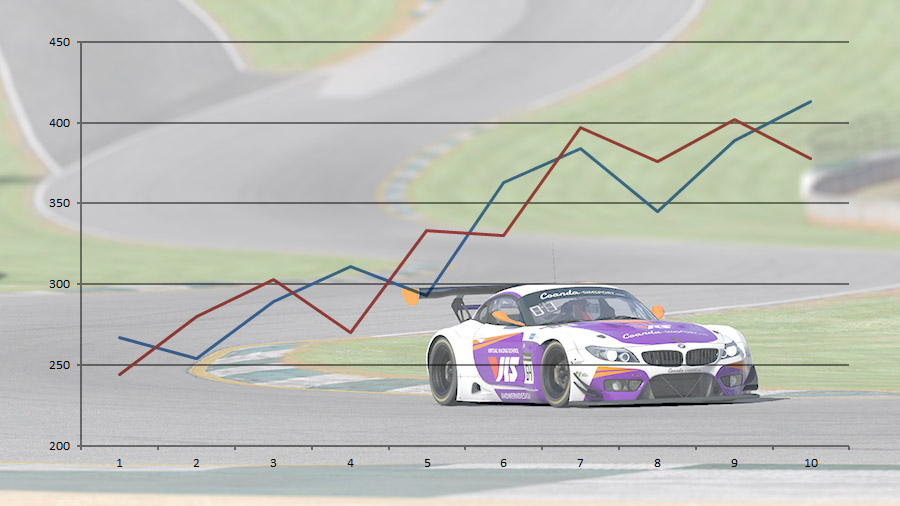
Another benefit from recording and logging your performance, especially over longer periods for which you’ve completed many sessions and carried out many self-evaluations, is the ability to track your long term progress in great detail.

A good way of achieving this is with an additional, separate log, or spreadsheet. Input your scores and time deltas from each session. By tracking your performance over time, you are able to see the exact rate of improvement in specific areas. You will easily be able to identify trends without having to make guesses. Perhaps your corner exit scores are still showing continuous improvement, but your braking scores have been stagnant and need some more work?

If you find that you’ve plateaued in a specific area and you’re still not happy with your performance, it is often a good idea to shift your focus away from that and onto something else. Relentlessly working on the same thing without seeing any further gains is sure to ruin your motivation and may even push you towards giving up altogether.

You can also log your race performances in the same way, but include additional variables which may influence your scoring, such as weather, time of day, strength of field. Races also provide many other stats on which to measure yourself including finishing position, incident count, iRating change, SR change. It may even be beneficial to have separate weekly, monthly and even yearly logs which may all identify different patterns.

Up to you

Not everyone will benefit from tracking their driving data in such detail. Some may have limited time available, with other priorities, while others simply want to have fun without expectations. This is perfectly OK! If, however, you are someone who is determined to improve and are willing to go the extra mile to succeed, closely monitoring your performance so you know how best to take the most productive action going forward is sure to help you!

3.7: Practising efficiently: Experimentation

In the previous article, we discussed how to analyse your driving. We also discussed how, as you become more experienced with driving and analysis, your intuition for what you should and shouldn’t do will develop. This time, we’ll focus on experimentation.

Experimentation is a great method for unlocking potential improvements, because while you may reach a very high level of consistency in your driving, you may also be unaware of further opportunities to improve your laptimes.

Try new lines, new braking points, try being more aggressive with the wheel. It really doesn’t matter what you change, as long as you’re conscious of doing it, and are paying close attention to the effect it has. The result can of course be seen in telemetry, but if you’re using the live delta in the sim (tab key to toggle), you can have instant feedback on how much time you’re gaining / losing versus your best lap or sector up until that point.

Let’s take a look at an example of two different laps in the HPD driven by myself at Le Mans, driven in the same practice session. We’re looking at the first chicane along the Mulsanne straight. The blue trace is an early lap, and the purple trace was driven later, and is 0.193 seconds faster through this sector.

Tele Le Mans
We can see on the bottom chart that in the early lap I was choosing to brake very late, optimising my entry into this complex. For several laps I continued like this, until my laptimes started to plateau. It wasn’t until I decided to experiment with braking earlier and a different line, that I realised how much time I was losing down the following straight by not prioritising my exit.

Line Le Mans 1
By braking earlier I was losing a tenth on entry, but I was able to carry a tighter line through the first half of the chicane, therefore opening up the second half and allowing a wider radius through the exit with an earlier throttle application. Even though it originally felt like I was optimising this corner by braking late, it actually proved quicker overall to brake earlier, sacrificing speed into the corner, then gaining it back on the long straight that follows.

Weather conditions

iRacing allows for variation in the weather conditions (temperature, humidity, wind, etc.) for each session you drive in. In the respective series schedule you can see the time of day (morning / afternoon / late afternoon) used for each week, and our datapacks on VRS match this with the addition of always running with default weather settings. When testing offline, it’s possible to control the precise conditions which you wish to use, and it’s highly recommended to stick to the same weather for each practice session you do if possible. This way you can be sure when you’re gaining or losing time between sessions that it’s because of changes in your driving or setup, not due to weather conditions.


With this said, the weather for the majority of series in iRacing is variable, and it can therefore be useful to practise in different conditions to prepare yourself for whatever is thrown your way, especially if you feel you’ve reached your peak in specific weather. Just remember to be aware of the influence this can have on the speed and handling of the car. Colder temperatures are usually faster, with hotter temperatures reducing grip and making it easier to reach the limit of the tyres. The weather of your session is also logged in the VRS software.

You can turn this into a deliberate exercise to help develop a better feel for the grip available going forward. Ultimately, this is what can prepare people to drive at their maximum whatever race weather they encounter. It’s common to first attempt the same driving in different weather conditions, using your previous references and markers. Going from default weather to a hotter track may suddenly feel very difficult as the car can no longer decelerate enough from the same braking point. On the other hand, you may find you can brake at the same point and achieve the same laptimes, which would mean you were driving below the limit in default weather. Similarly, switching to colder weather doesn’t guarantee faster laptimes if you’re not exploiting the extra grip. However, once your driving style is adjusted, you can then re-attempt this on a warmer track and discover laptime in areas you weren’t previously exploiting fully.

It’s worth noting that track temperature affects different cars differently, and doesn’t just affect grip levels. The balance of the car can also change, for instance more understeer on corner entry. Wind speed and direction, along with many other weather variables alter how fast you arrive at various braking zones and can hinder or assist cornering in specific directions. Learning to adapt to these changes will improve your overall ability as a driver at getting the most from the car at any given moment.

Setup experimentation

The same principle applies to setups as well. You can all the knowledge in the world about vehicle dynamics, but unless you try things out, you’ll never produce the most optimised setups. Of course having the theory is important and can help you make educated guesses, but the most productive method for setup creation is still trial and error. Once you feel you can lap as consistently as possible, try making one or two setup adjustments. Avoid making too many changes at once, as this can make it difficult to understand which adjustment is producing the biggest handling or performance change. Observe the effects of each change, before experimenting on new setup parameters.

Experimentation can be used effectively to learn and understand the result each adjustment has on vehicle handling and performance for a specific car. Initially it’s a good idea to explore a full range of settings, especially in an unfamiliar car. Once you’ve gained this base-level knowledge, you can then go about experimenting with more intelligent prediction and focus, with the goal of not only extracting the most performance for a particular circuit, but also making the car behave to your personal preference. Without first putting in the effort to understand each adjustment on its own, it’s much harder to build setups in the future without wasting a large amount of time essentially making guesses in the dark.

Save setups regularly; use new names if you wish to retain previous versions, and make notes! iRacing provides a note taking page for each setup you produce, so take advantage of it. VRS also provides the ability to store setups for each stint you drive on the online app, and also highlight the differences between them.

Up to you

Next time you head out on track to practise, make sure you allocate some time to analyse your driving, before attempting to apply a slightly altered approach based on what you may or may not have observed!

We’ll be back shortly with 3.8: Practising efficiently: Setting targets & tracking performance.

3.6: Practising efficiently: Analysing

video-analyserIn the previous article, 3.5: Self-analysis, we highlighted the importance of allocating practice time for analysis and critical reflection, rather than just spending all your time mindlessly driving on track. In this article, we focus on the methods you can use.

Prioritising your focus

Finding the optimal racing line on the track is usually your first priority. You should address each corner or sequence on it’s own, unless it’s influenced by another in which case you should review the sequence as one. An example of this are the Esses at Suzuka.

When studying telemetry or replays, the priority for speed should be on the exit of the corner, then the entry, and finally mid-corner. First optimise your exit, because most time can be gained here, not just in the corner but also during a full throttle section (such as a long straight) that follows. If you’ve done that, analyse your entry, and finally your mid-corner performance. We rank mid-corner as the lowest priority, because you spend the least amount of time in this phase, and often it will benefit your overall laptime to sacrifice mid-corner speed for a faster entry and exit.

Replays

iRacing provides a versatile replay system that can be used to analyse yourself as well as faster drivers. It’s very difficult (especially as a beginner) to memorise your driving with reasonable accuracy. The replay system allows you to rewind to any moment, or any lap. It also allows fine control over playback speed, and a huge variety of cameras and viewpoints. This essentially allows you to review your driving from a third person perspective, from outside the car, so you can better observe what you’ve been doing.

Making use of the different viewpoints is useful. For instance, switch to the chase camera to better understand the braking point relative to a marker on circuit, or see exactly how much curb you’ve used at the apex. It’s also helpful to slow down corners to observe in finer detail what happens very quickly in real-time. While you do this, you can still see all your own inputs, and you can then observe the response from your car in order to understand how effective your driving style is, and spot opportunities for improvement. Perhaps you’ve realised you’re turning in too aggressively which is provoking oversteer. Or, maybe you’ve made a more obvious mistake and simply wish to understand how your inputs may have caused it.

chase

In addition, the simulation allows for the cutting and saving of replays to your computer, making it possible to save and load a lap from a faster driver, who may have been using a different line or braking point to achieve better laptimes.

Telemetry

While the replay system is great, it has many limitations in comparison with telemetry, which can reveal much more information for analysis that your eyes would otherwise miss. For this purpose, telemetry uses live input and vast onboard sensor data from the car which is then displayed through the use of charts and other graphics. It also allows data from two separate laps to be compared, and their differences to be analysed in detail.

While there are many telemetry applications available for use today, most are unintuitive and complicated to use. The VRS software is easy to use and entirely browser-based, and comes with automated logging. Within VRS, the differences between two laps are highlighted in terms of racing line, driving speed and driving inputs, even those differences that would otherwise be impossible to discern from a replay. In addition, with the VRS video analyzer you can look at telemetry and a replay at the same time, in-sync, giving you a visual reference for whatever trace you’re analysing.

Using telemetry for efficient analysis: A case study

Racing line

The driven line is a result of not just steering input, but also braking, throttle and even gear selection. When it comes to telemetry analysis, we shouldn’t isolate one input trace without looking at the others.

With that said, let’s have a look at an example in the VRS software. I’ve chosen to compare a student’s lap with the best lap from the Blancpain Sprint Series data pack at Circuit Gilles Villeneuve, with the Audi R8 GT3. We’ll be focussing on corners six and seven: The sequence known as Pont de la Concorde.

The data for both laps is as follows (data pack is the blue trace, while the student’s is purple).

line-montreal

While the entrance, initially, is similar, we can see that the student runs much deeper in-between the two corners – there is a 2.17 metre distance between the two lines at the cursor.

Exit

If we look at the time delta (upper graph below), it’s possible to see that most of the time is lost through the apex and exit of the next corner. We can also see why this is the case by looking at the speed traces (lower graph below). The student has a drop in speed into the apex of turn 7, which is carried through to the exit (circled in red).

delta

When we look at the throttle and brake traces below (the dark red line is the data pack), we can see that the student has a much bigger lift (for a distance of 27 metres on track), which results in the loss of speed on the exit. This lift is the result of running wide before turn seven, requiring a tighter radius (see racing line) in the green shaded area, and therefore a drop in speed is necessary.

pedals

Entry

We have to look at the entry to turn six if we want to fully understand why the student has run too deep before turn seven. Initially the coach actually brakes later than the student, and gains a small advantage. Near the end of the braking zone however, the student bleeds off the brakes much more, briefly regaining some of the lost advantage into the corner.

Mid-Corner

As a result of bleeding off the brakes more than the coach, the student actually carries more speed into the corner, and it’s precisely this which causes them to run much deeper mid-corner, resulting in the time loss as explained earlier. It would pay off here to sacrifice some mid-corner speed at the apex, get on throttle sooner and take a line better suited for a faster exit.

Monitoring yourself while driving

As you spend more time out of the car studying replays and telemetry, you’ll begin to build an intuition for how your inputs on track relate to what you see when you carry out analysis. For example, if you’ve previously discovered that you’re losing time against a data pack as a result of braking too late, you may have changed your braking reference so you avoid losing time by braking a little earlier. It’s not hard to imagine that you’d now have a better awareness while driving for when you’ve braked too late and to be able to predict afterward how that would have looked in telemetry.

Over repeated sessions of driving-analysis-driving-analysis, you’ll become better at building this self-awareness for how your inputs on track affect your speed, lines and ultimately laptime, without needing to keep referring to telemetry for clarification. The best sim-racers in the world drive mostly at a subconscious level, which frees up their conscious mind to perform in-the-moment analysis as they drive, to which their subconscious can respond with any necessary corrections almost immediately.

iRacing also features a live delta bar on-screen which can be toggled while driving. This gives you immediate feedback on how much behind or ahead of your reference lap (which can be a sector by sector optimal or best continuous lap) you are in the present moment. This is a very useful form of live telemetry which can further enhance your ability to self-analyse in-the-moment.

delta-display

Up to you

Be sure to load datapack telemetry on the VRS app if it exists for the car / track combo you wish to race (if not, you can book a coaching session, too). Compare your own driving to that of one of our coaches. You’ll find areas where you’re losing out and you may even find things you’re doing better! Otherwise, compare your slow and fast laps against each other to learn from your own driving.

We’ll be back with 3.7 shortly!