5.6: Camber & Toe

In article 5.5 we’ve covered ride height, and with this article we’ll continue the setup adjustments on the suspension, namely camber and toe. We’ll go over both of them together, as their effects are tightly coupled.
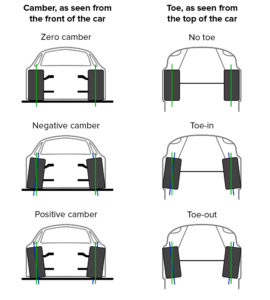
Click for full-res

Camber
Camber is the vertical inclination of the tire. Zero camber means that the tires are straight, perpendicular to the road and parallel to each other. With positive camber, the top of the tires points outwards of the car. With negative camber, the top of the tires points inwards.

Toe
Toe is the angle the tires are rotated around their vertical axis, looking at them from above the car. You have no toe if the tires are parallel to each other, along the direction of the car. You have toe-in when the tires point in towards each other, and toe-out when they point away from each other.

The effect of camber on available grip
As you go through a corner, the cornering force (as discussed more thoroughly in 5.3) causes the car to roll and the tire to deform, as it twists between the car which wants to go one direction, and the track that’s going the other direction. This is called lateral tire deflection.

With zero camber, the force on the tires are equally distributed along the contact patch when you’re standing still or driving in a straight line. This increases the available grip under straight line braking and acceleration (assuming no camber gain). Cornering with zero camber causes one side of the tire to unload, while the other side of the tire takes more load. This is unequal load distribution and lowers the overall available grip on the tire, just when you need it most: while cornering!

With negative camber, the force distribution along the contact patch is somewhat unequal while driving in a straight line. However, when cornering forces and carcass deflection come into play, they can negate the effect of negative camber, equalising load distribution along the contact patch. This maximises the available grip on the outside tires (which are the ones taking the heavier load), exactly the moment when the car is limited by its available grip. This is the exact reason why typically on road cars you’d use negative camber.

Tradeoffs of using camber
As always, nothing comes for free. While camber can help cornering, it causes additional heat, more tire degradation and uneven wear pattern on the tires. You should also realise that you are trading off traction on a straight line (braking and acceleration) with cornering grip. This means that the track profile is a determining factor on how much camber you want to run. In general, a track with mostly straights and low speed corners, you’d run lower camber; and on tracks with lots of bends or high-speed corners, you’d run more camber. And, as always with mixed profile tracks, you’d have to experiment different settings to see where you can gain more time; on the straights and low-speed corners, or high-speed corners.

Camber and vertical stiffness
Vertical stiffness of the tire is hugely tied with tire pressures, as discussed in 5.2. This is mostly to be considered on tires with high sidewalls. Having the tire inclined at an angle may cause the sidewall to deform a little. The effect is that of a softer tire without changing the tire pressure. As of time of writing, this really is only something to consider with two cars on iRacing, the Williams FW31 and the McLaren MP4-30.

Effects of toe-in and toe-out
There is one more effect of camber that we haven’t mentioned yet. If you roll a free tire at an angle, it would want to follow an elliptical trajectory instead of a straight line. In other words: an angled tire wants to turn. The force that causes this effect is called camber thrust. This results in a bit more friction, heat and wear, which can be offset by a toe-out adjustment. You can also use a toe-out adjustment to get the slip angles of the front tires in a more optimal spot. So you’d typically run some toe-out on the fronts.

Toe adjustments on the rear tires also have an effect on car handling. Toe-in on the rear creates understeer, which can help with cars that are oversteery on exit. The tradeoff is wear and heat in the rear tires. Toe-out on the rear is generally wrong, as you’re likely to get more oversteer on exit.

Up to you

While building a setup, go through the order of tire pressures, anti-roll bar, ride height and spring rates. If you have that set, experiment with the camber angles to find the optimal balance between speed in the corners and on the straight. Use toe-out on the front tires to counteract camber thrust, and possibly toe-in on the rear tires, to optimise handling.

FiSRA & VRS partner for the 2017 eSM championship

For the 2017 eSM championship, Finland’s top tier of sim racing, Virtual Racing School will partner with the Finnish Sim Racing Association, the FiSRA, to provide datapacks and coaching sessions for all six rounds of the championship.

VRS’ services will be free for all 2017 competitors, with tailormade datapacks for the six rounds and the Porsche 911 GT3 Cup car, with a hotlap replay file, setup file and telemetry data inside. Furthermore, Rens Broekman and David Williams will provide 1:1 coaching sessions after each round for a selected competitor, and VRS will add $400 worth of VRS credits towards the prize pool.

FiSRA eSM 2017 championship:
19th of March: Laguna Seca
2nd of April: Okayama
23rd of April: Monza
7th of May: Road Atlanta
21st of May: Bathurst

The final will be held at a live event in August.

More info at the FiSRA website (in Finnish): simracing.fi

3.1: Fundamentals: The traction circle

untitled-3Welcome to season two of the VRS Academy — let’s dive into racing on a more technical level. We’ll start off with the traction circle, which is a key element used to understand the grip available from the tyres.

Back in article 2.4 Driving basics, we summarised how the optimal lap is a combination of carrying the maximum speed on the best racing line. The best drivers can achieve this by understanding how to fully exploit the grip available at all times during a lap.

The traction circle
Tyres are responsible for providing a connection between the car and tarmac, and it’s through this connection that the driver is able to accelerate, brake and corner. The most important thing to recognise is that there is a finite limit to the amount of grip or force which can be produced in any direction.

To define this, we can visualise a diagram called the traction circle.

traction-circle-copy

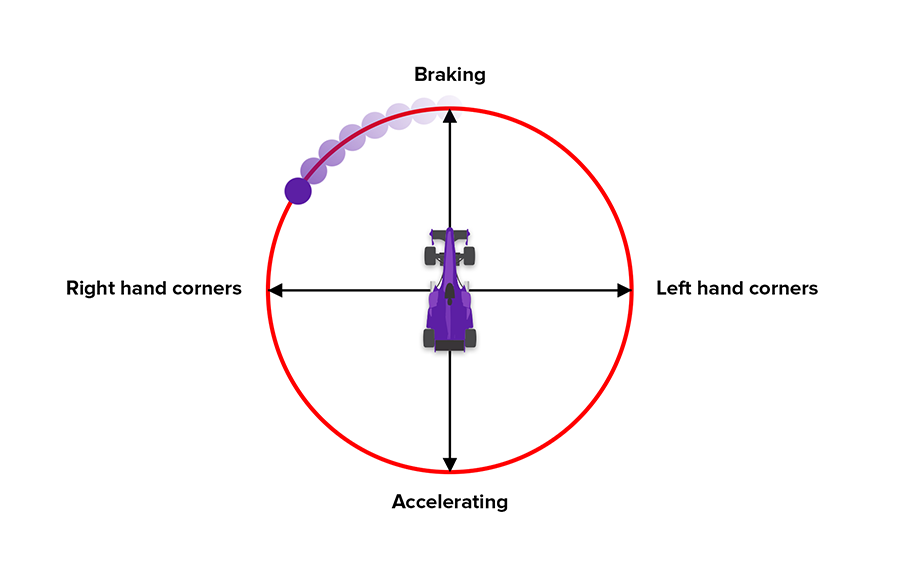
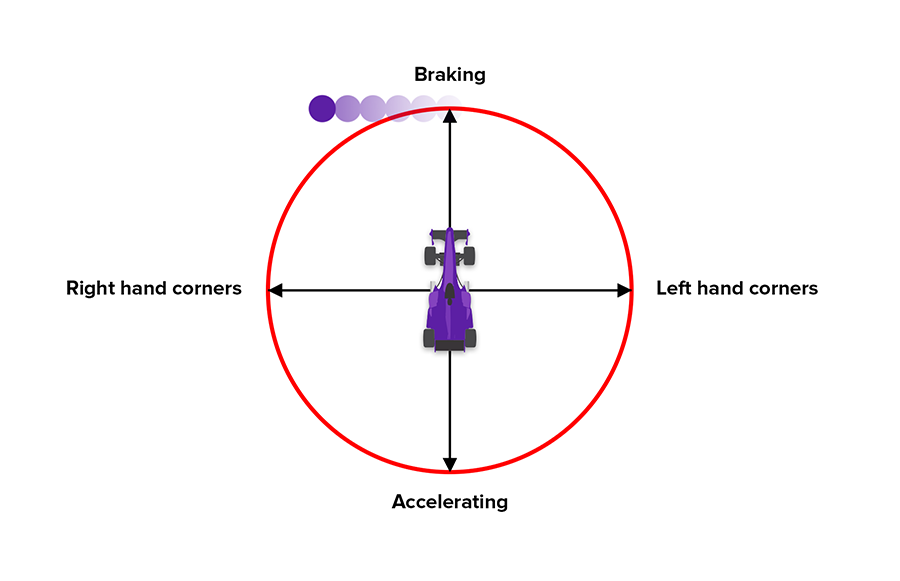
The axes represent g-forces experienced in the car as a result of tyre grip in a single direction. At rest and when coasting in a straight line, the resultant forces are effectively zero and thus we are in the centre of the traction circle. During acceleration, the tyres produce grip in a forward direction, translating into a rearward g-force and propelling us along, whilst the opposite happens under braking when the tyres produce rearward grip, slowing us down. It’s a similar story when cornering, and this is when we see the tyres produce lateral (side) forces.

The limit of force the tyres can produce is defined by the red circle in the diagram which represents 100% of grip available. It is the goal of a racing driver to operate as close to this as possible, but to never attempt to go beyond it.

Looking at the circle, it’s very easy to understand that wheelspin in a Formula 1 car is caused by reaching the red line in the acceleration direction. It’s also easy to see how braking too hard would cause the wheels to lock up trying to exceed the red line, and finally obvious to visualise how going too fast for a given corner would cause us to demand more than 100% from the tyres in a lateral direction and cause understeer or a slide.

It’s more difficult however to understand when on track how the combined relationship between braking or acceleration, and cornering at the same time works, and this is where the traction circle helps us.

Using the full traction circle in all directions
Again back in 2.4 Driving basics, we recommended that the beginner driver entirely separates their braking, steering and throttle inputs. Whilst this is a good approach for the novice, it is clear that this driving style does not fully exploit the full limits of the traction circle and the diagram instead will look more like the following.

2

We can see here that the driver reaches the outer limit under braking, but then comes off the brake fully before then steering, once again reaching the outer limit but this time laterally.

A driver can better exploit the grip available at the tyres by combining braking, steering and acceleration, however first picture the following scenario. You’re approaching a right-hand corner, and you’re braking to 100% of the available grip, on the edge of the circle. You begin to turn into the corner whilst maintaining the same brake pressure, the front tyres then lock up and you immediately begin to run wide.

traction-circle-1


Looking at the diagram, we can see that since you were already on the red line in the braking direction, as soon as you turned the wheel you tried to demand some lateral force from the tyres, which would put your car outside the circle (if it were possible).

traction-circle-2

The correct technique is to reduce braking pressure as you begin to steer, so that you remain inside the outer extent of the red line. As you reach the apex (middle) of the corner, you should be using 100% of the lateral grip available with little to no pedal input. From this point onwards you can feed in the throttle so you remain on the outer circle up until you reach full throttle (and are no longer limited by the grip available).


Using telemetry within the VRS software
The driving analyzer on the app includes a traction circle which can be displayed by choosing the “driving style” tab, which reveals the following diagram:

This diagram represents “g force” in the direction in which the driver feels it. Braking is at the top, acceleration at the bottom and lateral g force at the sides. The above data is from turn 4 at Okayama with the MX-5, and we can see that the full extent of the grip available is well used throughout braking, transitioning to cornering, and finally acceleration – until full throttle. The MX-5 only has 2 driven wheels and isn’t very powerful which is why the car has so much more braking potential when compared to acceleration.

Up to you

Continue reading with 3.2, where we explain the ideal racing line, which you can combine with your knowledge of the traction circle!


2.2: Your first test session

mazda

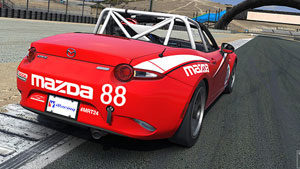
You can try any car, but for road you’ll need the Pontiac Solstice or Global Mazda MX-5 in order to progress from Rookie license to license class D. We recommend the Global Mazda MX-5 Cup car. The Mazda is light and low-powered, so maintaining cornering speed is key. This is perfect for learning.

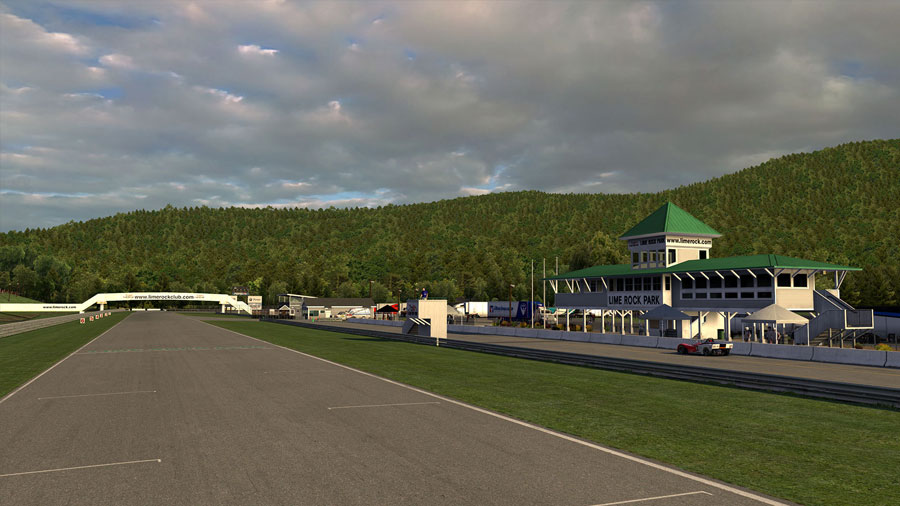
Recommended practice tracks are Lime Rock Park, Summit Point Raceway and Okayama Short. The Mazda goes really well on these circuits, plus they’re short so you’ll learn them more quickly. Alternatively, you can check which weekly track the Global MX-5 Cup series races at, and load that for your private test session.
It’s important to join a private test session first, before joining a public session, let alone a race. A simulator isn’t something you can just jump into, plus there are some things you need to learn about iRacing. We recommend you spend a good portion of the week in a private session. (We’ll talk more about this in scheduling)

And make sure you select Default Weather.

Default Weather explained
iRacing sessions can be held in outside temperatures from 18 to 32 degrees Celsius (65 to 90 degrees Fahrenheit), which greatly affects the performance of your tires and thus your laptime. It’s best to use Default Weather to allow better comparison with future laptimes and to then compare with other telemetry data, or VRS data packs which are always driven in Default Weather also.

Three steps to get here: click the orange 'Test' button, click 'Adjust weather', and click the blue 'use iRacing Defaults'.


Load the sim, set your video settings to what your computer can handle and calibrate your wheel and pedals. Then, set the Field of View via the calculator in-sim in graphics options. YouTuber KrazyDan explains it in this video.

Field of View explained
The FOV is very important to get right, otherwise your screen won’t display accurate real-world proportions for your view of the cockpit, track and your perception of distance and speed. If your FOV is off, your judgement and reactions will likely be off as well. Avoid choosing a wider view because you want to see your mirrors or your wheels, it’ll likely hurt your performance.

In the graphics menu, you can find your FOV settings. Measure your monitor and your distance from it, and let iRacing calculate your FOV. Single monitor users may find it necessary to compromise with a slightly higher value than calculated, but you can reduce the need for this by having the monitor as close as possible.
Going around
Don’t worry about the actual setup of the car itself, there’s no need to ever change the setup of the car if you’re not racing at the limit (and we’re not expecting you to do so right off the bat!). Just drive the track, get a feel for the weight and responsiveness of the car and, if new to “hardcore” simulations, you’ll likely realise this is unlike any other game you’ve ever driven.

Focus on driving clean laps, not going off-track, not locking wheels or getting all out of shape. Focus on hitting your apexes, finding the ideal line through the corners. Treat it like the real thing and try not to crash, as that will only demotivate you. Drive within your limits and slowly up the ante as you get more comfortable.

Going faster
Try to lap consistently within a second of your best lap. Don’t worry if it takes you a few hours to get to that level, it’s normal. As we said: sim racing is hard.

But once you reach that level of consistency, you can head over to YouTube and search for some hotlaps in your car and track combination, or check out one of the Virtual Racing School Data Packs. Take note of braking, turn-in, and apex points and the line taken through entry and exit.

limerock

Up to you:

Avoid rushing into a public practice session just yet. Practice in a private session! Before going ‘public’, consider reading up on ergonomics.