5.6: Camber & Toe

In article 5.5 we’ve covered ride height, and with this article we’ll continue the setup adjustments on the suspension, namely camber and toe. We’ll go over both of them together, as their effects are tightly coupled.
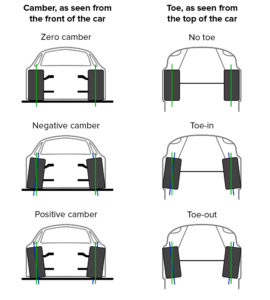
Click for full-res

Camber
Camber is the vertical inclination of the tire. Zero camber means that the tires are straight, perpendicular to the road and parallel to each other. With positive camber, the top of the tires points outwards of the car. With negative camber, the top of the tires points inwards.

Toe
Toe is the angle the tires are rotated around their vertical axis, looking at them from above the car. You have no toe if the tires are parallel to each other, along the direction of the car. You have toe-in when the tires point in towards each other, and toe-out when they point away from each other.

The effect of camber on available grip
As you go through a corner, the cornering force (as discussed more thoroughly in 5.3) causes the car to roll and the tire to deform, as it twists between the car which wants to go one direction, and the track that’s going the other direction. This is called lateral tire deflection.

With zero camber, the force on the tires are equally distributed along the contact patch when you’re standing still or driving in a straight line. This increases the available grip under straight line braking and acceleration (assuming no camber gain). Cornering with zero camber causes one side of the tire to unload, while the other side of the tire takes more load. This is unequal load distribution and lowers the overall available grip on the tire, just when you need it most: while cornering!

With negative camber, the force distribution along the contact patch is somewhat unequal while driving in a straight line. However, when cornering forces and carcass deflection come into play, they can negate the effect of negative camber, equalising load distribution along the contact patch. This maximises the available grip on the outside tires (which are the ones taking the heavier load), exactly the moment when the car is limited by its available grip. This is the exact reason why typically on road cars you’d use negative camber.

Tradeoffs of using camber
As always, nothing comes for free. While camber can help cornering, it causes additional heat, more tire degradation and uneven wear pattern on the tires. You should also realise that you are trading off traction on a straight line (braking and acceleration) with cornering grip. This means that the track profile is a determining factor on how much camber you want to run. In general, a track with mostly straights and low speed corners, you’d run lower camber; and on tracks with lots of bends or high-speed corners, you’d run more camber. And, as always with mixed profile tracks, you’d have to experiment different settings to see where you can gain more time; on the straights and low-speed corners, or high-speed corners.

Camber and vertical stiffness
Vertical stiffness of the tire is hugely tied with tire pressures, as discussed in 5.2. This is mostly to be considered on tires with high sidewalls. Having the tire inclined at an angle may cause the sidewall to deform a little. The effect is that of a softer tire without changing the tire pressure. As of time of writing, this really is only something to consider with two cars on iRacing, the Williams FW31 and the McLaren MP4-30.

Effects of toe-in and toe-out
There is one more effect of camber that we haven’t mentioned yet. If you roll a free tire at an angle, it would want to follow an elliptical trajectory instead of a straight line. In other words: an angled tire wants to turn. The force that causes this effect is called camber thrust. This results in a bit more friction, heat and wear, which can be offset by a toe-out adjustment. You can also use a toe-out adjustment to get the slip angles of the front tires in a more optimal spot. So you’d typically run some toe-out on the fronts.

Toe adjustments on the rear tires also have an effect on car handling. Toe-in on the rear creates understeer, which can help with cars that are oversteery on exit. The tradeoff is wear and heat in the rear tires. Toe-out on the rear is generally wrong, as you’re likely to get more oversteer on exit.

Up to you

While building a setup, go through the order of tire pressures, anti-roll bar, ride height and spring rates. If you have that set, experiment with the camber angles to find the optimal balance between speed in the corners and on the straight. Use toe-out on the front tires to counteract camber thrust, and possibly toe-in on the rear tires, to optimise handling.

5.5: Ride Heights basics

Static ride height is one of the key setup adjustments, and also one of the easiest to get right. For example, for many cars converting a qualifying setup into a race setup (or vice versa) only means adjusting fuel and the static ride height. In this article we’ll explain what ride height entails, how you can adjust it, and how it affects other setup adjustment.
Static versus dynamic ride heights
Ride height (measured in mm or in) defines how far off the ground the chassis sits. Static ride height is what you configure in the garage. Dynamic ride height is the actual ground clearance at any moment in time as the car goes around the track. The dynamic ride height changes throughout a lap, for instance when a car goes over a curbstone, or when downforce compresses the springs. The dynamic ride heights also changes throughout a stint, for as the fuel burns off and the tank empties, the car becomes lighter and therefore ‘rises’.

Depending on the location of the ride height sensor (e.g. splitter, tire, etc) and its vertical offset, the ride height as measured in the garage (and as reported in telemetry) does not necessarily equate the actual ground clearance. For example, the splitter ride height sensor (on cars that have one) may be positioned a few centimeters above the bottom of the splitter. As a result, you’ll get a non-zero reading even if the splitter bottoms out. And obviously every single car is different, so the first thing you need to find out when you start setting up a new car is what “bottoming out” means in terms of ride height reading.

Purposes of changing the ride height
1: Lower center of gravity means less lateral weight transfer, which means more grip
For cars that are not very aero dependant the ride heights are primarily used to affect the center of gravity. A lower sitting car generally has better handling because a lower center of gravity means less lateral weight transfer. And we’ve discussed in 5.3, lateral weight transfer reduces the total available grip.

2: Balance between downforce and drag
For cars where aero is a defining factor in car setup, the ride height is the key to optimizing aero performance. Each car is different, but in general there’s an ideal ride height range that produces maximum downforce. Similarly, there is an ideal ride height range that minimizes aero drag. These two ranges may or may not overlap. Each car is different and it takes a bunch of experimentation with each new car to find out what works and what doesn’t. By statically and/or dynamically adjusting the ride heights, you can optimize the aero performance of the car.

3: Ground clearance
The final factor, relevant for both downforce and no-downforce cars, is clearance from the ground. You may want to adjust the ride heights to avoid bottoming out on bumps and curbs. Like discussed in the spring rates article, bottoming out can cause handling issues as one or multiple tires may become unloaded or lose contact with the track altogether, and it can also severely lower speed when the car is dragging onto the track.

Example
One of the most common setup scenarios is converting a qualifying setup to a race set. In most cases the additional weight due to the added fuel is bringing the car ‘out of tech’, which means it’s too close to the ground and isn’t legal to race. To pass tech inspection, you need to raise the ride height.

Typically, it’s best to keep a note of the target ride heights as they are in the qualifying setup and try to resemble those as close as possible on the race setup. In order to increase ground clearance, you’ll need to decrease the perch offset on each wheel, or increase the pushrod length (when available). Matching front and rear ride heights may be all you need to convert a qualifying setup to a race setup.

For cars where the gas tank is located far from the center of gravity of the car (e.g. the BMW Z4 GT3 has it’s tank fairly far back in the car), setting the race fuel ride heights could be trickier. As fuel is burnt throughout a stint the front or back of the car will get lighter, increasing the ride height. You may have to take this into consideration when determining the static ride heights with a full tank.

How suspension geometry affects ride height
Different simulators implement this differently, but in iRacing you cannot set the ride heights with one parameter. Instead, on each wheel you can adjust the spring perch offset, or increase the pushrod length (when available). Adjust these properties until your achieve the desired measurement for ride height.

Keep in mind that many suspension elements are connected. Significant changes to spring perch offset, or to pushrod length could also impact camber and toe. Each time you make a change to ride heights you should remember to also take a look at camber and toe. If your camber has changed, change it back to the old (desired) value. This may change your ride height again, so you may have to do a few iterations of ride height adjustment, camber adjustment, until you achieve the desired result. The same applies to each wheel’s toe-in.

When adjusting ride heights
You need to keep ride heights in mind each time you change any of the following:
Spring rates: Stiffer springs raise the car, softer springs bring it closer to the ground. When changing spring rates you want to make sure that you maintain the ride height from before the spring rate adjustment (otherwise you’ll be applying two changes to the car).
Tire pressure: The tire is effectively a spring, and significant changes in tire pressure affect ride heights too.
Camber & toe: As already discussed, camber and toe adjustments may affect the ride height. Modify the suspension geometry so that you achieve the new desired camber (or toe) at that same ride height.
Fuel load: Added fuel (per the example above, for full race distance as opposed to for qualifying) adds more weight to the car, which compresses the springs more, which reduces the ride heights. Each time you add and remove fuel you’d generally want to do so without actually modifying the static ride height (with some exceptions, depending on car or track).

Up to you

Once you understand what ride heights are and what interactions ride heights have with suspension geometry, you need to spend a lot of time testing and experimenting with different settings in order to find out what works with each specific car. And in a later article we’ll look more closely how to approach dynamic ride heights.