Managing a simracing team: Javier Álvarez, team principal of Positive SimRacing

Javier Álvarez Benedí from Valladolid in Spain is the principal of the Positive SimRacing team, both spiritually as well as functionally; making the team grow with a business-like determination and can-do mentality. And it’s in this role that Javier is hugely influential in tutoring new sim racing talent.

What do you do during the day as your full time job?
In the government of the Castile and León region of Spain, I work a lot with people and teams as a strategist on long term plans and future innovations. And I’ve also been a scientific writer for over fifteen years.

How did you get started with Positive SimRacing?
In 2009 I was competing as a driver in Spanish sim racing championships, in sims like rFactor and games like F1 Challenge. Back than many Spanish drivers didn’t speak English, and didn’t have an international orientation, but I could see that sim racing would become an international eSport.

So, in 2012, I started to look for international championships, and joined Formula Sim Racing (FSR), in rFactor. There I found it was very difficult to start a team in that environment, because there was not enough drivers’ market. Basically, three teams dominated the grid and each had about ten drivers, which made very difficult the growth of new teams. But we had a different vision and philosophy: we saw the sim racing as something to be carried out beyond the sim racers, involving the general public and sponsors. Then, I met Jackson Wendt, and we started Positive SimRacing (PSR), maybe against the odds. Around this same time, the Royal Federation of Automobile of Spain hosted a sim racing competition, and we thought ‘let’s use this ‘, so we recruited some drivers from the top ten of that competition.

The first two years were a big challenge, because we weren’t such a strongly bonded team, more a group of drivers. For other teams it was really easy to steal our best drivers. Yet some people stayed and from this we grew into a team, more structured and moving up the ladder.

In 2014 we moved to iRacing, because there was more potential to grow and the competition was bigger. But because only three or four drivers joined the switch, we basically had to start the team from scratch again.

How does a team bond?
Some drivers, particularly young ones, may be very ambitious and don’t want plans spanning multiple years. They want to grow fast and become frustrated if they think they don’t have a good car setup. For them, it doesn’t matter if their driving style still needs work. With people who need results quickly like that, it’s nearly impossible to build a long term project.

But then, there are drivers that think long term and stick to the team. They have what you could call a philosophy, and we build a shared vision for the team. We’re very people focused. For instance, we don’t like to ‘steal’ drivers from other teams, we develop our own drivers. And that’s also why I think the PSR Driver Development Programme (DDP) with VRS is going so well. We invested lots of time in selecting the right people, and collaborating with drivers already in the team. The personal touch is what makes this strategy work.

How can philosophies differ among teams?
Maybe identity is a better word. There are teams who are elite and they only have to call a certain guy and he’ll join. Their main goal is to be at the limit and to win races. Although we won the SkipBarber 2K World Cup and took wins and podiums in other big events, we’re not at that level yet. We want to get there of course, but we need to develop the drivers and that takes time. This is our vision and we want to generate added value this way.

For this, we work together as a team. For instance, if a driver is in P4 and his teammate takes in P1, that’s like a win for both. We don’t have scenarios like Hamilton versus Rosberg in 2015-2016, or Hamilton versus Alonso in 2007. Everybody is committed to the success of the team. The identity and the sense of belonging to a project are essential parts of a team spirit, and I believe this is our niche.

Teams like Coanda don’t have a team manager role. Is this a different philosophy and
do you think one philosophy is better than the other?
I think it’s different, because Coanda may not have anyone in an official team manager role, however, drivers certainly assume leadership. It may not always be one and the same person, but they must have leadership within the team. They may have few but elite drivers, and they seem to aim to be an elite team with only a few elite drivers. A very good model, if you can make it work.

Coanda is perhaps the reference in modern sim racing, and beyond their sportive success and impressive results, their collaboration with VRS in improving the driver development constitutes a huge added value, which should be recognised by all the community.

Could you say you’re like a learning institution? To use an F1 comparison, like the
Sauber team?
Yes, that’s part of our philosophy, and it applies even to non-driving-related learning. I try to pair up Spanish drivers with English speaking drivers, so they learn English. And we focus on driving analysis and collaborations, like with VRS now. We think this is our added value to the drivers and the sim racing community.

How is the VRS DDP programme going?
We had over fifty applications for the DDP, but it was hard to select eight people. So we did extensive interviews and analysed profiles, and it looks like we’ve did a great job. Despite everybody having real life commitments and not always having 100% attendance in the practices or races, we’ve finished with two teams in top ten of the Blancpain Endurance Series.

Now we also have a junior programme with less intensity, and they’re improving at an incredible rate. They’re ready to join the main programme or be reserves (some of them are as fast as the top guys). So yes, I think the programme has gone well, in terms of results, as well as in terms of team building and driver development.

How do you manage that, how time consuming is it?
The management ‘overhead’ is significant. We had to spend a lot of work on this new structure, organising coaching and testing sessions, monitoring every driver individually, with individual meetings. This is huge! Can you imagine eight drivers and another eight drivers in the junior programme. Lots of work involved. But now we’ve appointed drivers as the ‘captain’ for each team, and this works quite well.

What prepares you for managing a simracing team? I mean, there’s plenty of tutorials
on racecraft, but nothing on managing a simracing team.
It’s not just life experience that helps, but also training. I mean, not just to practice and experience, but also through courses. I did this kind of training with my real life. I think my experience from work also helps, working with people with very different backgrounds helped me a lot.

Do you talk to other team managers?
Not really, with a few exceptions. And, until my knowledge, there is no team manager association. There was one in FSR, a team owner association, which is the only example that I know. However, team associations demand a clear common vision and managers working for the benefit of the group, which is very ambitious, if even realistic. So I don’t miss it. However, nowadays we have good contacts with managers of several teams, such as Blue Flag Racing and others. These contacts are usually very beneficial for the course of the competitions.

As the team principal. What do your tasks involve?
Team management is very demanding on time. For example, this morning I was scared to open Facebook, but maybe there are between fifteen and twenty messages. Some weeks I have to devote twenty or thirty hours. It’s like a second job. So we’ve decided we need to make it more sustainable, and that the team mustn’t depend on one person. If I can’t make it then the team shouldn’t stop. Two years ago we segmented the team into small and strongly bonded sections, and so for instance the Skip Barber team is six driver and one manager. I work with the managers, mostly all the time.

They can also work independently. In my dream, I would only decide on the strategy, budget and time. But often you’ve to talk and ask people what they want, and have the opinion of everybody. It’s always a balance between leadership and a full democracy.

What are difficult decisions you have to make sometimes?
To decide to let a driver join when he asks to join the team. When we were small, we always let everybody join. Now we’re careful, not to upset the balance. It’s difficult to really analyse someone and to anticipate, because when you say no to a driver you may have lost a good opportunity for the future. But then, if you decide to add a driver and he’s not a good addition to the team, he can upset the balance. So that’s one of the most difficult decisions.

Maintaining that balance can be difficult in another way too. In 2012 we had just started, but our philosophy changed a bit, so some of our core drivers sometimes feel a bit out of the team, and they don’t want to analyse their performance every week. But they still want to be part of the family, not all the new things, so we had to make that compatible with the evolution of the team. We had a lot of discussions to find a solution, so now we’ve started the ‘Positive Drivers Club’.

So what does it mean to you, when one of your drivers succeeds?
Several levels of happiness. First your project is succeeding and you get rewarded for all the work and patience, and also because you see your friends, people that you’ve helped and who’ve helped you, you see them succeeding. Maybe that’s the best feeling in life, when someone achieves something. When it has been a difficult journey, there’s also more happiness.

This applies to simracing, but maybe also to all of life?
For sure! Sim Racing is not only competition. It’s a sport that fosters personal and brain development, and there are scientific journals and that publish the benefits of gaming and development. Also concentration. I can do a race two hours without a mistake. But then I can’t sleep afterwards because my brain can’t sleep. And beyond that, as you say, it’s like everything in life. We put time, money, energy, to achieve something. Achieving something, at the end of the day, is the meaning of life.

What’s your goal looking forward?
For myself, I’d like my role to be less important so I can step back from day-to-day to focus on growing the budget and sponsors. It’s a matter of maturing the team. Now we’re working with the segmentation and managers, and I think in the next few years we can consolidate this.

As a team, we want to be in the iRacing World Championship Grand Prix Series, the Blancpain Endurance World Championship and the Skip Barber 2K Cup. Then we enter the top twenty, go to top fifteen. Maybe those are the last steps for the team, in terms of maturity.

You don’t aim to win those championships?
I think that’s too far. We want to be realistic. We would like that, but it’s too far. We don’t think this will happen within the next three years. For 2018 to 2020, the top 15 is a more realistic target, and later we will go for the top 10. Also, we are not obsessed with that.

3.8: Practising efficiently: Setting targets & tracking performance

Welcome to the final segment in this four-part series on how to practice efficiently. In this article we will look at the benefits of setting targets for yourself and monitoring your performance.

We’ve already discussed the importance of self-analysis in detail, and it’s an excellent idea to make notes during your practice sessions, so you don’t forget things and can give yourself clearly defined targets to work towards. Ideally you should be keeping a log of your progress in various areas, be it braking, concentration, smoothness etc. Perhaps having a rating from 1-10 for how satisfied you are in each area with some optional comments would make sense. This way you could also track your daily / weekly / monthly progress. You could even make reference to specific telemetry session laps and replays you may have saved.

Beginners vs advanced drivers

The types of goals and targets you should be giving yourself will vary based on your current experience and skill level. For beginner and intermediate level drivers, your focus should be on more of a driving fundamentals, objective approach. This means choosing categories such as braking points, braking consistency, apex speed, exit speed, line, for which to evaluate your performance.

As your driving becomes more advanced through experience with self-evaluation and analysis, the aforementioned categories should no longer be something you have to consciously focus on in order to understand where you can reduce your laptime. Your focus should instead shift to more abstract goals and targets, such as your breathing, concentration level and vision. We will cover these specific topics in future articles.

Your first self-assessment

Let’s start from the beginning. Before you’ve carried out any kind of analysis on your driving, it is not sensible to give yourself any targets. It is, however, a good idea to have an evaluation form with a list of performance criteria for which you can rate yourself on after your session. We have provided a template for you:

Self-assessment

Here we have divided up the driving components for each of the top three auto-generated sectors from VRS, which usually represents a single corner per sector. They are ordered to match the display of opportunities vs target on VRS, where the first one presents the biggest time opportunity to make up and so on.

Each component has a score out of 10 which you give yourself, based on how the session felt. Next to that is the same score, but this time it’s based on what you’ve seen in your driving having carried out some analysis using the tools on VRS. Additionally, each criterion has a field for entering any comments you feel are worth mentioning.

From this information, you should be able to narrow down a few targets to give yourself to work on for your next session, as shown in the example. We recommend keeping this list fairly short so you’re not overloading your brain with thoughts the next time you drive. In the example provided I’ve actually chosen just one target to focus on, which is to have a better exit, and I’ve broken it down into some important and related points.

The immediate benefits of documenting your practice like this are that it provides you with a clearer understanding for where you’re performing badly, and what you should be concentrating your efforts on. Any time you feel like you’re getting lost, or driving without intention, you can just refer yourself back to the notes you’ve given yourself and get back on track.

This document is just an example and a recommendation. By all means feel free to come up with your own version. More advanced drivers may find more value in scoring themselves with different or additional criteria, such as breathing or concentration as touched upon earlier. You might perhaps wish to create a new document for evaluating your performance over a full week, or even a month if you feel like you’ll get better value from doing so.

Tracking progress

Another benefit from recording and logging your performance, especially over longer periods for which you’ve completed many sessions and carried out many self-evaluations, is the ability to track your long term progress in great detail.

A good way of achieving this is with an additional, separate log, or spreadsheet. Input your scores and time deltas from each session. By tracking your performance over time, you are able to see the exact rate of improvement in specific areas. You will easily be able to identify trends without having to make guesses. Perhaps your corner exit scores are still showing continuous improvement, but your braking scores have been stagnant and need some more work?

If you find that you’ve plateaued in a specific area and you’re still not happy with your performance, it is often a good idea to shift your focus away from that and onto something else. Relentlessly working on the same thing without seeing any further gains is sure to ruin your motivation and may even push you towards giving up altogether.

You can also log your race performances in the same way, but include additional variables which may influence your scoring, such as weather, time of day, strength of field. Races also provide many other stats on which to measure yourself including finishing position, incident count, iRating change, SR change. It may even be beneficial to have separate weekly, monthly and even yearly logs which may all identify different patterns.

Up to you

Not everyone will benefit from tracking their driving data in such detail. Some may have limited time available, with other priorities, while others simply want to have fun without expectations. This is perfectly OK! If, however, you are someone who is determined to improve and are willing to go the extra mile to succeed, closely monitoring your performance so you know how best to take the most productive action going forward is sure to help you!

3.7: Practising efficiently: Experimentation

In the previous article, we discussed how to analyse your driving. We also discussed how, as you become more experienced with driving and analysis, your intuition for what you should and shouldn’t do will develop. This time, we’ll focus on experimentation.

Experimentation is a great method for unlocking potential improvements, because while you may reach a very high level of consistency in your driving, you may also be unaware of further opportunities to improve your laptimes.

Try new lines, new braking points, try being more aggressive with the wheel. It really doesn’t matter what you change, as long as you’re conscious of doing it, and are paying close attention to the effect it has. The result can of course be seen in telemetry, but if you’re using the live delta in the sim (tab key to toggle), you can have instant feedback on how much time you’re gaining / losing versus your best lap or sector up until that point.

Let’s take a look at an example of two different laps in the HPD driven by myself at Le Mans, driven in the same practice session. We’re looking at the first chicane along the Mulsanne straight. The blue trace is an early lap, and the purple trace was driven later, and is 0.193 seconds faster through this sector.

Tele Le Mans
We can see on the bottom chart that in the early lap I was choosing to brake very late, optimising my entry into this complex. For several laps I continued like this, until my laptimes started to plateau. It wasn’t until I decided to experiment with braking earlier and a different line, that I realised how much time I was losing down the following straight by not prioritising my exit.

Line Le Mans 1
By braking earlier I was losing a tenth on entry, but I was able to carry a tighter line through the first half of the chicane, therefore opening up the second half and allowing a wider radius through the exit with an earlier throttle application. Even though it originally felt like I was optimising this corner by braking late, it actually proved quicker overall to brake earlier, sacrificing speed into the corner, then gaining it back on the long straight that follows.

Weather conditions

iRacing allows for variation in the weather conditions (temperature, humidity, wind, etc.) for each session you drive in. In the respective series schedule you can see the time of day (morning / afternoon / late afternoon) used for each week, and our datapacks on VRS match this with the addition of always running with default weather settings. When testing offline, it’s possible to control the precise conditions which you wish to use, and it’s highly recommended to stick to the same weather for each practice session you do if possible. This way you can be sure when you’re gaining or losing time between sessions that it’s because of changes in your driving or setup, not due to weather conditions.


With this said, the weather for the majority of series in iRacing is variable, and it can therefore be useful to practise in different conditions to prepare yourself for whatever is thrown your way, especially if you feel you’ve reached your peak in specific weather. Just remember to be aware of the influence this can have on the speed and handling of the car. Colder temperatures are usually faster, with hotter temperatures reducing grip and making it easier to reach the limit of the tyres. The weather of your session is also logged in the VRS software.

You can turn this into a deliberate exercise to help develop a better feel for the grip available going forward. Ultimately, this is what can prepare people to drive at their maximum whatever race weather they encounter. It’s common to first attempt the same driving in different weather conditions, using your previous references and markers. Going from default weather to a hotter track may suddenly feel very difficult as the car can no longer decelerate enough from the same braking point. On the other hand, you may find you can brake at the same point and achieve the same laptimes, which would mean you were driving below the limit in default weather. Similarly, switching to colder weather doesn’t guarantee faster laptimes if you’re not exploiting the extra grip. However, once your driving style is adjusted, you can then re-attempt this on a warmer track and discover laptime in areas you weren’t previously exploiting fully.

It’s worth noting that track temperature affects different cars differently, and doesn’t just affect grip levels. The balance of the car can also change, for instance more understeer on corner entry. Wind speed and direction, along with many other weather variables alter how fast you arrive at various braking zones and can hinder or assist cornering in specific directions. Learning to adapt to these changes will improve your overall ability as a driver at getting the most from the car at any given moment.

Setup experimentation

The same principle applies to setups as well. You can all the knowledge in the world about vehicle dynamics, but unless you try things out, you’ll never produce the most optimised setups. Of course having the theory is important and can help you make educated guesses, but the most productive method for setup creation is still trial and error. Once you feel you can lap as consistently as possible, try making one or two setup adjustments. Avoid making too many changes at once, as this can make it difficult to understand which adjustment is producing the biggest handling or performance change. Observe the effects of each change, before experimenting on new setup parameters.

Experimentation can be used effectively to learn and understand the result each adjustment has on vehicle handling and performance for a specific car. Initially it’s a good idea to explore a full range of settings, especially in an unfamiliar car. Once you’ve gained this base-level knowledge, you can then go about experimenting with more intelligent prediction and focus, with the goal of not only extracting the most performance for a particular circuit, but also making the car behave to your personal preference. Without first putting in the effort to understand each adjustment on its own, it’s much harder to build setups in the future without wasting a large amount of time essentially making guesses in the dark.

Save setups regularly; use new names if you wish to retain previous versions, and make notes! iRacing provides a note taking page for each setup you produce, so take advantage of it. VRS also provides the ability to store setups for each stint you drive on the online app, and also highlight the differences between them.

Up to you

Next time you head out on track to practise, make sure you allocate some time to analyse your driving, before attempting to apply a slightly altered approach based on what you may or may not have observed!

We’ll be back shortly with 3.8: Practising efficiently: Setting targets & tracking performance.

5.3: Anti-roll bar basics (Skip Barber F2000)

Untitled-1
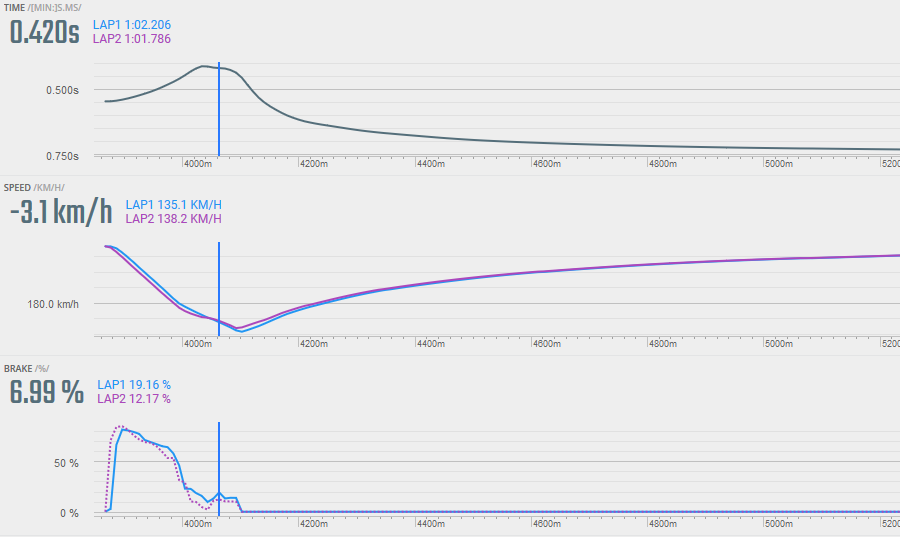
After the tyre pressures, which we handled in 5.2, another significant setting to tweak on the Skip Barber is the anti-roll bar (ARB) in the rear. First of all, you need to understand what an ARB is and what it does to the car.

The red component in the illustration below is an anti-roll bar, which nearly every racing car has on its rear and/or front axles. The ARB connects the suspension elements of two wheels on the same axle. As a result, as soon as one wheel moves up or down, the other wheel is forced to follow that motion. However, the ARB is essentially a torsion spring which stores some of the energy when twisted, so not the entire movement of one tire is transferred to the other.

arb3

To give an example of an ARB’s importance: When a car without an ARB installed goes through a fast right-hand corner, the inertia forces the car to lean to the left side, which is on the outside of the corner. This is because the mass of the chassis is not willing to change direction, while the tyres that grip to the surface are. Relative to the chassis, the left tyres move upwards, the right tyres move downwards, causing body roll. Try to visualise this in your mind.

  1. The main purpose of the ARB is to change the roll stiffness of the axle it’s installed on, which has two important implications:
    The more horizontal a car goes through a corner, the better the chassis is at creating downforce. We’ll cover this in a later article, since here we’re covering the low downforce Skip Barber car.
  2. The ratio of roll stiffness between the front and rear axles affect the balance of the car, especially its tendency to under- or oversteer. Unlike downforce, this is highly relevant for the Skippy.

To understand how balance is affected, we need to understand that as vertical load on a tyre is increased, the coefficient of friction of that tyre decreases. You still get more grip, but proportionally less. This is known as load sensitivity.

graph

Let’s work through an example, using the chart above. At 400 kg of vertical load on a tyre, the coefficient of friction is 1.25. By multiplying the two numbers, you get the amount of friction force provided by the tyre:

400 x 1.25 = 500 kg (single tyre)

If we have a perfectly balanced axle where each wheel is loaded with 400 kg, the total available grip at that axle is:

(400 x  1.25) + (400 x 1.25) = 1000 kg (axle)

Cornering causes lateral (left/right) load transfer at each axle. Vertical load will increase on the outside tires and will decrease on the inside tires. Continuing our example, let’s assume that due to lateral load transfer the vertical load on the left tyre becomes 500 kg, while the load on the right side becomes 300 kg. The coefficient on the left tyre decreases from 1.25 to 1.11, while on the right tyre it increases from 1.25 to 1.35.

500 kg x 1.11 =550 kg (left tyre)
300 kg x 1.35 = 405 kg (right tyre)
550 kg + 405 kg = 955 kg (axle)

So while the total load on the axle remains the same (800kg), the total available grip is now only 955 kg. Just when you need grip the most!

Now we understand how an axle can lose grip under cornering, and is this precisely what causes handling issues. When the available grip of the rear tyres is exceeded first, the car goes into oversteer; when the grip of the front tyres is exceeded first, the car goes into understeer. An ARB can balance this out.

Using the ARB to balance the car
A softer ARB causes less lateral load transfer on its axle, compared to a stiffer ARB. This can improve the balance of the car, and increase overall grip on the axle as shown in the earlier example. The ARB stiffness can also determine the lateral load transfer between the front and rear axles, even if a car only has one ARB, like the Skippy, which only has one on the rear.

A stiffer rear ARB causes more of the lateral load transfer to be distributed to the rear axle. Softer rear ARB means more of the lateral load transfer is distributed to the front axle. A stiffer rear ARB thus reduce available grip at the back while increasing it at the front, hence, making the car more oversteery and less understeery. Conversely, softening the rear ARB increases available grip at the back while decreasing it at the front, hence, making the car less oversteery and more understeery.

Controlling how much lateral load is transferred on the front versus rear axle is a balancing act, to optimise how much grip is available at each axle. Tuning the rear ARB on the Skip Barber car is mostly a question of driver preference: If you find the car too unstable for your liking, you can try reducing rear ARB stiffness. If you find the car unwilling to turn, you can try stiffening the rear ARB.

It’s important to note that tuning the ARB will only make a difference if you are utilizing the traction circle, as explained in 3.1. If you ask too much of the car (overall G’s), the ARB won’t help. If you ask too little, you won’t notice any difference in handling.

Up to you

Get the Skip Barber out for a spin, and see if you can adjust the ARB to your liking! See if you feel the effect of it, and try to visualise the forces working on the car as you go through the corners.

For further explanations on the matter of ARBs, please see the more advanced chapters of this guide, which we’ll publish soon.

5.1: To setup or not to setup?

vrsAs you progress through your iRacing career, competition is fiercer and you’ll need to use all the tools in the box to find the edge over your rivals. One of these tools is car setup. And while most beginner series have friendly communities with lots of setups being shared on the forums, the willingness to share setups significantly drops off at more competitive series. Especially at the top level of sim racing, setups are seen as highly guarded intellectual property. Thus, having a basic understanding of car setups becomes a very useful asset in your sim racing career.

But before you start, here are few questions you should answer to ascertain whether diving into setups is the best use of your time:

  • Are you willing to study and learn how to create a setup from scratch?
    This is not an “if this, then that” kind of guide. Setting up a car is about trade-offs within the limits of physics. Gaining proficiency in car setup is a process that requires you to experiment and analyze a lot.
  • Are you able to consistently hit lap times within 0.2s of your fastest lap?
    If not, then your biggest gains might not come from setups. In road racing, if you’re 3 seconds off the pace on a road track, probably only 0.3s is down to the setup. In oval racing, it’s much easier to learn the tracks, so car setup is a quite significant factor in open setup series.
  • Can you tell whether time loss was due to car or driver?
    You should be able to distinguish driver errors causing understeer, from a car setup change causing understeer. This means you should already be a driver capable of in-the-moment driving analysis.
  • Have you fully developed your driving style?
    Especially in road racing, driving style is typically a much more significant factor in lap times than car setup. Unless you are within 0.2-0.5s of your fastest teammate, or a VRS datapack, you are probably better off working on your driving style. On the flip side, if you have deeply ingrained old bad driving habits, it may be more efficient for you to tune the setup to your driving style. But still, we’d recommend that you try fixing your driving style first.
  • Are you used to driving the car which you want to setup?
    If you hop in a new car, it usually takes a bit of time getting used to it first. Pick up a decent setup (from the forums or a VRS datapack) first and focus on driving style until you are able to turn competitive lap times in the chosen setup.  

If you can answer all these questions with a definitive yes, then this guide is for you.

We’ll get started with the basics that apply to any car and we’ll progress to more advanced setup topics, which are only applicable to high-end cars. We’ll start with the Skip Barber RT2000, as it is the first open-setup car for most road racers, and also a car that’s understandable and sensitive enough to observe setup differences with. Then we’ll move on to the Formula Renault 2.0 which offers a lot more setup options. Also, the trade-offs between different adjustments become quite interesting in the FR2.0. Finally, we’ll look at a high-end, high-downforce car in the HPD ARX-01c.

Ready to get started? Head on to 5.2 where we focus on tyres.

3.4: Fundamentals: Braking technique

Having learned about the traction circle, the optimal racing line, and car control, the next chapter in this series looks at braking technique. Your brakes serve two purposes. The first is pretty obvious: to slow the car down. The second is more subtle, which is that brakes offer a method of controlling weight transfer and balance from corner entry to apex.

Straight line threshold braking
To brake as late as possible, you want to reduce the time spent slowing the car to a minimum. Achieving this requires you to exploit nearly 100% of the available grip from the tires in a straight line. This is known as threshold braking. It’s the brake pressure required to reach the point at which the tires are just on the edge of locking up, and no more.

We’ll divide braking technique up into non-downforce cars, such as the Mazda MX-5, Skip Barber, Porsche/RUF and Lotus 49, and downforce cars, such as the Formula Renault 2.0, the HPD, and the McLaren MP4-30. Even if you drive a downforce car, read the non-downforce section first.

Non-downforce cars
Don’t be afraid to brake too hard when you first hit the pedal from high speed. This is when the wheels have the most energy and are least likely to lock up. From this moment on, reaching threshold braking is a case of delicate modulation, and very much a feel thing, requiring practice.

With the above in mind, there are a couple of sources for feedback which can help out in the “feel” department. Firstly it’s a matter of listening to the tires, or in the case of open wheelers, visually seeing them lock up. It’s also possible (but more difficult) to feel changes in load through force feedback and rpm changes in the case of rear locking. Learn how the tires sound just before they lock up, and avoid braking harder than that (to help, you can raise the tire volume in the options menu). The required pressure will be consistent and repeatable regardless of speed assuming tire wear is discounted and the circuit is flat. This is therefore something which can be trained into your muscle memory over repetition. It’ll be obvious in iRacing when you’ve locked up, the tires will screech, the car won’t turn in the case of a front lock up, and you may see visible smoke.

VRS app telemetry braking trace before T5 at Okayama in the MX-5:braking trace - T5 Okayama

Downforce cars
Fundamentally the same rules apply to downforce cars, but it’s key to understand that the level of grip is speed-dependent. At high speed the car will produce more downforce and therefore the tires will have more grip when compared to travelling at low speed. When you start braking therefore, your speed is obviously greater than when you finish, and the grip level in turn decreases as you continue to brake. This of course means the required threshold braking pressure will decrease in connection with your speed.

How this typically works in practice: Slam the brakes to reach threshold braking quickly, then “bleed” off the brakes at the same rate as the car slows down and the downforce comes off.

Turn 1 at COTA with Martin Krönke in the MP4-30:
braking trace - T1 at COTA

A common mistake in racing downforce cars is not braking hard enough initially. Drivers tend to brake with an initial force which causes the tyres lock up at the end of the braking zone, failing to take full advantage of the extra grip early on.

ABS
Many modern race cars such as the GT3 class now feature driver aids such as traction control and ABS. Whilst ABS prevents locking of the wheels under heavy braking – especially when turning at the same time – it shouldn’t be relied on. Correctly carried out threshold braking is still more efficient, as ABS tends to work in a pulsating manner meaning the tyres lock up very briefly, reducing the braking performance and causing additional tire wear and heat. However, threshold braking is much easier to achieve in ABS equipped cars, as you get additional feedback – when engaged the ABS causes significant vibration which can be felt through the wheel with force feedback. Reduce brake pressure so you only have a subtle hint of this.

Understanding threshold braking while steering
Braking is further complicated when turning into a corner, and if you refer back to article 3.1 “The traction circle” you will know that in order to stay within the limits of the available grip at the tyres, you must reduce brake pressure as you steer, and eventually come off them at the point at which 100% of available lateral grip is being exploited (typically the apex of a corner).

Trail braking
The earlier paragraph is often termed “trail braking”, and is why you’ll see a fast driver bleed off the brakes as they turn into a corner even in cars without downforce. Proper trail braking technique however takes this a step further, and involves continuing to hold onto the brake pedal very deep into corners, typically right up to the moment at which the driver starts to apply throttle. This form of trail braking isn’t so much used to slow the car down but instead as a control method to maintain load on the front tires and reduce understeer from corner entry to apex. You can see evidence of this in Martin’s telemetry from the trace earlier in this article in his reluctance to fully release the brake pedal.

Here we can see David trail braking into T1 at Zolder with the BMW Z4. We have divided the braking phases as shown:
braking trace - T1 at Zolder

A: Threshold braking – bleeding off with downforce level
B: Exploiting the traction circle – reducing brake pressure with increasing steering angle
C: Trail braking – continuing to hold the brakes at 5-10% until applying exit throttle

Up to you:
These techniques will take a lot of practice and repetition before they start to become natural, and initially you may be worse off. Focus on one technique at a time and refer back to the VRS app for telemetry to review your efforts.

3.3: Fundamentals: Car control

A fundamental skill required to drive around a race track as quickly as possible, along with following the optimal racing line, 3.2, is having the ability to carry the maximum speed on that line. This essentially boils down to one thing: car control.

To have good car control means you are comfortable driving a car on the limit of its grip (and sometimes a little bit over it), where the behaviour of the car is very different to that of driving below this limit.

Below the limit, a car will steer to follow exactly the cornering path and radius to which you demand. Yet driving on the limit presents a much bigger challenge, and is where a competent racing driver operates.

How do we know when we’ve reached the limit of grip?
Two behaviours can occur when we exceed the maximum speed for a particular cornering radius. One of these is known as understeer, the other is known as oversteer.

Understeer
Understeer occurs when the available grip at the front tyres is less than at the rear tyres, and as a result the front of the car begins to push wide of the desired cornering radius when the limit of grip is exceeded.


Oversteer
Oversteer is the opposite and occurs when the available grip at the rear tyres is less than at the front tyres, and as a result the rear of the car begins to slide wide and the whole car rotates in the steered direction more than desired. When left uncorrected, this typically results in a loss of control and a spin.


Typically a car will exhibit very mild understeer or oversteer just below the limit of grip and the maximum possible speed for a given cornering radius. This is usually accompanied with a slight scrubbing sound from the tyres. In a simulator it’s difficult to feel the onset of under or oversteer, but it’s definitely possible to hear how hard you are pushing the tyres, and therefore how close you are to the limit of grip.

If you avoid exceeding the speed which results in these subtle cues from the car and tyres, you will also avoid putting yourself in the situation where you are forced to make a correction for either pushing wide from understeer, or over rotation due to oversteer. However, achieving this without ever exceeding the grip limit is an unrealistic expectation, and as a result it is very important to learn how to make corrections to deal with excessive understeer or oversteer to regain control of the car and bring it back within the limit of grip.

Generally a car will have an inherently built in bias towards either understeer or oversteer, but even a perfectly setup and balanced car can exhibit either characteristic depending on how it is driven.

Correcting for understeer
Understeer is certainly the easiest over-the-limit behaviour to make a correction to. The most effective method is to simply reduce throttle input, and if understeer persists, gently press on the brakes until the car ceases to run wide of the desired cornering line. The most common mistake a driver makes when experiencing understeer is to steer further into the corner. This will never reduce understeer (since you’re already over the limit of grip) and most of the time further reduce the grip at the front tyres, which in turn worsens the understeer.


Correcting for oversteer
Oversteer is significantly more difficult to deal with. If it’s felt or observed early enough, it can be fully corrected by doing the opposite to that which created the oversteer in the first place. For example, oversteer can be caused by using too much throttle in rear wheel driven cars, overwhelming the rear tyres and robbing them of lateral grip. Clearly, reducing throttle input in this situation will help reduce the oversteer.


There are however, other ways in which oversteer can be induced. There’s so called “lift off oversteer” whereby a driver abruptly lifts off the throttle whilst the car is loaded up mid corner, which causes a sudden deceleration due to engine braking and the car experiences a forward weight transfer shift, which adds grip to the front tyres whilst simultaneously reducing it at the rears. This effect can be even more severe if the driver squeezes on the brake pedal. The best method to correct for this is to quickly reapply some maintenance throttle to shift the weight transfer back to its original balance.


Opposite lock or countersteer
Generally, when oversteer occurs, it very quickly escalates beyond the point at which the above methods offer an effective correction, and a further measure is required.

This is known as countersteering, but also goes by the name of opposite lock, or steering into the slide. It is the act of steering in the opposite direction to that which the car is rotating.


Common mistakes
One of the most typical situations experienced by drivers who attempt to countersteer when presented with oversteer is overcorrecting. This happens when the correct amount of steering input is applied to begin to reverse the rotation of the car, but the driver is too late at straightening the steering wheel and as a result the car continues to rotate beyond the desired direction and continues into a “spin”.


Snap oversteer is another problem inexperienced drivers tend to suffer with, and is characterised by a sudden transition from understeer to oversteer. Typically when the car is understeering, the driver makes the mistake of applying more steering lock, further reducing the front grip. In this situation if the car loses rear grip (which could be caused by an abrupt throttle change, braking or a change in track surface), the car may begin to transition to oversteer whilst the driver maintains steering input. At this stage, if the driver attempts to countersteer, he/she must first unwind the extra steering lock which momentarily results in even more front grip before they can countersteer. Unsurprisingly, this almost always results in a terminal spin before the driver can react properly.

Drifting – sustained oversteer
Oversteer can be deliberately sustained in many cars, and the act of doing so is known as drifting. Drifting involves intentionally provoking oversteer, and then modulating the throttle and steering corrections in a way which prevents the car from spinning out of control but doesn’t fully arrest the slide. It can be a very helpful technique to learn, as it forces you to very quickly learn excellent car control which can help balancing the car on the limit of grip and saving potential spins and / or crashes. Of course we don’t recommend intentional drifting as a means for driving fast!


Balance
The ultimate goal here is a word you hear often in top level motor racing circles such as Formula 1, and that is balance. When the car has good balance, it means that you’re equally likely to experience either under or oversteer above the limit, resulting in the most neutral cornering behaviour which is usually the most efficient – and the fastest.

Up to you

We recommend taking the MX-5 out to the centripetal circuit within iRacing and having a play with the car at and over the limit, much in the same way as the demo videos in this article. We’re sure it will help you handle the car better at the limit and improve your overall car control. Aim to sense early cues for under and oversteer, both visually and aurally through tyre noise to recognise when they are nearing their limit of grip. Then apply that to the racetrack!


3.2: Fundamentals: The optimal racing line

Let’s apply the traction circle from 3.1 to the racing line, and combine it what we learned in 2.4, Driving Basics. Simply put, we want the tyres as close to the limit of grip as possible, and we want to carry the largest possible radius through a corner. See the following illustration.

The maximum speed we can carry through a corner is dictated by the size of the radius of the line taken, and as such, in the above corner, the green line will allow for the highest cornering speed for a given grip level.

racing-line

Sequences
Corners vary greatly in shape and style, and often tracks contain closely connected sequences. A good example are turns five to eight at Summit Point Raceway, where the ideal exit of turn five isn’t at the edge of the circuit because you want a wide entry into turn six, where you tighten up before running wide and bringing the car back in again for turn seven and finally turn eight. Notice how when treated as an interconnected sequence, the ideal line still follows the largest radius possible at all times, whilst being a compromise at an individual corner scale.

summit-point

Chicanes are treated in the same way: a combination of two corners with the route of straightest line through both, as seen here at Donington Park National.

donington

Entry vs exit
The ideal line isn’t always symmetric. Driving around a track isn’t a corner-by-corner thing. With each one you should consider what comes before and after. It’s worth, for example, compromising the entrance of a corner for a faster exit if you have a long straight after, as more time can be gained since exit speed is carried for the duration of the straight.

To achieve this, your turn-in point will be later and from a wider position, and therefore the radius of curvature is going to be tighter before returning to a late apex, resulting in a straighter line on exit, allowing for earlier throttle application as a result.

The reverse is also true. If you have a slow corner immediately following the one you’re taking, you can sacrifice the exit for a faster, more direct entry. The slow exit of the corner doesn’t matter, because you’ll spend very little time before the next one which requires a slow apex anyway.

Each corner requires prioritisation between entrance and exit, based on what comes before and after.

Here’s an example. The first corner of the Nürburgring Grand Prix layout has an early apex, where you compromise the exit because a slow corner follows.

nurb-gp

A good example of a late apex is the last corner at Road America, where the straight follows. Keep the car wide on the brakes and have a late turn-in. Your minimum speed should be well before the apex. Once you’re there, the car is already accelerating hard, carrying more speed onto the straight.

rd-america

Other factors
A final thing to note about the optimum racing line is that there are often exceptions caused by track and corner specific characteristics, such as bumps, camber (positive or negative), and curbs. Consider the racing line F1 cars use at Monaco after “Casino”, where they jink to the right then left to avoid the bump which would otherwise unsettle the traction and balance of the car, costing time. The racing line as described above assumes a circuit where grip levels are uniform throughout the racing surface, but when these other factors come into play, it’s worth modifying your line to where the extra grip is provided and vice versa.

Up to you

Analyze your lines carefully, keeping the biggest radius in mind and the sequence of corners and straights. Combine it with the knowledge of the traction circle, for the fastest way through corners.

If you’re struggling, remember you can compare your lines at any time with telemetry from datapacks on the VRS app. Follow it up with reading 3.3, on car control.