5.6: Camber & Toe

In article 5.5 we’ve covered ride height, and with this article we’ll continue the setup adjustments on the suspension, namely camber and toe. We’ll go over both of them together, as their effects are tightly coupled.

Click for full-res

Camber
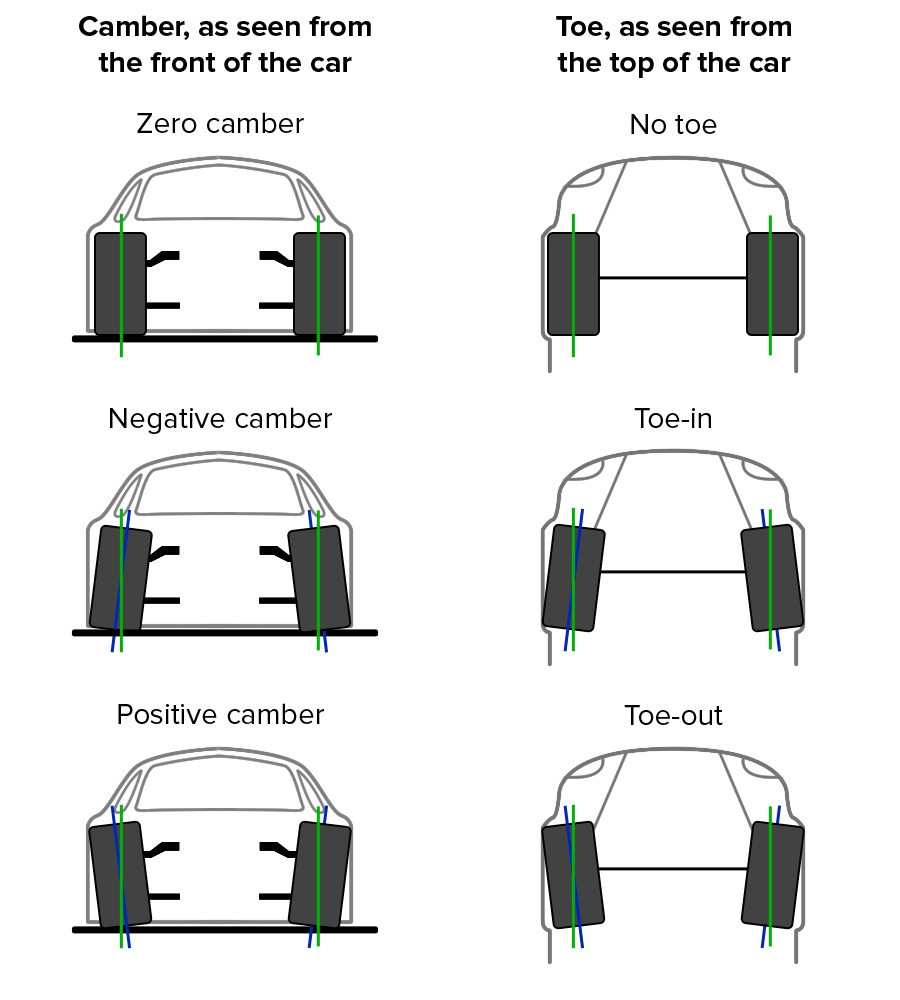
Camber is the vertical inclination of the tire. Zero camber means that the tires are straight, perpendicular to the road and parallel to each other. With positive camber, the top of the tires points outwards of the car. With negative camber, the top of the tires points inwards.

Toe
Toe is the angle the tires are rotated around their vertical axis, looking at them from above the car. You have no toe if the tires are parallel to each other, along the direction of the car. You have toe-in when the tires point in towards each other, and toe-out when they point away from each other.

The effect of camber on available grip
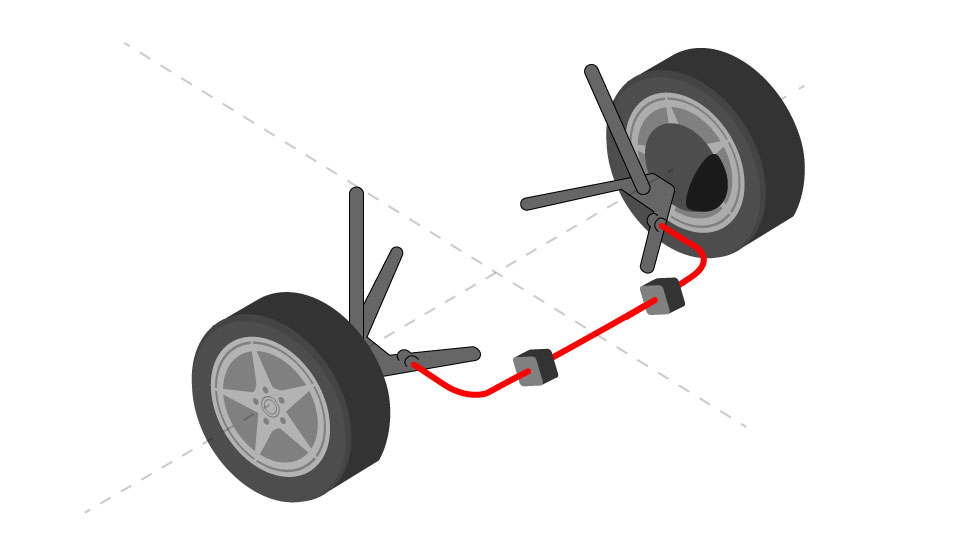
As you go through a corner, the cornering force (as discussed more thoroughly in 5.3) causes the car to roll and the tire to deform, as it twists between the car which wants to go one direction, and the track that’s going the other direction. This is called lateral tire deflection.

With zero camber, the force on the tires are equally distributed along the contact patch when you’re standing still or driving in a straight line. This increases the available grip under straight line braking and acceleration (assuming no camber gain). Cornering with zero camber causes one side of the tire to unload, while the other side of the tire takes more load. This is unequal load distribution and lowers the overall available grip on the tire, just when you need it most: while cornering!

With negative camber, the force distribution along the contact patch is somewhat unequal while driving in a straight line. However, when cornering forces and carcass deflection come into play, they can negate the effect of negative camber, equalising load distribution along the contact patch. This maximises the available grip on the outside tires (which are the ones taking the heavier load), exactly the moment when the car is limited by its available grip. This is the exact reason why typically on road cars you’d use negative camber.

Tradeoffs of using camber
As always, nothing comes for free. While camber can help cornering, it causes additional heat, more tire degradation and uneven wear pattern on the tires. You should also realise that you are trading off traction on a straight line (braking and acceleration) with cornering grip. This means that the track profile is a determining factor on how much camber you want to run. In general, a track with mostly straights and low speed corners, you’d run lower camber; and on tracks with lots of bends or high-speed corners, you’d run more camber. And, as always with mixed profile tracks, you’d have to experiment different settings to see where you can gain more time; on the straights and low-speed corners, or high-speed corners.

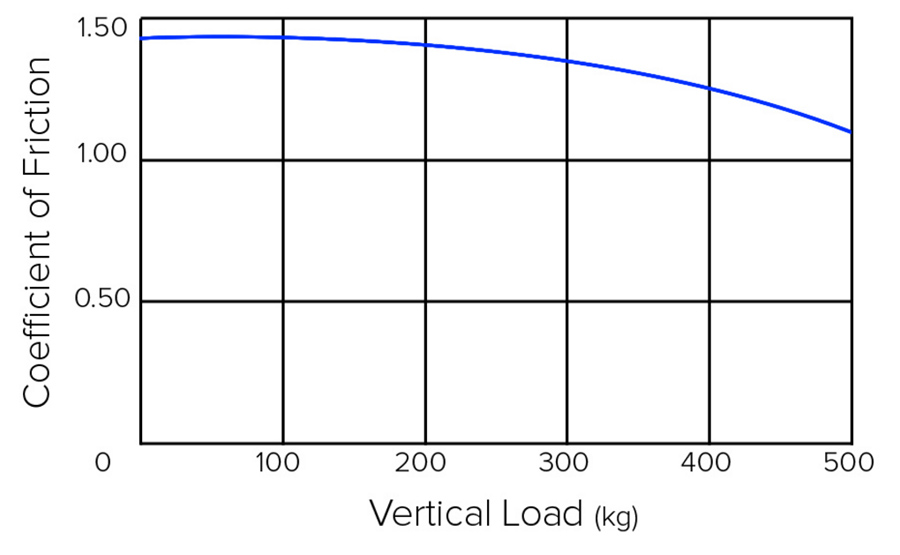
Camber and vertical stiffness
Vertical stiffness of the tire is hugely tied with tire pressures, as discussed in 5.2. This is mostly to be considered on tires with high sidewalls. Having the tire inclined at an angle may cause the sidewall to deform a little. The effect is that of a softer tire without changing the tire pressure. As of time of writing, this really is only something to consider with two cars on iRacing, the Williams FW31 and the McLaren MP4-30.

Effects of toe-in and toe-out
There is one more effect of camber that we haven’t mentioned yet. If you roll a free tire at an angle, it would want to follow an elliptical trajectory instead of a straight line. In other words: an angled tire wants to turn. The force that causes this effect is called camber thrust. This results in a bit more friction, heat and wear, which can be offset by a toe-out adjustment. You can also use a toe-out adjustment to get the slip angles of the front tires in a more optimal spot. So you’d typically run some toe-out on the fronts.

Toe adjustments on the rear tires also have an effect on car handling. Toe-in on the rear creates understeer, which can help with cars that are oversteery on exit. The tradeoff is wear and heat in the rear tires. Toe-out on the rear is generally wrong, as you’re likely to get more oversteer on exit.

Up to you

While building a setup, go through the order of tire pressures, anti-roll bar, ride height and spring rates. If you have that set, experiment with the camber angles to find the optimal balance between speed in the corners and on the straight. Use toe-out on the front tires to counteract camber thrust, and possibly toe-in on the rear tires, to optimise handling.

5.4: Spring rates basics (Formula Renault 2.0)

Untitled-6(If you haven’t read article 5.3 about anti-roll bars, please do that first, because this article builds on the same basics of physics.)

From the Skip Barber, we progress into a faster and more complex car: the Formula Renault 2.0. The FR 2.0 has more setup options available, including an important one, which will vary greatly between circuits: the selection of front and rear springs. The spring rates hugely affect mechanical grip, but also aerodynamics, which may surprise you.

The most common type of spring used in race cars is the coil spring, which is typically installed together with a damper (see picture). For this article though, we’ll focus solely on the coil spring, and ignore the damper until a later article.

Spring rates and their effects
The spring rate is the measure of spring stiffness, and represents the amount of force required to compress the spring a certain distance. It’s measured in Newtons per millimeter (N/mm) or pounds per inch (lbf/in).

  • A higher spring rate gives a stiffer spring, so there’s less displacement per unit of force (the spring compresses less easily).
  • A lower spring rate gives a softer spring, which allows more displacement per unit of force (the spring compresses more easily).

A spring rate adjustment affects the following:

  • Weight transfer causes the ride height to change. For instance, during braking a car with softer front springs compresses more on the front, which pitches the car forward (dynamic reduction of ride height at the front). This impacts the mechanical grip of the car, because it changes the center of gravity. Aside from mechanical grip, an increased pitch (also known as rake) may also have aerodynamic effects, because the angle of the car changes. And during cornering, lateral forces cause the body to ‘roll’ which compresses the springs on the outside tires. Stiffer springs will reduce body roll. See the illustration for the difference between pitch and roll.
  • Aerodynamics will cause the ride height to change. For example, softer springs will compress more on the straights, as higher speeds generate more downforce. Lower dynamic ride heights are advantageous in reducing aero drag (unless the floor is scraping the track!).
  • The ‘bounciness’ of the car. For example, with stiffer springs, going over bumps and curbs may cause one or more tires to get momentarily unloaded or completely lose contact with the track, which would cause handling issues. Going with softer springs could solve the ‘bounciness’, but in return could hurt the pitch and roll attitude of the car, and may influence suspension geometry (such as camber), and consequently hurt aerodynamic effects and possibly cause aero-related handling issues.

3v2small

As we see, springs don’t control a single variable in a straightforward way. So, finding the optimal spring rate is a matter of finding the right trade-off between the above effects, which is often a compromise. In practice, when setting up the car, adjusting spring rates comes in handy when optimising aero effects, and the tradeoff is typically between aero related time gains (lower drag on the straights) and car handling (more downforce in the corners).

The nature of the track would typically determine the baseline you start tuning from. With this we mean the bumpiness of the surface, and the lengths of the straights, and whether there are many fast or slow corners.
On tracks with fast straights and many flat, slow corners (such as Gilles Villeneuve, Montreal), you’d like to start with stiff front springs and soft rear springs. Such a setup would produce more rake (and downforce) in the slow corners and less drag on straights.
On tracks with short straights and a wide range of corner speeds (such as Motegi), you’d like to start with stiff springs on both the front and the rear. This would allow you have a car with more consistent aero performance in all corners regardless of speed.

Most tracks are in-between, so you’d want to pick a baseline for the overall profile, then look at the track specifics. For example, a bumpy slow track like Sebring could need softer springs.

Applying it to the FR2.0
Let’s get to know the suspension layout for the FR2.0. As you can already see in the setup-screen, there is only one center mounted spring and damper in the front, with non adjustable ARB. In the rear are two separate spring and damper units. Unlike the front ARB, the bar in the rear is adjustable in stiffness.

fr2.0-illuUntitled-1

This single spring design at the front is called a monoshock. It is characteristic of a monoshock that the front spring has no effect on roll-stiffness. It only provides stiffness in heave (vertical) motion. This essentially causes spring stiffness to have no significant effect on the mechanical balance (lateral load transfer distribution and roll) of the car. And so the front roll-stiffness is solely controlled by the front ARB, which is adjustable in the real car, but is fixed in iRacing.

In contrast, with the two springs at the rear of the car, roll stiffness is influenced by both the adjustable rear ARB and the rear springs. In practice, you wouldn’t make spring rate adjustments to affect roll-stiffness. If a spring rate adjustment (for a different reason) results in undesired impact on roll-stiffness, you’d counter that effect with an ARB adjustment.

The regulations allow the FR2.0’s ride height to be very low, as a consequence you can run the stiffest front springs and still achieve your desired front ride height. This simplifies the front spring rates setup. In general, aim to run the stiffest springs that still allow you to go over bumps (if a curb is giving problems, you may not want to counter it through setups, but just avoid hitting it). Finding out the optimal rear spring rates will mostly be a matter of how much you want to vary the dynamic ride height in the back. Stiffer rear springs give you a more consistent handling through the corners, while softer rear springs will give less drag on the straights.

Over to you

Try fiddling with the spring rates, and see if you can improve your laptime with it. For instance, load a session at Silverstone Historic. The circuit has fast corners and fast straights, so a compromise is needed between the two baselines suggested above. You pick either baseline as a starting point, for example stiff front and soft rear. From there stiffen the rear and see if it leads to laptime improvements. Because the rear spring rate changes multiple parameters of the car, such as the ride height, you could correct those accordingly to maintain the same static ride height. You can also use the anti-roll bar to help restore the balance of the car, just never change it together with the spring rates, because it makes it hard to tell which change is causing which effect.

5.3: Anti-roll bar basics (Skip Barber F2000)

Untitled-1After the tyre pressures, which we handled in 5.2, another significant setting to tweak on the Skip Barber is the anti-roll bar (ARB) in the rear. First of all, you need to understand what an ARB is and what it does to the car.

The red component in the illustration below is an anti-roll bar, which nearly every racing car has on its rear and/or front axles. The ARB connects the suspension elements of two wheels on the same axle. As a result, as soon as one wheel moves up or down, the other wheel is forced to follow that motion. However, the ARB is essentially a torsion spring which stores some of the energy when twisted, so not the entire movement of one tire is transferred to the other.

arb3

To give an example of an ARB’s importance: When a car without an ARB installed goes through a fast right-hand corner, the inertia forces the car to lean to the left side, which is on the outside of the corner. This is because the mass of the chassis is not willing to change direction, while the tyres that grip to the surface are. Relative to the chassis, the left tyres move upwards, the right tyres move downwards, causing body roll. Try to visualise this in your mind.

  1. The main purpose of the ARB is to change the roll stiffness of the axle it’s installed on, which has two important implications:
    The more horizontal a car goes through a corner, the better the chassis is at creating downforce. We’ll cover this in a later article, since here we’re covering the low downforce Skip Barber car.
  2. The ratio of roll stiffness between the front and rear axles affect the balance of the car, especially its tendency to under- or oversteer. Unlike downforce, this is highly relevant for the Skippy.

To understand how balance is affected, we need to understand that as vertical load on a tyre is increased, the coefficient of friction of that tyre decreases. You still get more grip, but proportionally less. This is known as load sensitivity.

graph

Let’s work through an example, using the chart above. At 400 kg of vertical load on a tyre, the coefficient of friction is 1.25. By multiplying the two numbers, you get the amount of friction force provided by the tyre:

400 x 1.25 = 500 kg (single tyre)

If we have a perfectly balanced axle where each wheel is loaded with 400 kg, the total available grip at that axle is:

(400 x  1.25) + (400 x 1.25) = 1000 kg (axle)

Cornering causes lateral (left/right) load transfer at each axle. Vertical load will increase on the outside tires and will decrease on the inside tires. Continuing our example, let’s assume that due to lateral load transfer the vertical load on the left tyre becomes 500 kg, while the load on the right side becomes 300 kg. The coefficient on the left tyre decreases from 1.25 to 1.11, while on the right tyre it increases from 1.25 to 1.35.

500 kg x 1.11 =550 kg (left tyre)
300 kg x 1.35 = 405 kg (right tyre)
550 kg + 405 kg = 955 kg (axle)

So while the total load on the axle remains the same (800kg), the total available grip is now only 955 kg. Just when you need grip the most!

Now we understand how an axle can lose grip under cornering, and is this precisely what causes handling issues. When the available grip of the rear tyres is exceeded first, the car goes into oversteer; when the grip of the front tyres is exceeded first, the car goes into understeer. An ARB can balance this out.

Using the ARB to balance the car
A softer ARB causes less lateral load transfer on its axle, compared to a stiffer ARB. This can improve the balance of the car, and increase overall grip on the axle as shown in the earlier example. The ARB stiffness can also determine the lateral load transfer between the front and rear axles, even if a car only has one ARB, like the Skippy, which only has one on the rear.

A stiffer rear ARB causes more of the lateral load transfer to be distributed to the rear axle. Softer rear ARB means more of the lateral load transfer is distributed to the front axle. A stiffer rear ARB thus reduce available grip at the back while increasing it at the front, hence, making the car more oversteery and less understeery. Conversely, softening the rear ARB increases available grip at the back while decreasing it at the front, hence, making the car less oversteery and more understeery.

Controlling how much lateral load is transferred on the front versus rear axle is a balancing act, to optimise how much grip is available at each axle. Tuning the rear ARB on the Skip Barber car is mostly a question of driver preference: If you find the car too unstable for your liking, you can try reducing rear ARB stiffness. If you find the car unwilling to turn, you can try stiffening the rear ARB.

It’s important to note that tuning the ARB will only make a difference if you are utilizing the traction circle, as explained in 3.1. If you ask too much of the car (overall G’s), the ARB won’t help. If you ask too little, you won’t notice any difference in handling.

Up to you

Get the Skip Barber out for a spin, and see if you can adjust the ARB to your liking! See if you feel the effect of it, and try to visualise the forces working on the car as you go through the corners.

For further explanations on the matter of ARBs, please see the more advanced chapters of this guide, which we’ll publish soon.