5.5: Ride Heights basics

Static ride height is one of the key setup adjustments, and also one of the easiest to get right. For example, for many cars converting a qualifying setup into a race setup (or vice versa) only means adjusting fuel and the static ride height. In this article we’ll explain what ride height entails, how you can adjust it, and how it affects other setup adjustment.

Static versus dynamic ride heights
Ride height (measured in mm or in) defines how far off the ground the chassis sits. Static ride height is what you configure in the garage. Dynamic ride height is the actual ground clearance at any moment in time as the car goes around the track. The dynamic ride height changes throughout a lap, for instance when a car goes over a curbstone, or when downforce compresses the springs. The dynamic ride heights also changes throughout a stint, for as the fuel burns off and the tank empties, the car becomes lighter and therefore ‘rises’.

Depending on the location of the ride height sensor (e.g. splitter, tire, etc) and its vertical offset, the ride height as measured in the garage (and as reported in telemetry) does not necessarily equate the actual ground clearance. For example, the splitter ride height sensor (on cars that have one) may be positioned a few centimeters above the bottom of the splitter. As a result, you’ll get a non-zero reading even if the splitter bottoms out. And obviously every single car is different, so the first thing you need to find out when you start setting up a new car is what “bottoming out” means in terms of ride height reading.

Purposes of changing the ride height
1: Lower center of gravity means less lateral weight transfer, which means more grip
For cars that are not very aero dependant the ride heights are primarily used to affect the center of gravity. A lower sitting car generally has better handling because a lower center of gravity means less lateral weight transfer. And we’ve discussed in 5.3, lateral weight transfer reduces the total available grip.

2: Balance between downforce and drag
For cars where aero is a defining factor in car setup, the ride height is the key to optimizing aero performance. Each car is different, but in general there’s an ideal ride height range that produces maximum downforce. Similarly, there is an ideal ride height range that minimizes aero drag. These two ranges may or may not overlap. Each car is different and it takes a bunch of experimentation with each new car to find out what works and what doesn’t. By statically and/or dynamically adjusting the ride heights, you can optimize the aero performance of the car.

3: Ground clearance
The final factor, relevant for both downforce and no-downforce cars, is clearance from the ground. You may want to adjust the ride heights to avoid bottoming out on bumps and curbs. Like discussed in the spring rates article, bottoming out can cause handling issues as one or multiple tires may become unloaded or lose contact with the track altogether, and it can also severely lower speed when the car is dragging onto the track.

Example
One of the most common setup scenarios is converting a qualifying setup to a race set. In most cases the additional weight due to the added fuel is bringing the car ‘out of tech’, which means it’s too close to the ground and isn’t legal to race. To pass tech inspection, you need to raise the ride height.

Typically, it’s best to keep a note of the target ride heights as they are in the qualifying setup and try to resemble those as close as possible on the race setup. In order to increase ground clearance, you’ll need to decrease the perch offset on each wheel, or increase the pushrod length (when available). Matching front and rear ride heights may be all you need to convert a qualifying setup to a race setup.

For cars where the gas tank is located far from the center of gravity of the car (e.g. the BMW Z4 GT3 has it’s tank fairly far back in the car), setting the race fuel ride heights could be trickier. As fuel is burnt throughout a stint the front or back of the car will get lighter, increasing the ride height. You may have to take this into consideration when determining the static ride heights with a full tank.

How suspension geometry affects ride height
Different simulators implement this differently, but in iRacing you cannot set the ride heights with one parameter. Instead, on each wheel you can adjust the spring perch offset, or increase the pushrod length (when available). Adjust these properties until your achieve the desired measurement for ride height.

Keep in mind that many suspension elements are connected. Significant changes to spring perch offset, or to pushrod length could also impact camber and toe. Each time you make a change to ride heights you should remember to also take a look at camber and toe. If your camber has changed, change it back to the old (desired) value. This may change your ride height again, so you may have to do a few iterations of ride height adjustment, camber adjustment, until you achieve the desired result. The same applies to each wheel’s toe-in.

When adjusting ride heights
You need to keep ride heights in mind each time you change any of the following:
Spring rates: Stiffer springs raise the car, softer springs bring it closer to the ground. When changing spring rates you want to make sure that you maintain the ride height from before the spring rate adjustment (otherwise you’ll be applying two changes to the car).
Tire pressure: The tire is effectively a spring, and significant changes in tire pressure affect ride heights too.
Camber & toe: As already discussed, camber and toe adjustments may affect the ride height. Modify the suspension geometry so that you achieve the new desired camber (or toe) at that same ride height.
Fuel load: Added fuel (per the example above, for full race distance as opposed to for qualifying) adds more weight to the car, which compresses the springs more, which reduces the ride heights. Each time you add and remove fuel you’d generally want to do so without actually modifying the static ride height (with some exceptions, depending on car or track).

Up to you

Once you understand what ride heights are and what interactions ride heights have with suspension geometry, you need to spend a lot of time testing and experimenting with different settings in order to find out what works with each specific car. And in a later article we’ll look more closely how to approach dynamic ride heights.

5.2: Tyre pressures basics (Skip Barber F2000)

tyresOne of the few setup options available to the Skip Barber car is the pressure in the tyres. It’s also one of the most important things to get right on every single car. To find the ideal tyre pressure, it’s important to know what to look out for.

Tyre pressures influence a number of factors in the performance of the car, and both high and low tyre pressures have their drawbacks.

Factors: Deflection, contact patch, vertical and lateral stiffness
A tyre is a spring and damper unit after all, and becomes stiffer with higher tyre pressures. A higher tyre pressure also changes the curvature of the tyre, from a flat shape to like that of a bicycle.

Lower tyre pressures lower the vertical stiffness, which in turn causes a bigger contact patch (flatter tyre), and in theory sounds promising. Yet a bigger contact patch also increases the rolling resistance of the car. An even lower tyre pressure will cause the shoulders of the tyre to bare the grunt of the load, less than ideal (see illustration).

untitled-3

type2
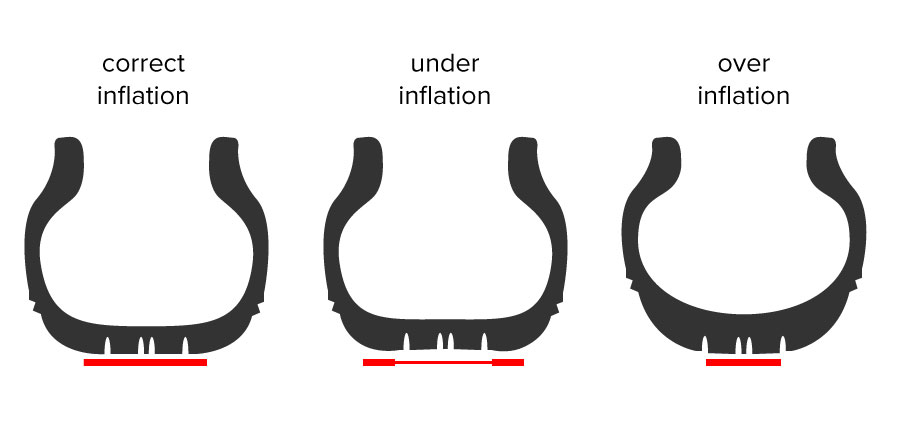
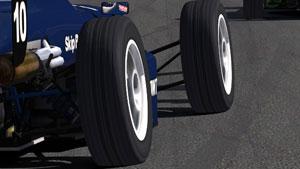
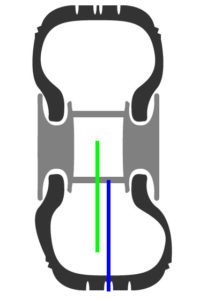
Moreover, lower tyre pressures also affect the lateral stiffness, and when running very low pressures, it’s possible that the middle of the tyre is no longer at the centre of the rim while cornering. It can cause the sidewalls of the tyres to nearly fold. This is also not ideal (see image).

This effect is most noticeable on the McLaren MP4-30 or Williams FW31, as they’re running on wheels with very tall sidewalls relative to their width. We recommend you take either of these for a spin on low tyre pressures, so you get familiar to the feeling of too-low tyre pressures.

Finding the balance
So, running low pressures has it’s drawbacks, as does having too high a pressure. As with almost every setup option that will be covered later on, some compromise is needed.

Fortunately, for the Skip Barber car and its tyres, finding the ideal pressure is fairly easy and does not depend on the track or weather conditions too much. We suggest you select a track, default weather and start a test session. Use the baseline setup, and drive a few laps to get the heat into the tyres. When the pressures stabilize, you have reached the stable operating temperature of the tyres. You have to use telemetry to find out after how many laps this takes. Let’s say that number is 4 laps. You’d need to drive 4 + 5 laps (4 laps to get the tires warmed up, then 5 clean laps within a few tenths of each other). Observe the car and check your laptimes.

Then increase the pressure a bit, and check behaviour and laptimes again. If the car is nicer to drive and/or quicker, go into the same direction with the pressure another time. If it’s worse and/or slower, go back to the original setting and then lower the pressure. Repeat this step until the improvement stops or the car becomes worse again.

The Skip Barber, as a non-downforce car, can be driven with the same pressure at practically every track. However, with higher end cars, especially those with high amounts of downforce, finding the right tyre pressure becomes a little more complex. A given tyre pressure is ideal for one specific amount of load on the tyres, yet this load varies greatly because of the different amount of downforce generated through high and low speed corners.

As a general rule of thumb, on tracks with lots of low speed corners such as Okayama, you’ll want to run relatively low pressures, because compared to high speed circuits like Spa, the downforce generated by the car is fairly low on Okayama, and therefore the loads on the tyres are lower. At a track with lots of high speed corners you may want to run higher pressures to increase grip in high-load situations.

When playing with the pressures you should be able to notice differences in traction in slow corners between higher and lower pressures. Likewise, you should notice a difference in grip in higher speed corners, although this might be more difficult to notice. Use the delta-bar to keep track of time gained or lost in individual corners.

Up to you:

The process of finding a good tyre pressure, at least for short runs, is the same iterative process as with the lower end cars. As you can already guess, for long runs it’s a little different and this will be covered later on in a more advanced section. Later on, we’ll also focus on temperature and weather differences.

For now, start your setup crafting career by finding the right tyre pressure. Continue with anti-roll bars, in 5.3.

2.8: Mapping your career

untitled-1Written with the expert advice from driver coach Martti Pietilä.

With your first season about to begin or underway, it’s good to know what you may want to expect from yourself, both short and long term. This will help you stay motivated and progress on a clearly defined path.

Two ways to progress
There are two ways to move forward in your iRacing career. ‘Vertically’, so to say, you can move to a new series, which is enabled by a promotion to the next license class (there’s Rookie, D, C, B, and A). You can also stay within a series and progress ‘horizontally’, based on iRating.

Both, to an extent, have the same effect, meaning you move up the ladder and will be drafted in with quicker and more experienced drivers.

First season
Regardless of where you go, your first season should be spent in the Production Car Challenge or the MX-5 Global Cup. Attendance is probably highest in the latter, as it’s seen as iRacing’s equivalent to karting. In the sense that it’s the ultimate grassroots series, so we highly recommend the MX-5 Global Cup.

The goal of your first season in one word: mileage. Try to focus on enjoying the races and getting to the finish with all the parts still on your car. There’s no point in trying to overdrive the car and getting demotivated from the struggle and lack of pace, nor is it useful to risk getting involved in a crash.

There isn’t a championship at stake here, you need mileage and seat time most of all, as that’ll make you a better driver. Don’t make a name for yourself as a wrecker. Key points (for any season in a new series): enjoy the driving, get to the finish and slowly build up your speed.

If you feel you’re on the pace and driving well, you can progress up the ladder of motorsport. If not, just do another season of the same series and see what else you can learn. Progressing only makes sense if you’ve learned enough. If you’re advancing too quickly, you’re going to get in cars above your skill level and you’ll lose iRating, Safety Rating and eventually, motivation. It’ll only get tougher. This advice applies to any season end, not just your first season. It is not advisable to change series mid-season. It takes time to get used to a car.

Progressing vertically (to a new series)
If you’re wanting to move on from the MX-5 Global Cup, it’s a good idea to plot out your ‘end-game’. Where do you wish to go? There are a few series which make claim to being the most prestigious in iRacing, such as the Grand Prix Series (and its World Championship Grand Prix Series), and the Blancpain Endurance Series (and its World Championship version).

Because of iRacing’s rating mechanism, competition is high in any series, so don’t look for competitiveness. Ask yourself: do you prefer to race open wheelers, road cars, touring cars, endurance or GT3 sprint races?

Open wheeler drivers, your route should be like this:
Skip Barber -> Star Mazda or Formula Renault 2.0 -> MP4-30

For endurance races:
Grand Touring Cup > VLN Endurance Championship > Proto GT Series > Blancpain Endurance Series or Neo Endurance Series (a very well-run unofficial iRacing series)

For GT3 sprint:
Grand Touring Cup > VLN Endurance Championship > Proto GT Series (don’t use the HPD) > Blancpain Sprint Series

Multiclass series:
VLN Endurance Championship > Proto GT Series or Kamel GT > IMSA or Neo Endurance Series (a very well-run unofficial iRacing series)

Progressing horizontally (within your series)
If you like a series, for instance the MX-5 Global Cup, you can stay within the series and climb the iRating ladder, to compete against better drivers.

Since rookies start with 1300 iRating, you’re not going to come across many rookies if your iRating is above 2000, unless there are no ‘splits’.

When more people sign up for a race than the grid can handle, the race ‘splits’, and the half with the highest iRating gets drafted in together, and the same for the half with the lowest iRating. A single race can be split multiple times. If your iRating is high, that’s better, because you’ll be with more drivers equal to your iRating. It’s a great way to learn and see if you can progress. During the weekends, there will be plenty of races with an average participant iRating (or SOF – strength of field) of at least 3000.

Yet we believe that if you’re new to iRacing, you probably want to progress to a higher class series. We’d also recommend this if you want to race at an elite level eventually, because you’ll develop much more as a widely skilled driver by driving different vehicles. You can always return to racing series like the MX-5 Global Cup on a higher level, once your iRating has increased.

Motivational goals
Goals should keep you motivated, but keep them realistic. Do you want to be the best in iRacing? That means a multi-year commitment of several hours per day, no slacking (this is only for a rare few).

Everyone should have a long term goal, specific for them. Maybe you want to practise for real life racing, maybe you want to win a Blancpain Sprint championship. Whatever you want, it’s important to realise that iRating and especially License / Safety Rating are not necessarily great end goals (there are way too many ways to game the these ratings).

A good short-term goal is reaching the top twenty in your division of that season in a particular series. Divisions are basically rankings within series, determined by your iRating at the beginning of the season. This means your division consists of people at your level, and as a result this is almost always an achievable goal.

The division ranking takes your best result (out of 4) from the week and uses that in the series standings. Perhaps at first it may feel like you have no chance, but as the weeks go by, your pace will increase, others will drop off, and drop weeks come into play, so only your best 8 weeks out of the 12 weeks count. Try to become champion of your division as an ultimate goal.

Up to you:

Think about where you want to go, and let this all motivate you, let it push you harder!