5.6: Camber & Toe

In article 5.5 we’ve covered ride height, and with this article we’ll continue the setup adjustments on the suspension, namely camber and toe. We’ll go over both of them together, as their effects are tightly coupled.
Click for full-res

Camber
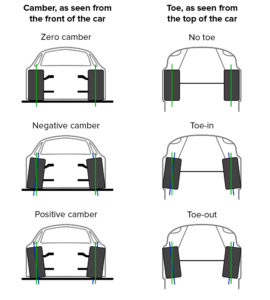
Camber is the vertical inclination of the tire. Zero camber means that the tires are straight, perpendicular to the road and parallel to each other. With positive camber, the top of the tires points outwards of the car. With negative camber, the top of the tires points inwards.

Toe
Toe is the angle the tires are rotated around their vertical axis, looking at them from above the car. You have no toe if the tires are parallel to each other, along the direction of the car. You have toe-in when the tires point in towards each other, and toe-out when they point away from each other.

The effect of camber on available grip
As you go through a corner, the cornering force (as discussed more thoroughly in 5.3) causes the car to roll and the tire to deform, as it twists between the car which wants to go one direction, and the track that’s going the other direction. This is called lateral tire deflection.

With zero camber, the force on the tires are equally distributed along the contact patch when you’re standing still or driving in a straight line. This increases the available grip under straight line braking and acceleration (assuming no camber gain). Cornering with zero camber causes one side of the tire to unload, while the other side of the tire takes more load. This is unequal load distribution and lowers the overall available grip on the tire, just when you need it most: while cornering!

With negative camber, the force distribution along the contact patch is somewhat unequal while driving in a straight line. However, when cornering forces and carcass deflection come into play, they can negate the effect of negative camber, equalising load distribution along the contact patch. This maximises the available grip on the outside tires (which are the ones taking the heavier load), exactly the moment when the car is limited by its available grip. This is the exact reason why typically on road cars you’d use negative camber.

Tradeoffs of using camber
As always, nothing comes for free. While camber can help cornering, it causes additional heat, more tire degradation and uneven wear pattern on the tires. You should also realise that you are trading off traction on a straight line (braking and acceleration) with cornering grip. This means that the track profile is a determining factor on how much camber you want to run. In general, a track with mostly straights and low speed corners, you’d run lower camber; and on tracks with lots of bends or high-speed corners, you’d run more camber. And, as always with mixed profile tracks, you’d have to experiment different settings to see where you can gain more time; on the straights and low-speed corners, or high-speed corners.

Camber and vertical stiffness
Vertical stiffness of the tire is hugely tied with tire pressures, as discussed in 5.2. This is mostly to be considered on tires with high sidewalls. Having the tire inclined at an angle may cause the sidewall to deform a little. The effect is that of a softer tire without changing the tire pressure. As of time of writing, this really is only something to consider with two cars on iRacing, the Williams FW31 and the McLaren MP4-30.

Effects of toe-in and toe-out
There is one more effect of camber that we haven’t mentioned yet. If you roll a free tire at an angle, it would want to follow an elliptical trajectory instead of a straight line. In other words: an angled tire wants to turn. The force that causes this effect is called camber thrust. This results in a bit more friction, heat and wear, which can be offset by a toe-out adjustment. You can also use a toe-out adjustment to get the slip angles of the front tires in a more optimal spot. So you’d typically run some toe-out on the fronts.

Toe adjustments on the rear tires also have an effect on car handling. Toe-in on the rear creates understeer, which can help with cars that are oversteery on exit. The tradeoff is wear and heat in the rear tires. Toe-out on the rear is generally wrong, as you’re likely to get more oversteer on exit.

Up to you

While building a setup, go through the order of tire pressures, anti-roll bar, ride height and spring rates. If you have that set, experiment with the camber angles to find the optimal balance between speed in the corners and on the straight. Use toe-out on the front tires to counteract camber thrust, and possibly toe-in on the rear tires, to optimise handling.

2.8: Mapping your career

untitled-1Written with the expert advice from driver coach Martti Pietilä.

With your first season about to begin or underway, it’s good to know what you may want to expect from yourself, both short and long term. This will help you stay motivated and progress on a clearly defined path.

Two ways to progress
There are two ways to move forward in your iRacing career. ‘Vertically’, so to say, you can move to a new series, which is enabled by a promotion to the next license class (there’s Rookie, D, C, B, and A). You can also stay within a series and progress ‘horizontally’, based on iRating.

Both, to an extent, have the same effect, meaning you move up the ladder and will be drafted in with quicker and more experienced drivers.

First season
Regardless of where you go, your first season should be spent in the Production Car Challenge or the MX-5 Global Cup. Attendance is probably highest in the latter, as it’s seen as iRacing’s equivalent to karting. In the sense that it’s the ultimate grassroots series, so we highly recommend the MX-5 Global Cup.

The goal of your first season in one word: mileage. Try to focus on enjoying the races and getting to the finish with all the parts still on your car. There’s no point in trying to overdrive the car and getting demotivated from the struggle and lack of pace, nor is it useful to risk getting involved in a crash.

There isn’t a championship at stake here, you need mileage and seat time most of all, as that’ll make you a better driver. Don’t make a name for yourself as a wrecker. Key points (for any season in a new series): enjoy the driving, get to the finish and slowly build up your speed.

If you feel you’re on the pace and driving well, you can progress up the ladder of motorsport. If not, just do another season of the same series and see what else you can learn. Progressing only makes sense if you’ve learned enough. If you’re advancing too quickly, you’re going to get in cars above your skill level and you’ll lose iRating, Safety Rating and eventually, motivation. It’ll only get tougher. This advice applies to any season end, not just your first season. It is not advisable to change series mid-season. It takes time to get used to a car.

Progressing vertically (to a new series)
If you’re wanting to move on from the MX-5 Global Cup, it’s a good idea to plot out your ‘end-game’. Where do you wish to go? There are a few series which make claim to being the most prestigious in iRacing, such as the Grand Prix Series (and its World Championship Grand Prix Series), and the Blancpain Endurance Series (and its World Championship version).

Because of iRacing’s rating mechanism, competition is high in any series, so don’t look for competitiveness. Ask yourself: do you prefer to race open wheelers, road cars, touring cars, endurance or GT3 sprint races?

Open wheeler drivers, your route should be like this:
Skip Barber -> Star Mazda or Formula Renault 2.0 -> MP4-30

For endurance races:
Grand Touring Cup > VLN Endurance Championship > Proto GT Series > Blancpain Endurance Series or Neo Endurance Series (a very well-run unofficial iRacing series)

For GT3 sprint:
Grand Touring Cup > VLN Endurance Championship > Proto GT Series (don’t use the HPD) > Blancpain Sprint Series

Multiclass series:
VLN Endurance Championship > Proto GT Series or Kamel GT > IMSA or Neo Endurance Series (a very well-run unofficial iRacing series)

Progressing horizontally (within your series)
If you like a series, for instance the MX-5 Global Cup, you can stay within the series and climb the iRating ladder, to compete against better drivers.

Since rookies start with 1300 iRating, you’re not going to come across many rookies if your iRating is above 2000, unless there are no ‘splits’.

When more people sign up for a race than the grid can handle, the race ‘splits’, and the half with the highest iRating gets drafted in together, and the same for the half with the lowest iRating. A single race can be split multiple times. If your iRating is high, that’s better, because you’ll be with more drivers equal to your iRating. It’s a great way to learn and see if you can progress. During the weekends, there will be plenty of races with an average participant iRating (or SOF – strength of field) of at least 3000.

Yet we believe that if you’re new to iRacing, you probably want to progress to a higher class series. We’d also recommend this if you want to race at an elite level eventually, because you’ll develop much more as a widely skilled driver by driving different vehicles. You can always return to racing series like the MX-5 Global Cup on a higher level, once your iRating has increased.

Motivational goals
Goals should keep you motivated, but keep them realistic. Do you want to be the best in iRacing? That means a multi-year commitment of several hours per day, no slacking (this is only for a rare few).

Everyone should have a long term goal, specific for them. Maybe you want to practise for real life racing, maybe you want to win a Blancpain Sprint championship. Whatever you want, it’s important to realise that iRating and especially License / Safety Rating are not necessarily great end goals (there are way too many ways to game the these ratings).

A good short-term goal is reaching the top twenty in your division of that season in a particular series. Divisions are basically rankings within series, determined by your iRating at the beginning of the season. This means your division consists of people at your level, and as a result this is almost always an achievable goal.

The division ranking takes your best result (out of 4) from the week and uses that in the series standings. Perhaps at first it may feel like you have no chance, but as the weeks go by, your pace will increase, others will drop off, and drop weeks come into play, so only your best 8 weeks out of the 12 weeks count. Try to become champion of your division as an ultimate goal.

Up to you:

Think about where you want to go, and let this all motivate you, let it push you harder!

2.7: Using datapacks

untitled-1

Data Packs are bundles for a specific car and iRacing series combination, and contain data for tracks in the series for that season. That data includes a hotlap replay file, setup files and telemetry data inside. You can use them as a reference for learning the track and to compare your own telemetry input with that of world class sim racers.

On a weekly basis, VRS coaches spend time to put these files together. For this article, we look at the Data Pack for Week 4 of the Blancpain series, at Mount Panorama, also known as ‘Bathurst’. David Williams is driving the Audi R8, with Olli Pahkala driving the McLaren MP4-12C. Both datapacks are available in the VRS software.

Using datapacks
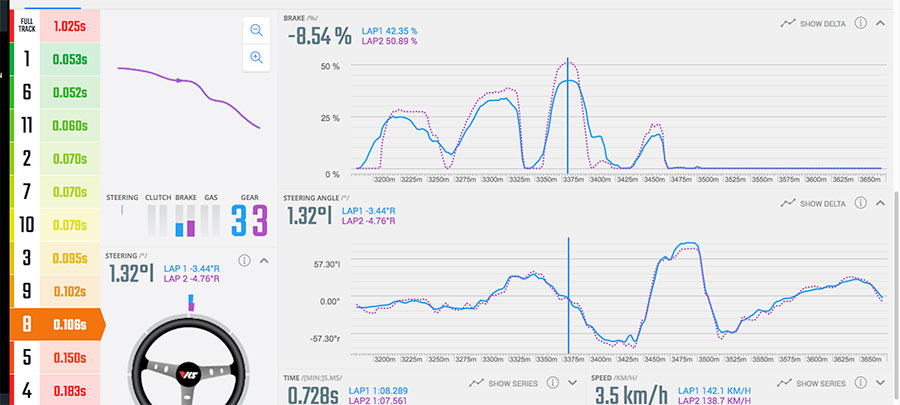
You can load the replay file in the sim to learn the line around the track and general technique, and you can load the telemetry data in the VRS software to see the driver inputs, such as throttle, steering and braking. You can subsequently load your own data to find out where you’re losing or gaining time. For example, you can see two lines in the graph below, which show David’s braking inputs at ‘The Dipper’, during separate laps.

screen-shot-2016-10-09-at-19-05-58

Make sure your lap is run in the same conditions though (Default Weather).

Telemetry data from world class sim racers
Olli and David are both very experienced sim racers, with slightly differing approaches. Olli tweaks the setup of the car early on and pushes the car hard immediately quickly finding the limit. If you have the experience and skill to match, this is probably the most efficient method of practice.

You can check out Olli’s session onboard here:

In contrast, David has a more conservative approach which works better for him and we certainly recommend it for sim racers of all levels excluding perhaps the very elite.

Choose a base setup which you think will work well for the circuit, and with the exception of something very obvious (such as low downforce at Monza), avoid making early adjustments if you can. Treat the session like the real deal, putting in several laps of fuel so you can focus on settling into a rhythm, avoiding crashes and making continuous, gradual improvement.

Be self critical as you drive, and try to have self awareness for where time may have been lost or gained in the moment (the delta bar displayable with the tab key can help for instant feedback). If you do have a crash, big slide or lock a wheel, take a moment to review the replay until you’re satisfied with what was the cause, so you can learn from it and take measures to prevent future occurrences.

Once you reach consistency with your laptimes and your driving is repeatable, then go to the garage screen and make adjustments based on how you think the car could perform better. When you next go out, your driving should be consistent enough to have reliable feedback for the results of the setup changes.

David’s onboard is below:

Up to you:

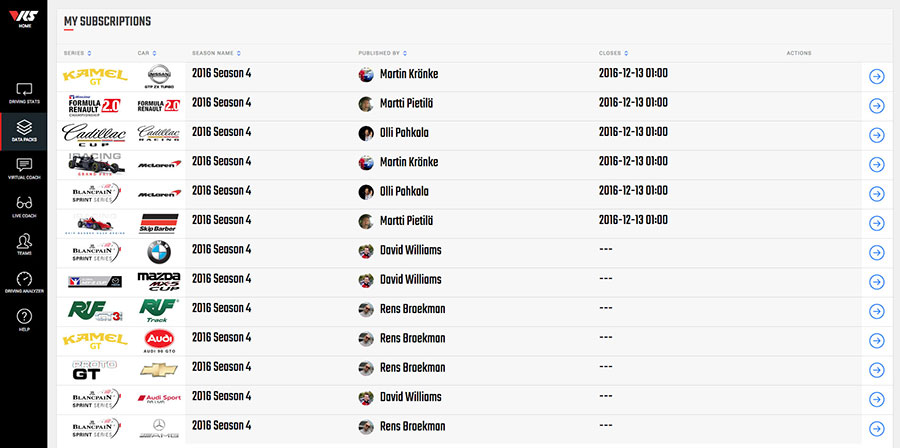
Head into the sim and see if you can replicate Olli’s or David’s laps. To access the datapack, click here to go to the VRS software, and click the Datapacks icon on the left. From there, navigate to your season, series and car.

screen-shot-2016-10-09-at-19-35-29