 Sure, it’s all well and good being a driver capable of superfast laptimes, but what if your main competition has a slower pace over a single lap, yet can (for whatever reason) better maintain a faster average laptime over a race distance than you?
When most of us think about what it means to be consistent, we think about hitting our brake markers within a few metres, lap after lap. We imagine apexing in exactly the same spots in all corners, lap after lap. Ultimately, we think about setting the same laptimes to within a few tenths or even hundredths, lap after lap. But is this really what it means to be consistent?
I guess you could certainly call this a form of consistency, but I don’t believe it to be a very useful and achievable way to look at what is in reality actually a mostly different story.
I believe the key is not, as many will tell you, an ability to closely replicate the exact same inputs in every lap. While this may be an end result of being a consistent driver, simply being repeatable is NOT actually the true origin of what makes a top level driver consistent.
True consistency
True consistency comes from being adaptable. From being willing to make small adjustments lap after lap, either on-the-fly during a corner, or during the following lap. Simply sticking to an identical “routine” each lap, with no flexibility for adjusting brake points, turn-in points, and apexes may well result in short term consistency, but in the long term – over a stint for example – it’s unlikely to be effective.
Tyres wear, fuel burns off, traffic forces you offline, and even the track conditions evolve. The only way repeatability could ever be a reliable method for consistency, is if you were driving so far below the limit that the variables beyond your control never changed the response from your car. However, most of us wish to shape their driving over a single lap to run the car as close to the limit as possible, so we can set the best possible laptimes.
So what might happen to a driver who started a race, initially driving very close to the limit, with the goal of maintaining the same references, inputs, and ultimately laptimes as their “ideal” lap?
Well firstly, it’s likely that the track conditions at the start of the race don’t exactly match those during which the driver established their references and markers for the fastest possible laps in practice. It’s also highly likely that their tyres would quickly lose grip over the first few laps as the pressures increase and the compound settles. It’s also likely that the balance and handling of the car will change over the course of the race as the fuel burns off and a whole host of other variables come into play. Is it then realistic to expect the driver to maintain the same laptimes throughout the race? Instead, it wouldn’t be surprising to see some strong opening laps slowly and steadily deteriorate, with more frequent and more severe mistakes as time went on and no recovery in sight.
Being adaptable
So what does it mean to be adaptable? We know that the “limit”, for instance the fastest route through a series of corners in any given moment, isn’t a stationary target. It is however a physical target we can aim for, and subsequently assess how close we are to in each corner we drive. Think of the limit as your ultimate reference for shaping your driving.
The truth is, the closer you are to the limit, the easier it is to be consistent. If you’re constantly receiving various streams of feedback from the car which indicate a close proximity under or over the limit, it’s much easier to make continuous fine adjustments to your driving in an effort to zone in on the fastest possible laptimes throughout the entire race.
Consider asking an established fast driver, someone known for speed and consistency to deliberately drive exactly five seconds off the pace of their personal best in strictly controlled, static track conditions. To make things more representative, they’re not given any form of live feedback to indicate laptimes until after they’ve finished the stint.
How do you think they’d perform? Would they at the very least be able to repeat laptimes to within a few tenths of a second like they manage with ease when permitted to drive as fast as possible?
The answer is almost definitely no, not a chance! Instead you’ll see huge variation, not only in overall laptimes, but also in brake points, apexes, pedal inputs, lines etc.
When you drive so far below the limit that you never experience any signs of being near to or exceeding it, you lose your ultimate reference for driving fast laptimes. Without that, consistency is an infinitely more difficult goal to achieve.
Developing a feel for the limit
Fortunately, there are many feedback cues from which we can use to gauge our proximity to the limit at any given moment when driving. Of course, in a simulator, we lack a feeling for physical movement and a general seat-of-the-pants sense for the limit like we would have to an extent in a real car.
However, it’s still possible to sense the limit even in a simulator through a combination of visual, aural and even tactile cues through force-feedback.
Firstly, let’s expand on what it really means to drive at the limit. We know that you have to drive at the limit in order to navigate a car through a series of corners as fast as physically possible, so in that sense the limit is the fastest possible speed on the most effective racing line. The maximum speed in a corner is dictated by the total grip available from the tyres for a given vehicle mass as well as the radius of racing line used in that moment. As the driver, it’s our job to try and use as much of the grip available at all times in order to follow the optimal racing line at the highest speed with the inputs available to us.
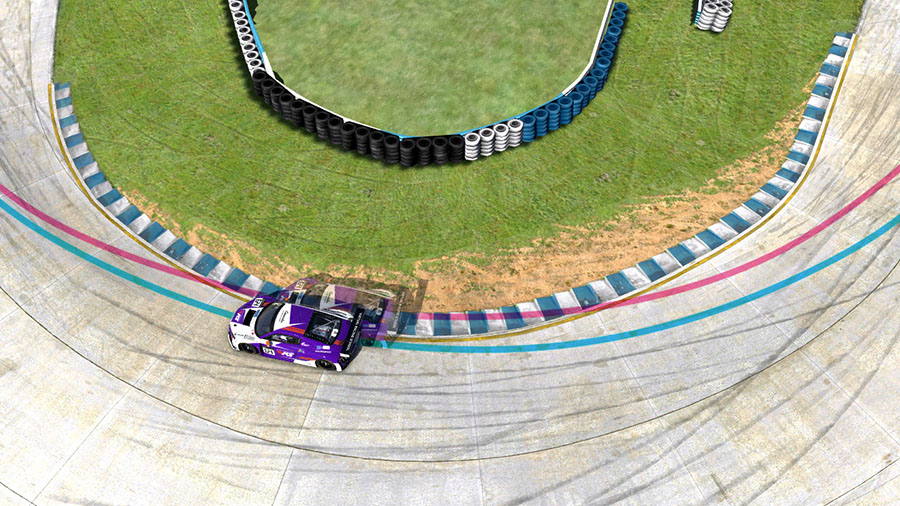
Your eyes receive information relaying the position of the car in physical space around the track at all times. It’s this visual feedback from which most of your driving input revolves around. When the car is running wide or understeering, you sense less rotation in the form of reduced horizontal movement from the circuit outside your car across your display device. In a similar vein, if you’re oversteering you sense more rotational movement. Both these things are examples of being at or exceeding the limit. In your mind’s eye you should have developed visualisation for where the car should be at all times for the optimum racing line, and you can compare this to what your eyes actually see at any point during the lap.
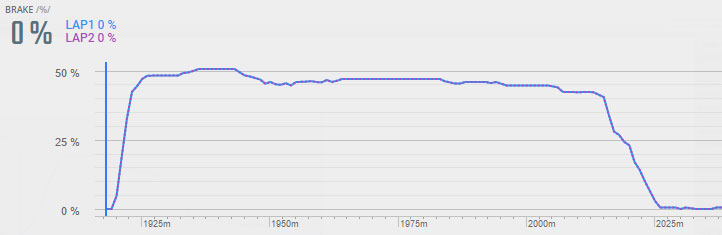
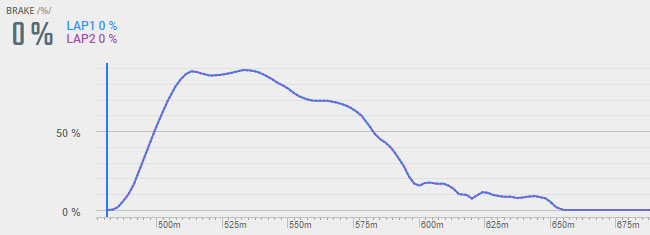
In addition to the obvious visual feedback the sim provides, it’s also possible to sense how close you are to the limit of grip by listening to the sound of the tyres. Tyres produce their maximum grip when sliding slightly (typically 5-10% slip), and begin to produce an audible screeching noise when doing so. If you can only hear a subtle scrubbing sound, it usually means there’s more grip still available, while if they’re excessively screeching, you’ve typically exceeded maximum grip which eventually results in an overheated tyre with less grip.
Finally, modern force-feedback wheels – especially direct drive – offer high fidelity feedback representing the forces at the steering column of the car. This provides both a centering force, useful for catching oversteer when quick countersteering is required, and also steering weight, effectively corresponding to the load and grip through both front tyres. When turning into a corner, FFB load increases up until maximum grip where it peaks, making it easier to sense how hard to steer to exploit the most grip without overworking the tyres more than necessary which would ultimately result in slower laptimes.
Putting it into practice
Firstly, when approaching any given corner, you should always have a plan for how to best execute your driving at or near the limit.
This plan can be formed from any one of many possible key thoughts you may need, and could include:
- A braking marker or reference you wish to brake near to
- An ideal apex point, or any other physical reference on-track relating to your driving inputs
- An adjustment to your “typical” approach to the corner, for example “turn-in later”
- A specific technique you wish to emphasize, such as “brake hard and bleed off slowly” or “be patient on the throttle”
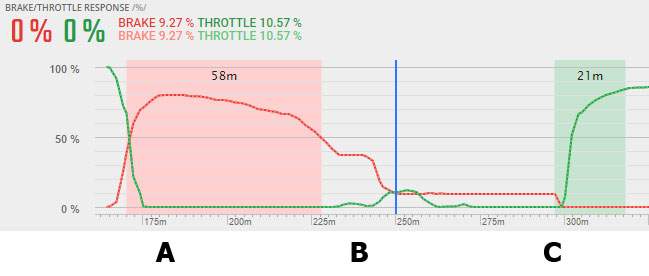
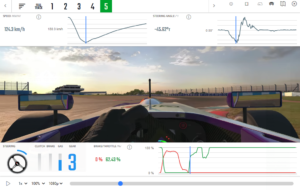
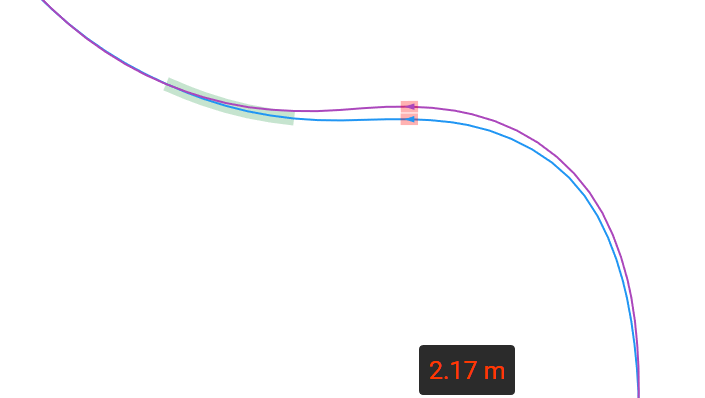
Of course, the best way to come up with an appropriate plan is to use some form of telemetry or driving analysis such as is offered on VRS to identify opportunities for improvement in comparison to a faster lap. If you’re looking for personal feedback or guidance, it might be worthwhile to request some coaching from any of our world class coaches to help identify areas for improvement along with any questions you may have.
With repeated use of tools such as the driving analyser over time, you should find that some of the opportunities you’d previously required the analyser to spot are now observable to you in the moment, while actually driving the car. Familiar patterns should emerge more clearly as your awareness builds and develops. If you’ve spent enough time learning what it is you’re supposed to look for, this almost becomes second nature to you. It becomes internalised.
We know that the secret to true consistency is being adaptable. Initially this might be identifying a small “mistake”, such as running wide of the apex due to insufficient trail braking and consciously reminding yourself to trail brake more on the following lap to allow you to carry the same entry speed but with improved rotation, hitting the apex and ultimately improving your performance through the corner in comparison to your previous effort
The best drivers in the world do this extremely well, and it is the primary reason why they’re so consistent. By being aware of and constantly monitoring their driving on the fly, in the moment, they’re often able to make split second adjustments to their driving to refocus themselves and their car back onto the limit. One such example would be responding to having a tyre lock up under braking by releasing the pedal slightly, and adjusting their line for a later apex. They may lose time in the middle of the corner, but it’s possible for a better exit to result which ultimately limits the damage of their error.
During a stint, this needs to be your mindset for each and every corner of each and every lap. You must monitor your driving, and in particular your proximity to the limit. You must be willing to exceed the limit at times – especially early on with practice – in order to experience it as your reference for the fastest possible lap as often as possible. From there you can then reduce the margin of error either under or over the limit in any given moment to ultimately hone in on the elusive “perfect” lap. When you’re willing to constantly monitor and adapt your driving in this way, changing grip levels and conditions during your stint will prove routine for you to deal with, and allow you to extract the most from the car on any given day, in any given circumstance.
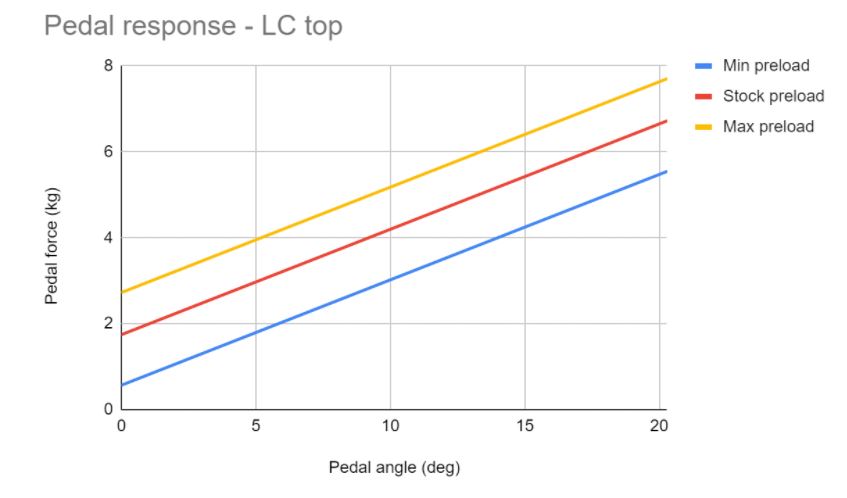
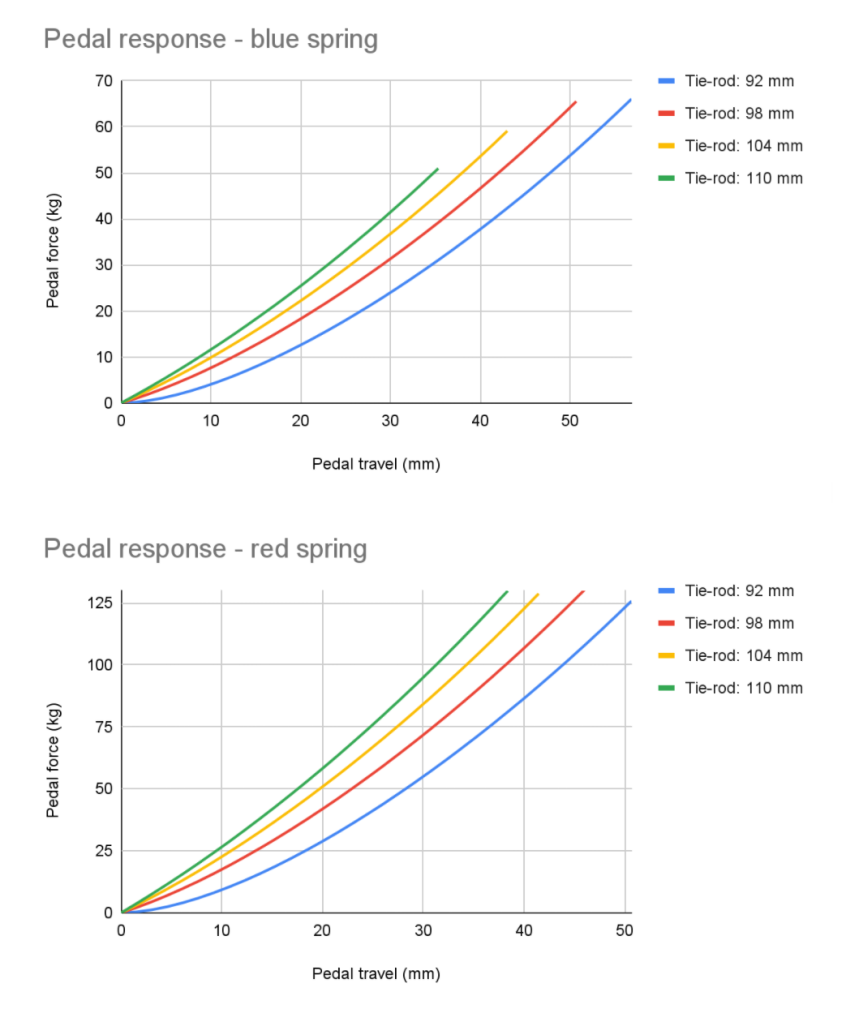
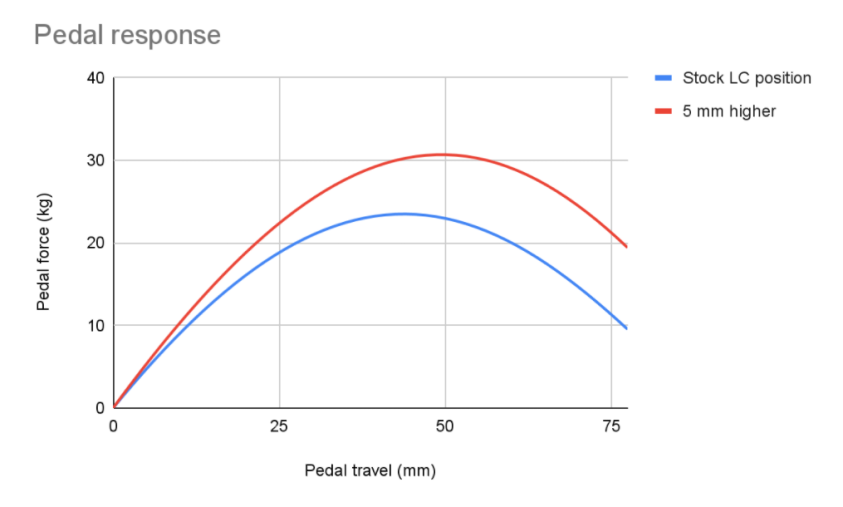
 The DirectForce Pro lineup offers state-of-the-art sim racing pedals engineered to create a superior racing experience.


 This sentiment was recently shared by a VRS user. They are not alone in feeling this way! So we decided it’s worthwhile to blog about it. Here’s the quote that many will probably relate to:
 Welcome to the final segment in this four-part series on how to practice efficiently. In this article we will look at the benefits of setting targets for yourself and monitoring your performance.
 In the
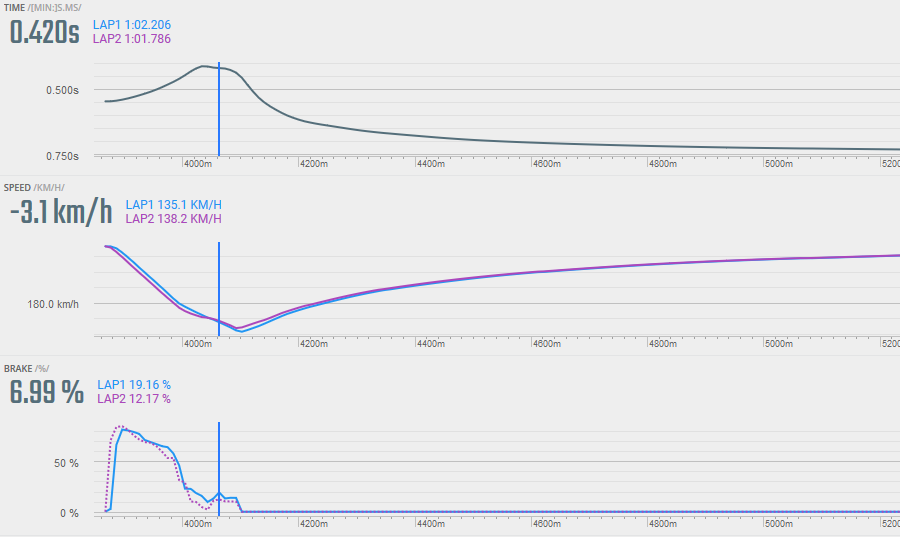


 In the previous article,


 In this four-part series, we shall take an in-depth look at how to practise your sim-racing with the best possible time and energy efficiency. In this first article, we’ll be looking at self-analysis and reflection.