3.4: Fundamentals: Braking technique

Having learned about the traction circle, the optimal racing line, and car control, the next chapter in this series looks at braking technique. Your brakes serve two purposes. The first is pretty obvious: to slow the car down. The second is more subtle, which is that brakes offer a method of controlling weight transfer and balance from corner entry to apex.

Straight line threshold braking
To brake as late as possible, you want to reduce the time spent slowing the car to a minimum. Achieving this requires you to exploit nearly 100% of the available grip from the tires in a straight line. This is known as threshold braking. It’s the brake pressure required to reach the point at which the tires are just on the edge of locking up, and no more.

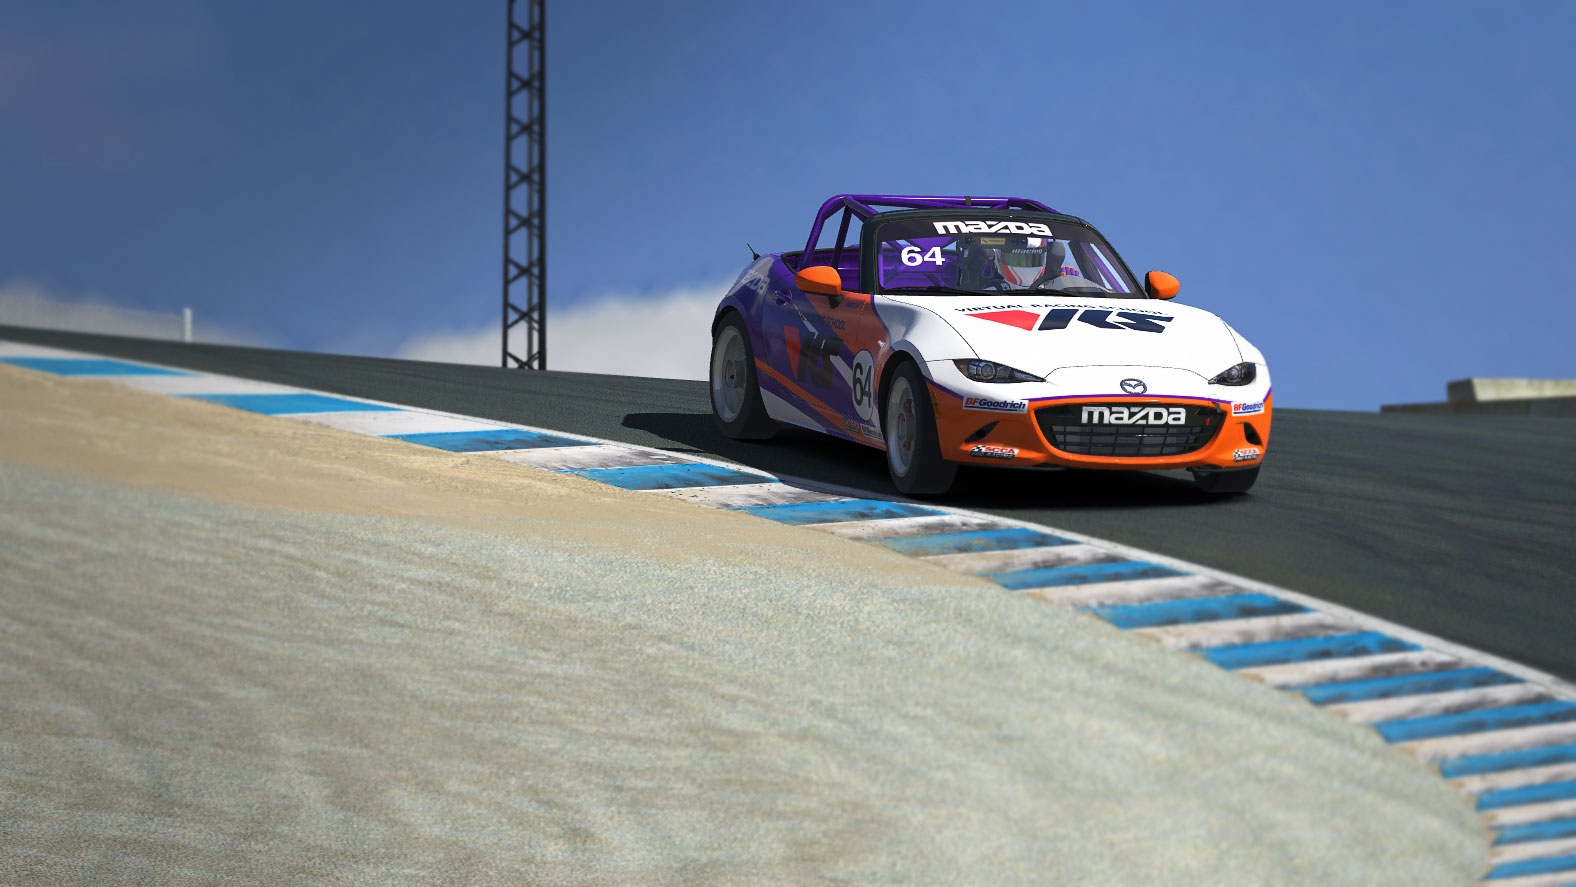
We’ll divide braking technique up into non-downforce cars, such as the Mazda MX-5, Skip Barber, Porsche/RUF and Lotus 49, and downforce cars, such as the Formula Renault 2.0, the HPD, and the McLaren MP4-30. Even if you drive a downforce car, read the non-downforce section first.

Non-downforce cars
Don’t be afraid to brake too hard when you first hit the pedal from high speed. This is when the wheels have the most energy and are least likely to lock up. From this moment on, reaching threshold braking is a case of delicate modulation, and very much a feel thing, requiring practice.

With the above in mind, there are a couple of sources for feedback which can help out in the “feel” department. Firstly it’s a matter of listening to the tires, or in the case of open wheelers, visually seeing them lock up. It’s also possible (but more difficult) to feel changes in load through force feedback and rpm changes in the case of rear locking. Learn how the tires sound just before they lock up, and avoid braking harder than that (to help, you can raise the tire volume in the options menu). The required pressure will be consistent and repeatable regardless of speed assuming tire wear is discounted and the circuit is flat. This is therefore something which can be trained into your muscle memory over repetition. It’ll be obvious in iRacing when you’ve locked up, the tires will screech, the car won’t turn in the case of a front lock up, and you may see visible smoke.

VRS app telemetry braking trace before T5 at Okayama in the MX-5:
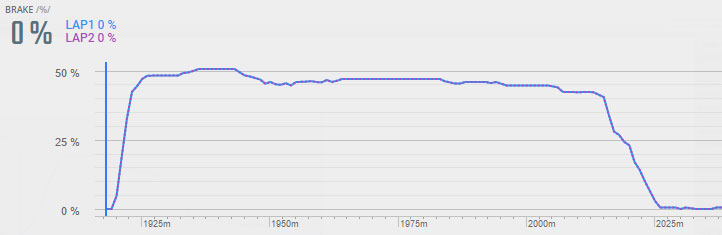
braking trace - T5 Okayama

Downforce cars
Fundamentally the same rules apply to downforce cars, but it’s key to understand that the level of grip is speed-dependent. At high speed the car will produce more downforce and therefore the tires will have more grip when compared to travelling at low speed. When you start braking therefore, your speed is obviously greater than when you finish, and the grip level in turn decreases as you continue to brake. This of course means the required threshold braking pressure will decrease in connection with your speed.

How this typically works in practice: Slam the brakes to reach threshold braking quickly, then “bleed” off the brakes at the same rate as the car slows down and the downforce comes off.

Turn 1 at COTA with Martin Krönke in the MP4-30:
braking trace - T1 at COTA

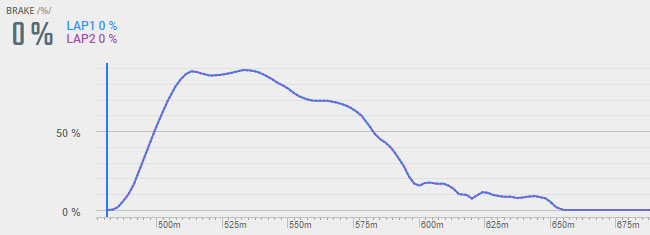
A common mistake in racing downforce cars is not braking hard enough initially. Drivers tend to brake with an initial force which causes the tyres lock up at the end of the braking zone, failing to take full advantage of the extra grip early on.

ABS
Many modern race cars such as the GT3 class now feature driver aids such as traction control and ABS. Whilst ABS prevents locking of the wheels under heavy braking – especially when turning at the same time – it shouldn’t be relied on. Correctly carried out threshold braking is still more efficient, as ABS tends to work in a pulsating manner meaning the tyres lock up very briefly, reducing the braking performance and causing additional tire wear and heat. However, threshold braking is much easier to achieve in ABS equipped cars, as you get additional feedback – when engaged the ABS causes significant vibration which can be felt through the wheel with force feedback. Reduce brake pressure so you only have a subtle hint of this.

Understanding threshold braking while steering
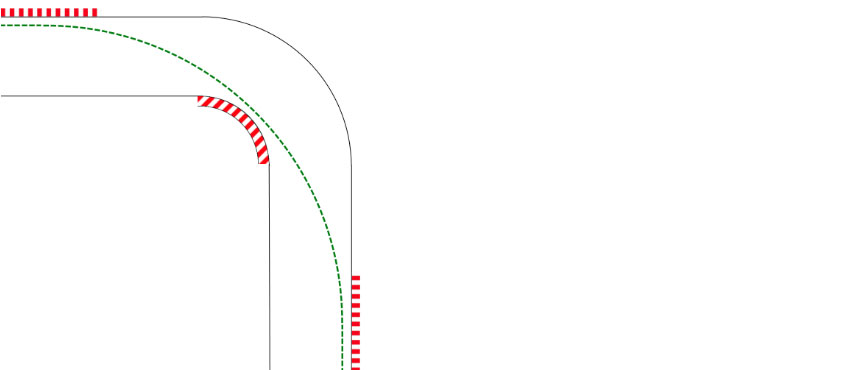
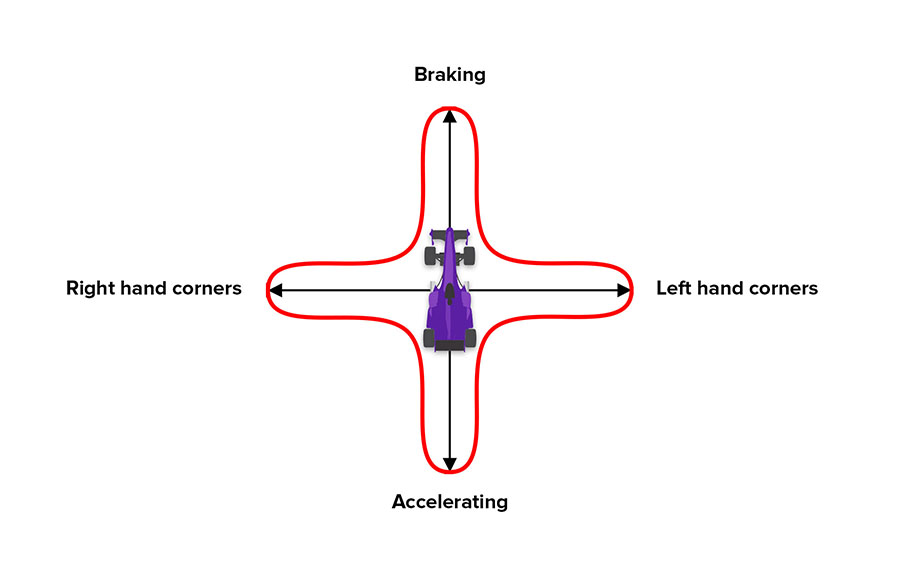
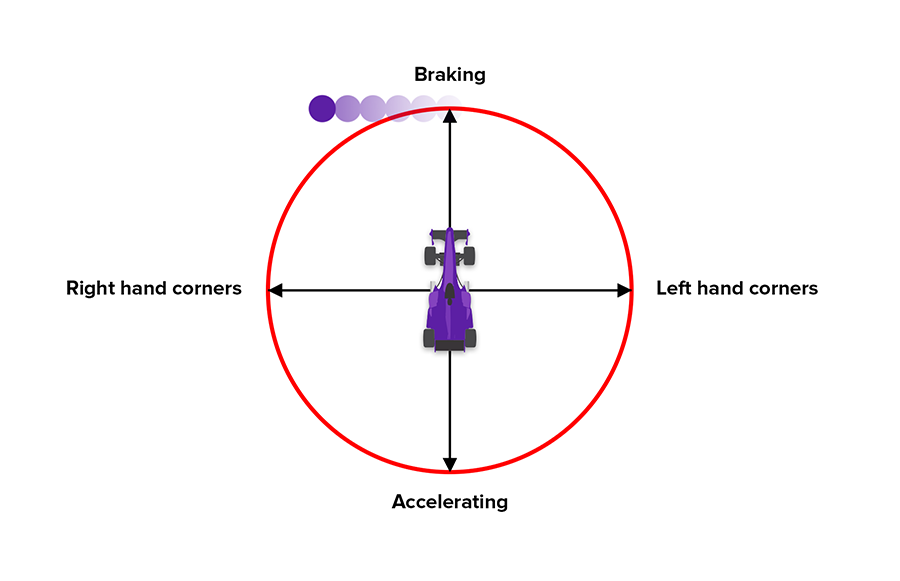
Braking is further complicated when turning into a corner, and if you refer back to article 3.1 “The traction circle” you will know that in order to stay within the limits of the available grip at the tyres, you must reduce brake pressure as you steer, and eventually come off them at the point at which 100% of available lateral grip is being exploited (typically the apex of a corner).

Trail braking
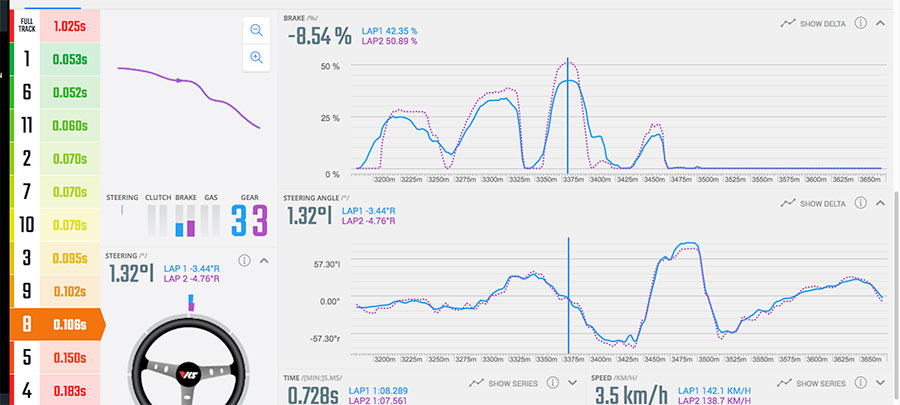
The earlier paragraph is often termed “trail braking”, and is why you’ll see a fast driver bleed off the brakes as they turn into a corner even in cars without downforce. Proper trail braking technique however takes this a step further, and involves continuing to hold onto the brake pedal very deep into corners, typically right up to the moment at which the driver starts to apply throttle. This form of trail braking isn’t so much used to slow the car down but instead as a control method to maintain load on the front tires and reduce understeer from corner entry to apex. You can see evidence of this in Martin’s telemetry from the trace earlier in this article in his reluctance to fully release the brake pedal.

Here we can see David trail braking into T1 at Zolder with the BMW Z4. We have divided the braking phases as shown:
braking trace - T1 at Zolder

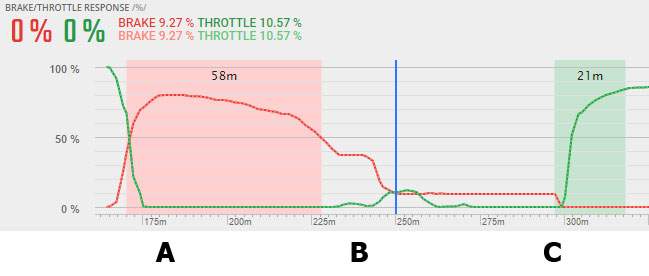
A: Threshold braking – bleeding off with downforce level
B: Exploiting the traction circle – reducing brake pressure with increasing steering angle
C: Trail braking – continuing to hold the brakes at 5-10% until applying exit throttle

Up to you:
These techniques will take a lot of practice and repetition before they start to become natural, and initially you may be worse off. Focus on one technique at a time and refer back to the VRS app for telemetry to review your efforts.

3.1: Fundamentals: The traction circle

untitled-3Welcome to season two of the VRS Academy — let’s dive into racing on a more technical level. We’ll start off with the traction circle, which is a key element used to understand the grip available from the tyres.

Back in article 2.4 Driving basics, we summarised how the optimal lap is a combination of carrying the maximum speed on the best racing line. The best drivers can achieve this by understanding how to fully exploit the grip available at all times during a lap.

The traction circle
Tyres are responsible for providing a connection between the car and tarmac, and it’s through this connection that the driver is able to accelerate, brake and corner. The most important thing to recognise is that there is a finite limit to the amount of grip or force which can be produced in any direction.

To define this, we can visualise a diagram called the traction circle.

traction-circle-copy

The axes represent g-forces experienced in the car as a result of tyre grip in a single direction. At rest and when coasting in a straight line, the resultant forces are effectively zero and thus we are in the centre of the traction circle. During acceleration, the tyres produce grip in a forward direction, translating into a rearward g-force and propelling us along, whilst the opposite happens under braking when the tyres produce rearward grip, slowing us down. It’s a similar story when cornering, and this is when we see the tyres produce lateral (side) forces.

The limit of force the tyres can produce is defined by the red circle in the diagram which represents 100% of grip available. It is the goal of a racing driver to operate as close to this as possible, but to never attempt to go beyond it.

Looking at the circle, it’s very easy to understand that wheelspin in a Formula 1 car is caused by reaching the red line in the acceleration direction. It’s also easy to see how braking too hard would cause the wheels to lock up trying to exceed the red line, and finally obvious to visualise how going too fast for a given corner would cause us to demand more than 100% from the tyres in a lateral direction and cause understeer or a slide.

It’s more difficult however to understand when on track how the combined relationship between braking or acceleration, and cornering at the same time works, and this is where the traction circle helps us.

Using the full traction circle in all directions
Again back in 2.4 Driving basics, we recommended that the beginner driver entirely separates their braking, steering and throttle inputs. Whilst this is a good approach for the novice, it is clear that this driving style does not fully exploit the full limits of the traction circle and the diagram instead will look more like the following.

2

We can see here that the driver reaches the outer limit under braking, but then comes off the brake fully before then steering, once again reaching the outer limit but this time laterally.

A driver can better exploit the grip available at the tyres by combining braking, steering and acceleration, however first picture the following scenario. You’re approaching a right-hand corner, and you’re braking to 100% of the available grip, on the edge of the circle. You begin to turn into the corner whilst maintaining the same brake pressure, the front tyres then lock up and you immediately begin to run wide.

traction-circle-1


Looking at the diagram, we can see that since you were already on the red line in the braking direction, as soon as you turned the wheel you tried to demand some lateral force from the tyres, which would put your car outside the circle (if it were possible).

traction-circle-2

The correct technique is to reduce braking pressure as you begin to steer, so that you remain inside the outer extent of the red line. As you reach the apex (middle) of the corner, you should be using 100% of the lateral grip available with little to no pedal input. From this point onwards you can feed in the throttle so you remain on the outer circle up until you reach full throttle (and are no longer limited by the grip available).


Using telemetry within the VRS software
The driving analyzer on the app includes a traction circle which can be displayed by choosing the “driving style” tab, which reveals the following diagram:

This diagram represents “g force” in the direction in which the driver feels it. Braking is at the top, acceleration at the bottom and lateral g force at the sides. The above data is from turn 4 at Okayama with the MX-5, and we can see that the full extent of the grip available is well used throughout braking, transitioning to cornering, and finally acceleration – until full throttle. The MX-5 only has 2 driven wheels and isn’t very powerful which is why the car has so much more braking potential when compared to acceleration.

Up to you

Continue reading with 3.2, where we explain the ideal racing line, which you can combine with your knowledge of the traction circle!


2.7: Using datapacks

untitled-1

Data Packs are bundles for a specific car and iRacing series combination, and contain data for tracks in the series for that season. That data includes a hotlap replay file, setup files and telemetry data inside. You can use them as a reference for learning the track and to compare your own telemetry input with that of world class sim racers.

On a weekly basis, VRS coaches spend time to put these files together. For this article, we look at the Data Pack for Week 4 of the Blancpain series, at Mount Panorama, also known as ‘Bathurst’. David Williams is driving the Audi R8, with Olli Pahkala driving the McLaren MP4-12C. Both datapacks are available in the VRS software.

Using datapacks
You can load the replay file in the sim to learn the line around the track and general technique, and you can load the telemetry data in the VRS software to see the driver inputs, such as throttle, steering and braking. You can subsequently load your own data to find out where you’re losing or gaining time. For example, you can see two lines in the graph below, which show David’s braking inputs at ‘The Dipper’, during separate laps.

screen-shot-2016-10-09-at-19-05-58

Make sure your lap is run in the same conditions though (Default Weather).

Telemetry data from world class sim racers
Olli and David are both very experienced sim racers, with slightly differing approaches. Olli tweaks the setup of the car early on and pushes the car hard immediately quickly finding the limit. If you have the experience and skill to match, this is probably the most efficient method of practice.

You can check out Olli’s session onboard here:

In contrast, David has a more conservative approach which works better for him and we certainly recommend it for sim racers of all levels excluding perhaps the very elite.

Choose a base setup which you think will work well for the circuit, and with the exception of something very obvious (such as low downforce at Monza), avoid making early adjustments if you can. Treat the session like the real deal, putting in several laps of fuel so you can focus on settling into a rhythm, avoiding crashes and making continuous, gradual improvement.

Be self critical as you drive, and try to have self awareness for where time may have been lost or gained in the moment (the delta bar displayable with the tab key can help for instant feedback). If you do have a crash, big slide or lock a wheel, take a moment to review the replay until you’re satisfied with what was the cause, so you can learn from it and take measures to prevent future occurrences.

Once you reach consistency with your laptimes and your driving is repeatable, then go to the garage screen and make adjustments based on how you think the car could perform better. When you next go out, your driving should be consistent enough to have reliable feedback for the results of the setup changes.

David’s onboard is below:

Up to you:

Head into the sim and see if you can replicate Olli’s or David’s laps. To access the datapack, click here to go to the VRS software, and click the Datapacks icon on the left. From there, navigate to your season, series and car.

screen-shot-2016-10-09-at-19-35-29

2.6: Driving basics

untitled-1
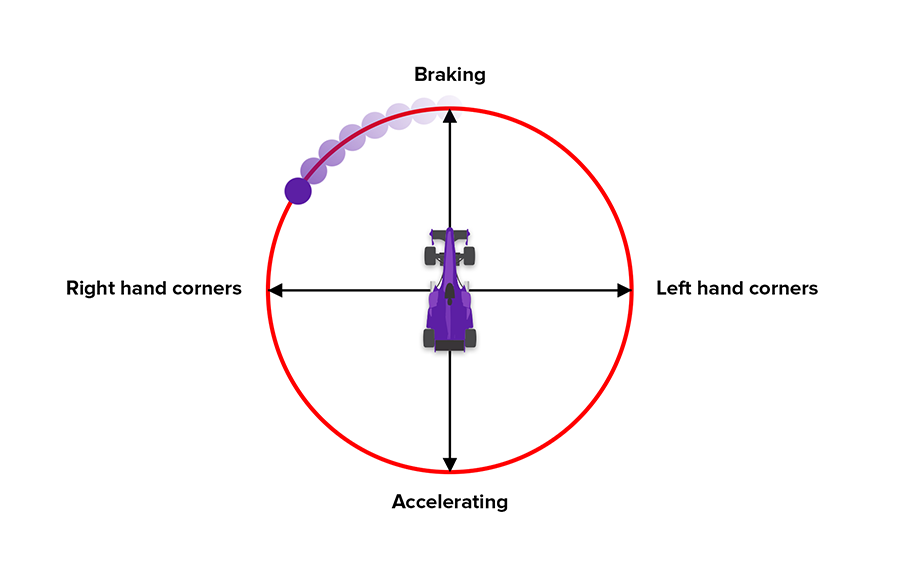
The optimal lap is easy to describe, but difficult to achieve. It’s a combination of two basic things: utilising the full grip of the tyres through the perfect line. In other words: optimal racing line & optimal speed.

Sounds simple? Mastering this is in fact extremely challenging due to the complex layout of a typical circuit and the behaviour of a racing car at the limit of grip. This is why the following fundamentals are so important to achieving your maximum potential, not only as a beginner but also as a seasoned veteran.

Importance of solid basics, an analogy:
Several months after struggling to learn the guitar, I learned that I’d been holding the pick incorrectly. I stumbled across my mistake randomly whilst browsing internet tutorials, where I discovered the widely accepted, correct grip. Initially the change made my playing worse, however a few weeks later and I’d made massive progress over my previous level.

Racing line
The most fundamental thing a racing driver can learn is the correct line, so we’ll start with the basics for this first. Generally speaking, the optimum line through a single corner is that of the largest radius, as it allows for the highest speed possible for a given amount of grip. Essentially, the goal is to reduce the tightness of a corner as much a possible, which can be achieved by using all of the track.

All of the track
Take for example a 90 degree corner on a circuit roughly five times the width of your car. The line of largest radius is going one which starts from the outside of the corner on entry, sweeps to the inside at the apex, before then tracking out to the outside once again for the exit. This is illustrated in the following image:

screen-shot-2016-10-09-at-20-08-45

Often the track will either tighten or open on exit. Sequences of corners often require a compromised line, and the length of the straight following a corner will strongly determine if you are better off sacrificing a wide entry for a tight exit, or vice versa.

We strongly recommend referring to the datapacks provided on the VRS app to gain a good understanding for the best line on a particular circuit with a given car. If there’s no datapack, search your car, track and season combination on the iRacing forums or YouTube.

Limit of grip
Generally speaking, the limit of grip is the speed at which a car begins to no longer follow the line on which you intend to stick to. Your goal should be to drive at a speed close to this, but to not exceed it, so that you can follow the best line around a circuit. If you drive too fast, you’ll find the car either runs wide (understeer), or you risk having the rear step out (oversteer).

Common mistakes
The most common errors the average beginner to race driving or sim racing make are the following:

  • They enter slow corners too quickly, and enter fast corners too slowly
  • They brake too late
  • They attempt to brake and turn at the same time
  • They carry too little speed out of corners

A phrase you often hear in racing circles is known as “slow in fast out”. This is a generalisation, but it’s used to reduce the likelihood of the either of the above mistakes from occurring. It’s also much easier to make a correction to your driving when you’re not going fast enough and there’s more grip still available. Focus on carrying more speed out of corners, rather than trying to carry too much speed in. Pay attention also to the type of corner; is it quite shallow or very tight? Adjust your entry speed accordingly.

Brake in a straight line
When braking hard, it’s highly recommended to travel in a straight line. This comes down to something known as the “traction circle”, whereby a tyre only has certain amount of grip in any direction. This means that in order for a tyre to produce any sideways grip required for cornering, it will have less grip available for braking or accelerating.

As such, we recommend to a beginner driver that they deliberately separate braking and turning completely. Combining braking and turning is a more advanced driving technique which definitely has it’s rewards, but it requires more skill and will feature in a future article.

Brake hard enough so you can sense the wheels would lock up if you braked harder, and smoothly release the pedal as the turn in point approaches. You should be turning the car hardest in the middle of the corner (the apex).

Commit to full throttle when you know you don’t need to lift
After driving through the apex, smoothly unwind the steering whilst carefully applying throttle as the exit of the corner approaches. Avoid applying too much throttle too early and then lifting again later, as this will greatly reduce your exit speed and momentum on exit. Exit speed is very important, especially when a long straight follows a corner as you will carry that speed all the way until the next braking zone or lift.

iracingsim64dx11-2016-10-11-23-40-46-03 

Up to you:

We recommend that you come back to this article several times in between practice sessions to refresh your understanding as it is a lot of information to process and too much to remember and apply in one session.

As we said: the optimal lap is easy to describe, but difficult to achieve!