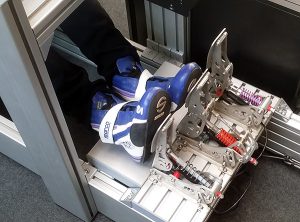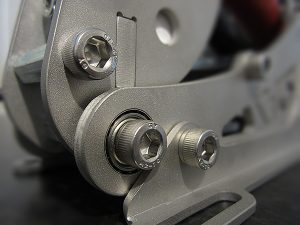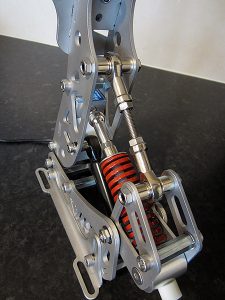
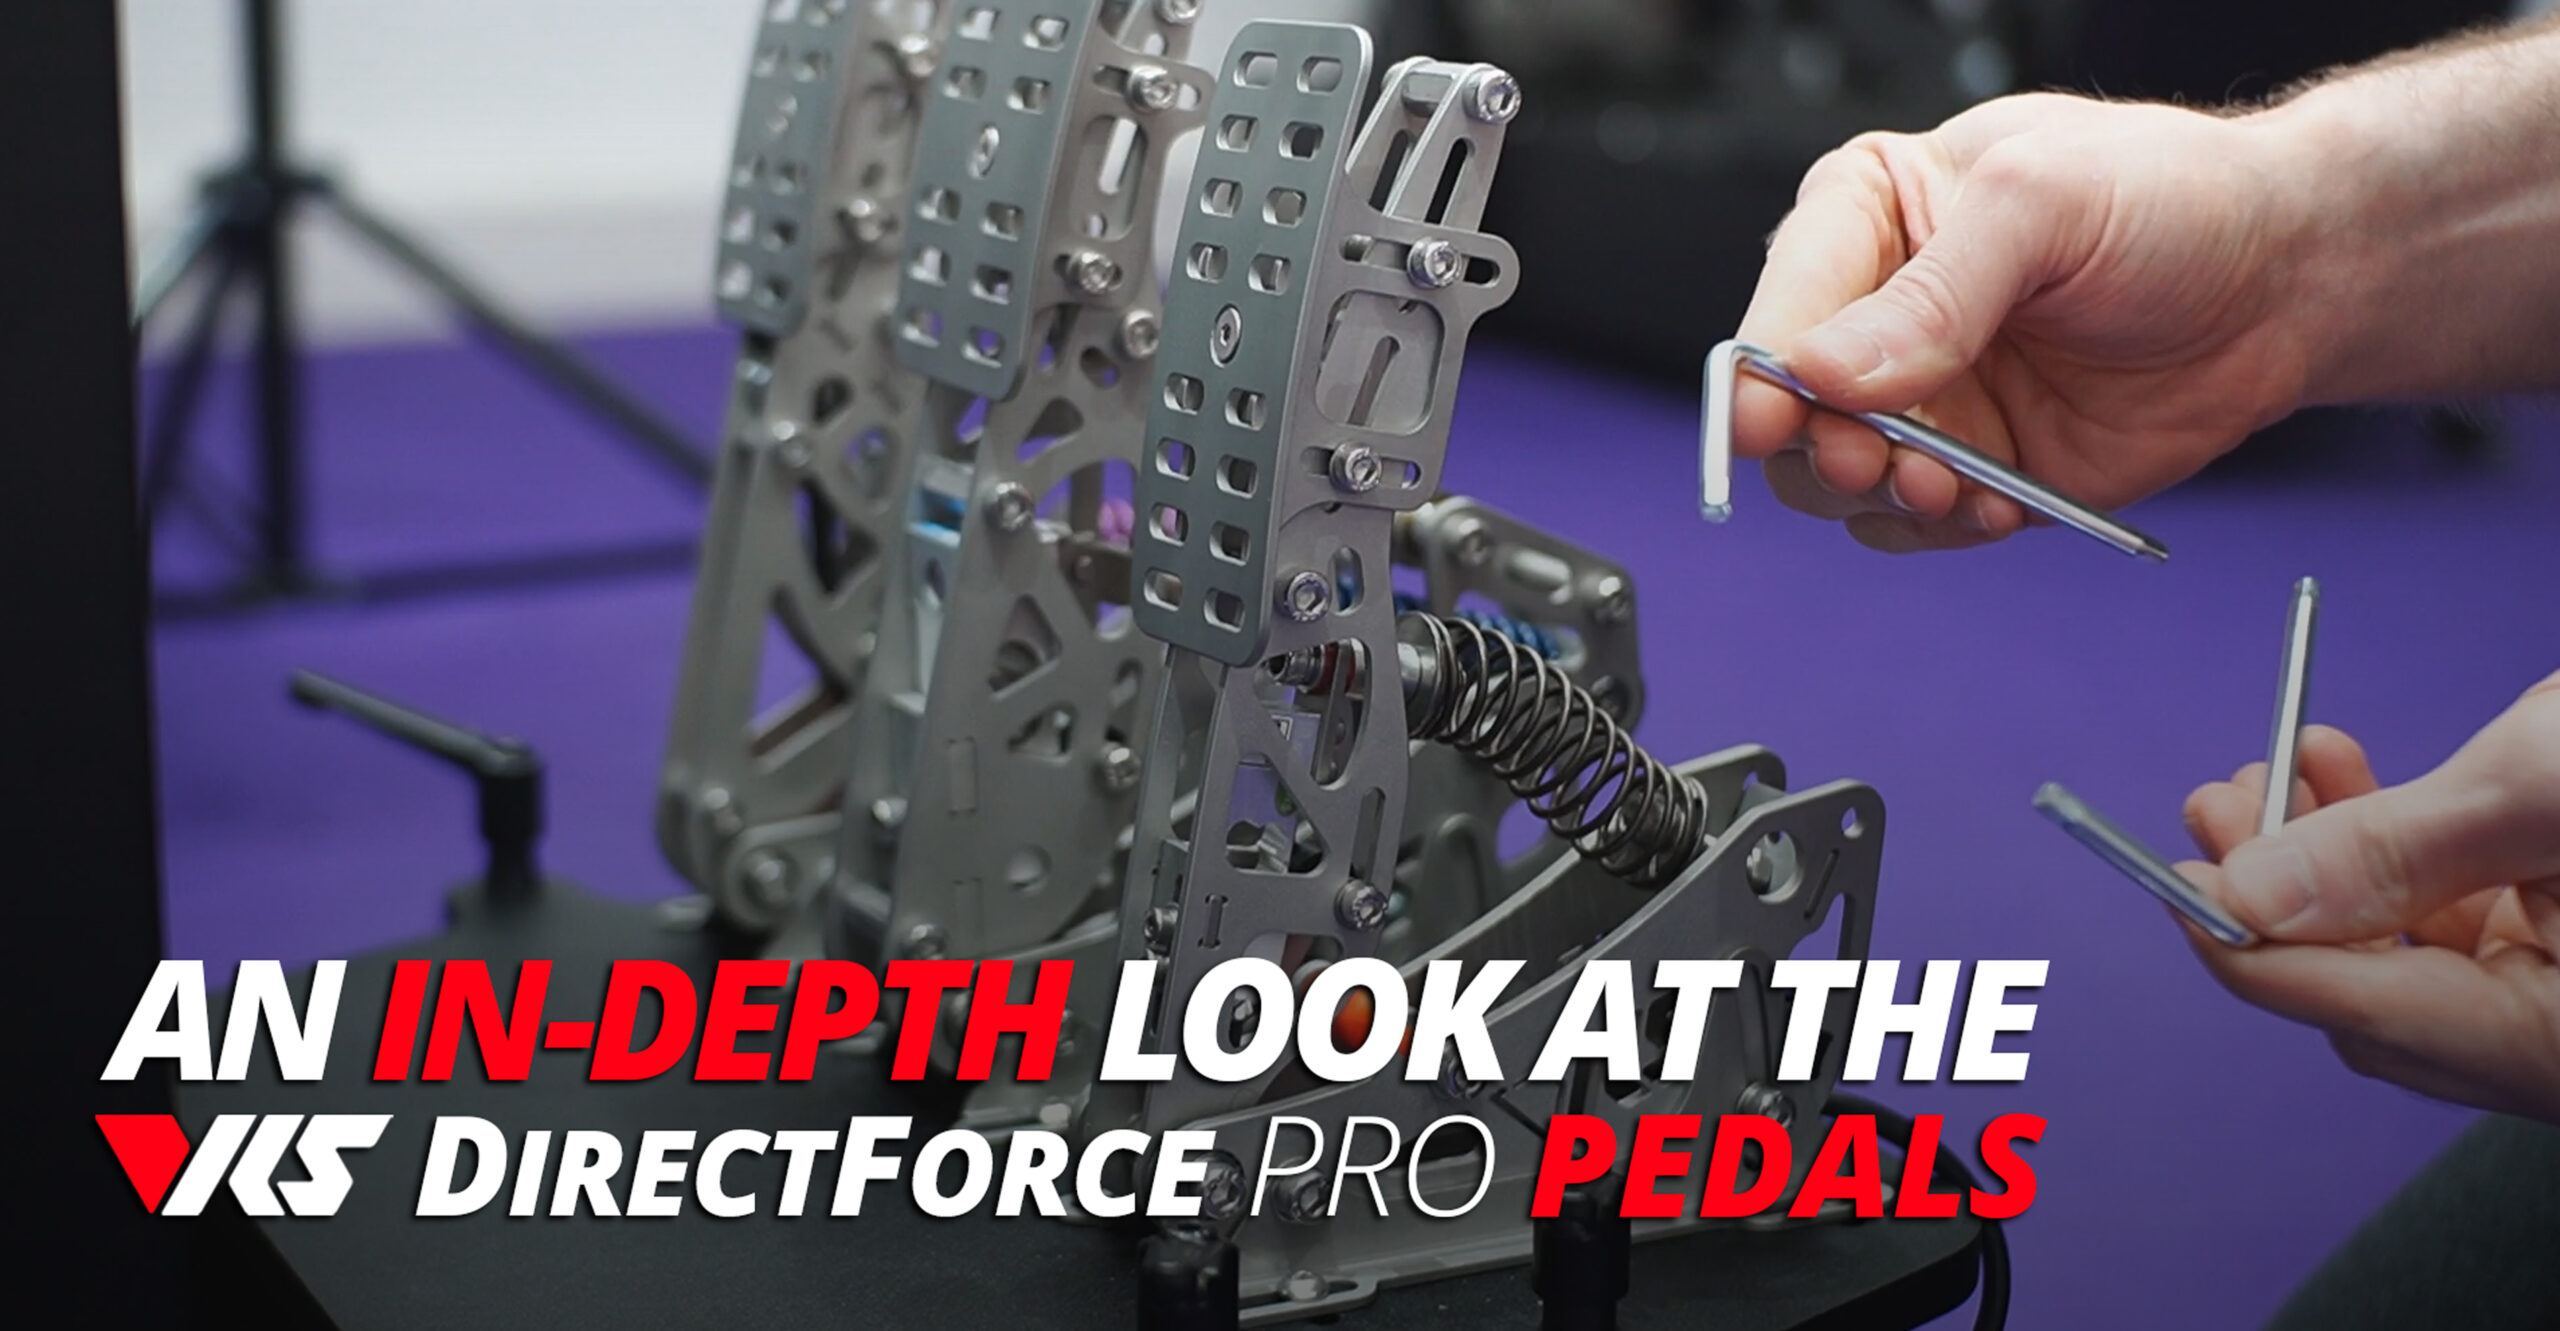
An In-depth look at the VRS DirectForce Pro Pedals

The DirectForce Pro lineup offers state-of-the-art sim racing pedals engineered to create a superior racing experience.

After more than two years of development, our DirectForce Pro pedals are ready and available. The DirectForce Pro pedal system was designed by racers for racers. It is currently being used by some of the best sim racers in the world including Coanda Simsport drivers Joshua Rogers, Mitchell DeJong, Martin Krönke, Mack Bakkum, and David Williams.

So, if you’re looking for precise, smooth, and durable pedals at a very competitive price, we believe you will be quite pleased with our two years of hard work, engineering, and testing. These ultra-premium pedals are highly adjustable with a reliable and consistent response.

  • Extensive pedal face adjustability, including height, angle, and depth
  • Custom PTFE inserts for even smoother operation
  • Fully shielded pedal controller, cables, and grounded load cells
  • throughout
  • Customized and refined hydraulic dampers with minimal free-play
  • Rodless throttle redesign to completely eliminate friction
  • FEA optimized laser cut stainless steel construction to minimize
  • weight
  • Coil springs throughout for consistent and friction-free response
  • Shielded and flanged ball bearings, eliminating free-play from the
  • construction

All pedals allow for an overall tilt angle change of 21 degrees. In addition, the pedal faces themselves allow for an angle adjustment range of more than 30 degrees, as well as 20 mm depth adjustment (with even more range for the throttle face), and up to 30 mm vertical adjustment. We are confident that these pedals can be adjusted to suit almost any rig out there.

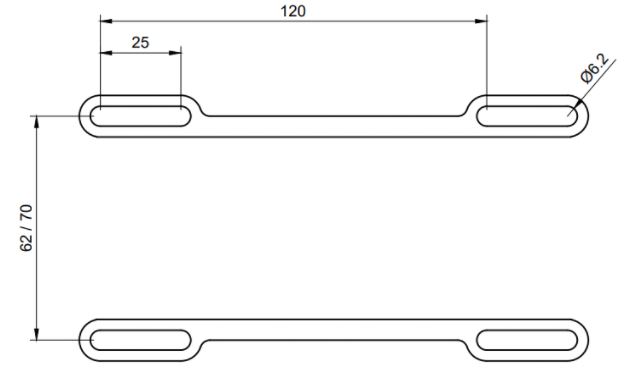
The following diagram represents the mounting dimensions for the pedal feet, with the brake having wider dimensions than the clutch and throttle:

Throttle:

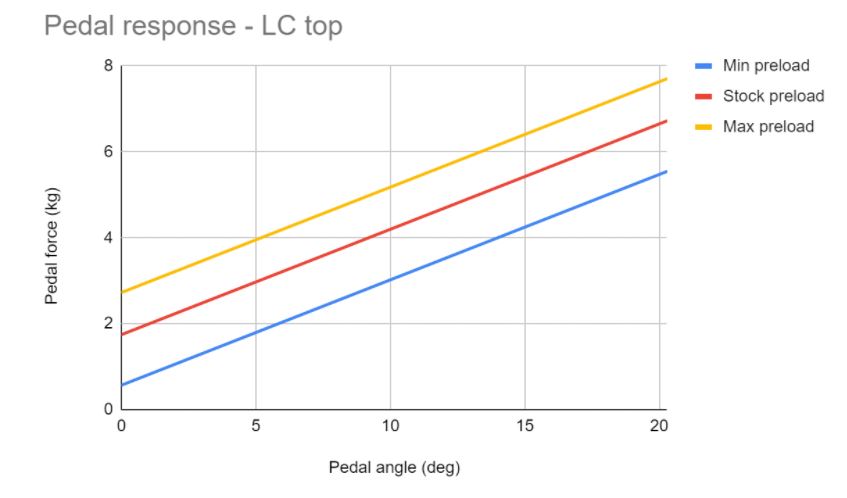
The throttle pedal has a maximum throw of 20.3 degrees, or 58.1 mm of travel, with the pedal face in the mid position. When adjusted for minimum travel, the throw is just 7.5 degrees, or 21.5 mm. The travel will decrease by 9% and the pedal force will increase also by 9% when the face is at the minimum height and vice versa. This means a maximum configurable pedal force of 8.4 kg.

In its stock configuration, the middle of the pedal face has a height of 188 mm from the base mounting point, without a heel plate. The face itself has a length of 120 mm and is 55 mm wide.

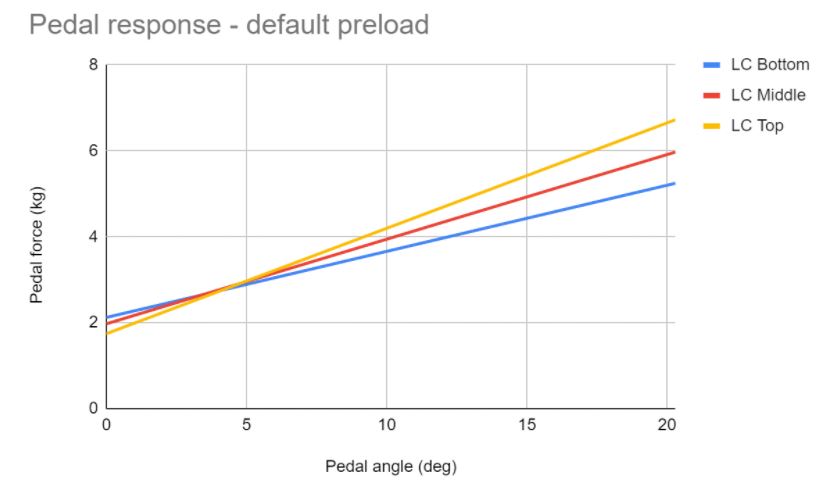
Here’s a graph for the pedal response when adjusted for various load cell and corresponding spring seat hole positions:

vrs pedals, directforce pro

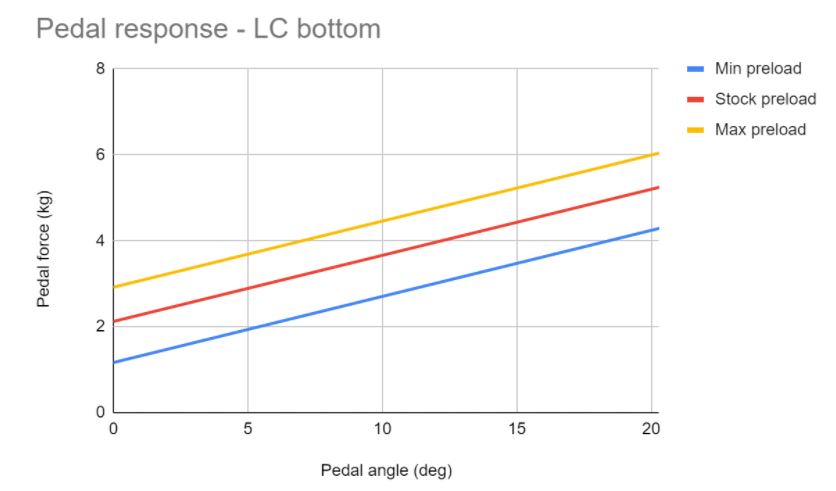
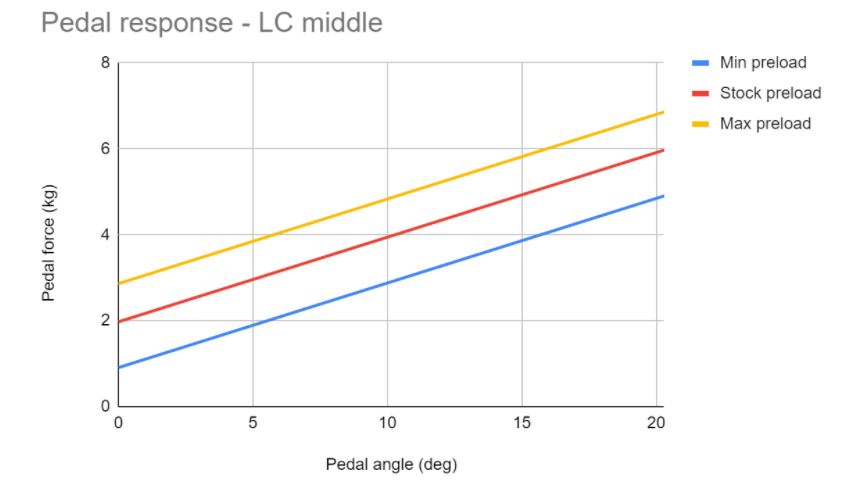
The following graphs represent pedal responses at various preloads at each of these load cell positions:

Brake:

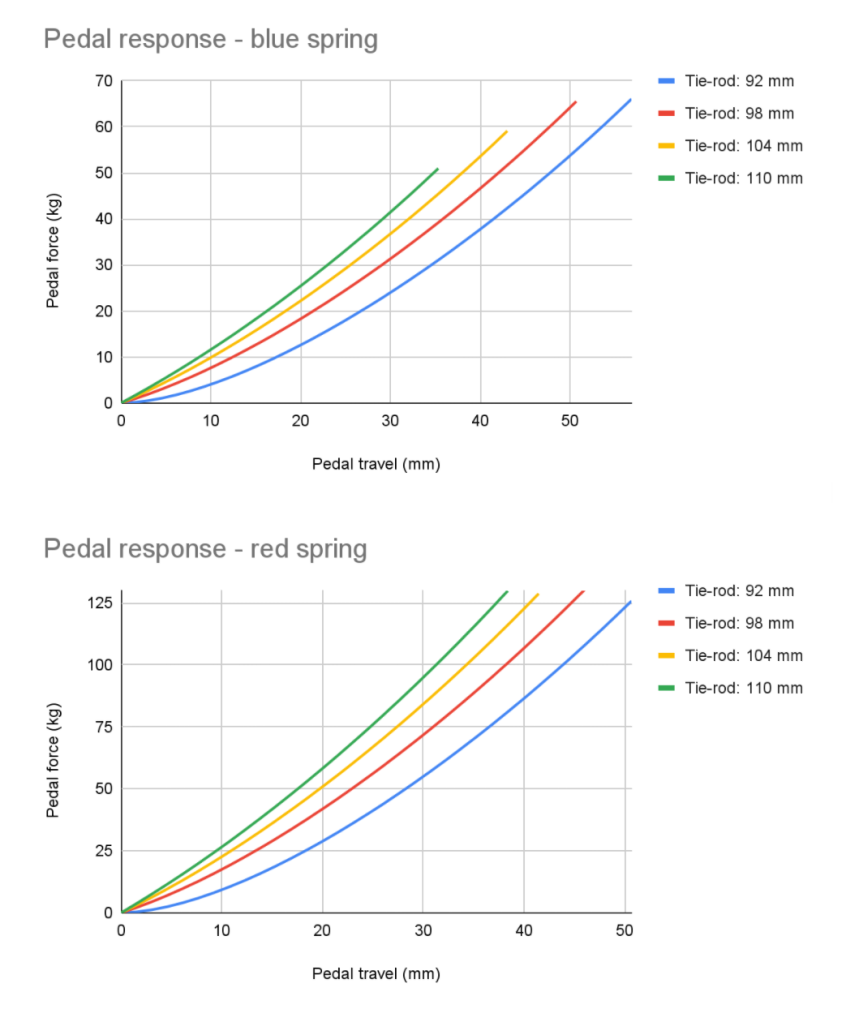
In its stock configuration, with the blue spring fitted, the brake pedal has a maximum pedal force of 65 kg, 16.2 degrees, or 49.6 mm of travel. This can be increased to 18.5 degrees with the shortest tie-rod setting.

With the red spring fitted, the maximum pedal force with stock settings is 130 kg, at 15 degrees and 46.1 mm of travel. Since the travel will decrease by 9% and the pedal force will increase also by 9% when the face is at the lowest height and vice versa, the maximum pedal force can be configured to reach 140 kg.

In its stock configuration, the middle of the pedal face has a height of 200 mm from the base mounting point, without a heel plate. The face itself has a length of 100 mm and is 70 mm wide.

Here are graphs for the pedal responses when adjusted for various tie-rod lengths – with the spring spacer stack chosen accordingly to adjust preload to zero* for each setting:

*When the tie-rod is lengthened, the length of the spring spacer stack must be increased with a different configuration of washers and spacers to eliminate free-play, which would otherwise be introduced. The opposite is true when shortening the tie-rod, unless additional preload is intended, despite a “softening” of the response curve.

Clutch:

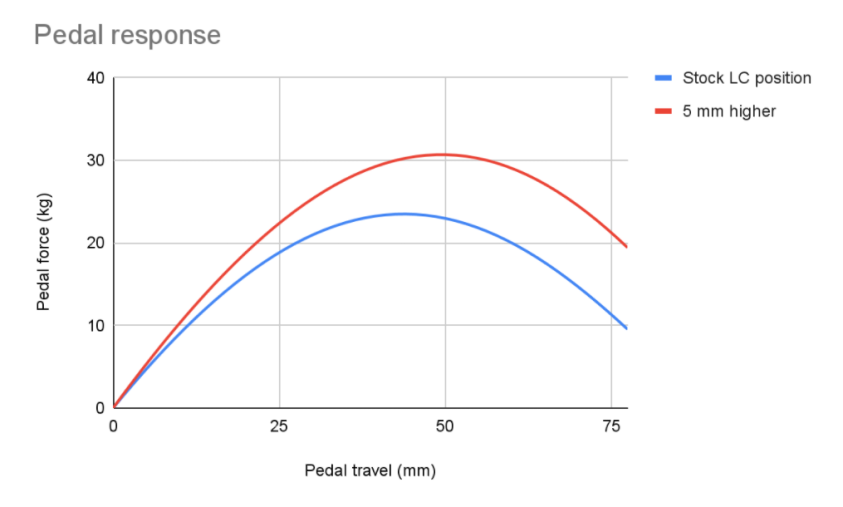
The clutch pedal has a maximum throw of 25.4 degrees, or 77.1 mm of travel, with the pedal face in the mid position. Peak pedal force is 23.5 kg in the stock configuration. When adjusted for minimum travel, the throw is just 12.4 degrees, or 37.8 mm. The travel will decrease by 9% and the pedal force will increase also by 9% when the face is at the minimum height and vice versa.

In its stock configuration, the middle of the pedal face has a height of 200 mm from the base mounting point, without a heel plate. The face itself has a length of 100 mm and is 55 mm wide.

Here’s a graph for the pedal response when adjusted for two load cell positions:

A great place to get assistance for VRS hardware is on our Discord channel under DIRECTFORCE PRO.
You can go to https://discord.com or https://discordapp.com to download Discord. You can also message us on Facebook.

And, for an in-depth video on how to adjust the pedals,  we’ve put together a step-by-step tutorial.  You can see it here:  https://www.youtube.com/watch?v=sUzUO3CbyGQ

Virtual Racing School and Coanda Simsport are once again raising the bar…

…with the introduction of the first ever professional sim racing team house.


With sim racing continuing to grow in both recognition and prize money among the wider esports and motorsports community, the competition is becoming even more intense. The idea of making sim racing a full time job for top drivers and streaming personalities has progressed well past the point of being a mere fantasy, it’s already happening.

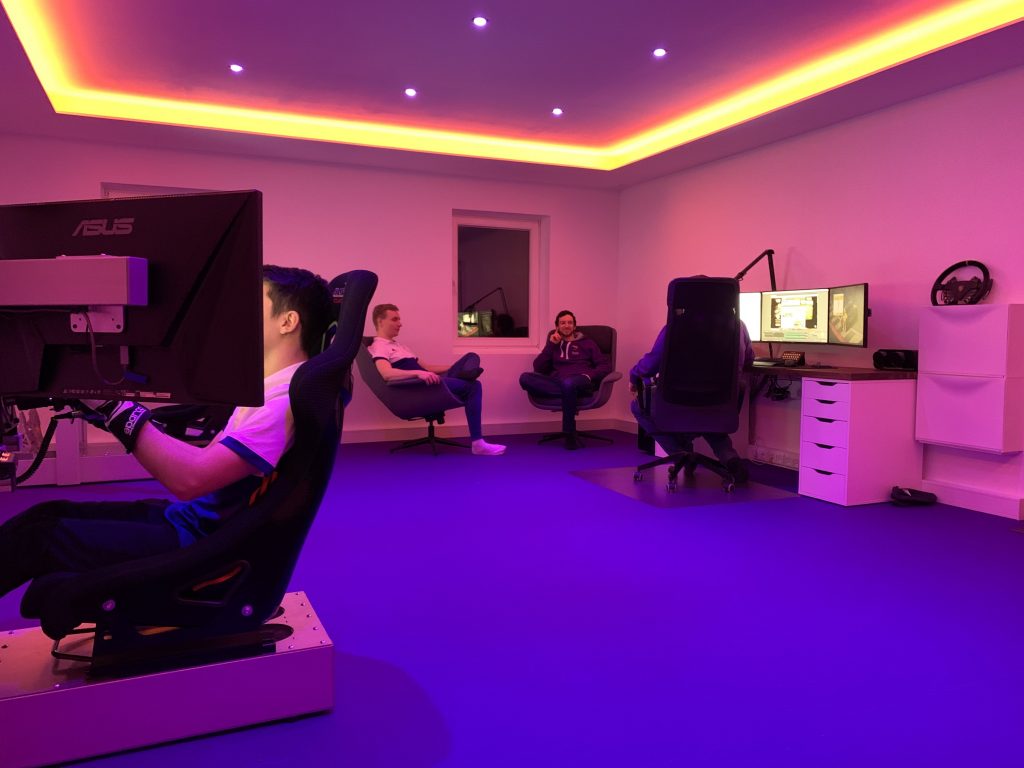
Carrying forward the momentum of their success throughout 2019 in multiple world championships, Coanda Simsport is looking to aim higher than ever before, starting with the introduction of an official team base in Germany. Half a year in the making, several prominent Coanda members from around the world have taken the leap to make sim racing, including Virtual Racing School (VRS) content creation and coaching their full time profession. Over the last few months they have worked tirelessly to construct a dedicated broadcasting room with several rigs kitted out with the latest VRS hardware, complete with a streaming race control centre.

The team members living in the house are drivers Josh Rogers, Mack Bakkum and David Williams, with others including Mitchell deJong, Martin Krönke and Jeremy Bouteloup already scheduled to visit throughout the year. Also a permanent resident is Philip Stamm who is working hard to make this project a success and is providing continuous support to the drivers. In addition to the fully detached streaming house, the property consists of a spacious living space with a small gym complete with sauna, and workshop for hardware prototype development, creating an optimum environment for continued success for the team and to help push sim racing forwards as a whole. The house is also opening up the ability to host events and guests for competitions, podcasts and in-person coaching.

Coanda is able to achieve this with the substantial support from its main partner Virtual Racing School. Their drivers will enter the 2020 world championship series in full VRS colours as teams Virtual Racing School and DirectForce Pro, with the first showing of the new liveries in the upcoming Sebring 12h race.

We look forward to some exciting times and to sharing more details about this project in the coming weeks. To get all the latest, subscribe and follow Coanda Simsport and Virtual Racing School on social media.

VRS DirectForce Pro Pedals – Development update


Shortly after this year’s SimRacing Expo at the Nurburgring, we published a blog post about how our latest prototype VRS DirectForce Pro direct drive wheel and pedals were received from our booth at the event. The feedback was extremely positive, and you can find that post here. As promised, in this post we will offer some insight behind the design of the VRS DirectForce Pro Pedals, while you wait for further news.

Our goal with the hardware in general has been as follows: To offer the best performance and functionality out there, without the ultra-premium price tag. We want as many sim racers as possible to enjoy the same hardware as the most hardcore users among us. The pedals are no exception to this, and a great deal of research was spent figuring out what it would take to create the best sim racing pedals available on the market. The bar in recent years has been set very high, so we had a good challenge ahead of us!

Ultimately, we can narrow down the key requirements to:

– Smooth, precise action
– No unintended free play or movement
– High adjustability
– Capable of handling large forces
– Hydraulic feel if desired
– Reliable and consistent response
– Minimal or zero maintenance, durability
– Wide compatibility
– Aesthetically attractive
– High strength-to-weight / size
– Unique design
– Fast order turnaround and availability

We feel like we’ve already achieved most of these, and time will tell how we do on the rest.

VRS DirectForce Pro Pedals

Let’s dive into the requirements more closely then. The first being smooth action. In order to deliver on this we’re using shielded and flanged ball bearings in all major pivot points, complete with tolerance ring mountings. This also allows us to hit several of our remaining requirements far more easily, as this eliminates any free play and unwanted movement aside from the desired axis of rotation. They are also maintenance free and extremely hard wearing, and should function well for many many years.

All other joints are PTFE lined with very tight tolerances, again requiring no maintenance (PTFE is essentially self-lubricating) and allowing for no unwanted movement and an ultra-smooth action.

In addition, we’re employing the use of load cells for all pedals. Load cells offer numerous advantages: accuracy, precision, repeatability, reliability, durability, and resistance to dust and dirt. Somewhat uniquely in the market, we are mounting the load cells directly in the pedal arms themselves. This helps to ensure that the force measured by load cells is linearly proportional to the force the driver is exerting on the pedal face. This also allows more room for other components while keeping the overall size nice and compact.

VRS DirectForce Pro Pedals - Brake Pedal

For the brake pedal, we’re also using a unique design, revolving around a metal coil spring for pedal travel response, rather than any rubber bumpers or bushings as are more commonly used in the market currently. Rubbers offer the progressive pedal feel expected from a brake pedal but have shortcomings in respect to maintainability, durability and precision. They are also known to become squeaky over time, yet lubricating them has a small effect on their response curve. Environmental conditions such as humidity and exposure to direct sunlight can impact the properties of rubber. Some drivers describe rubbers feeling “spongy” or “sticky” when trying to finely control pedal pressure. These small details may not be noticeable to the average sim racers but the pro drivers take note of such things (as we saw at the Expo). Finally, rubbers do not have a good durability record under heavy use like in sim racing centres. Knowing all of this, we decided early on that we would stay away from rubbers for the brake pedal and find a metal spring based solution instead.

The use of a coil spring however does present some challenges, namely that they typically provide a linear response, rather than the progressive ramp-up in force which is more typical for a real braking system. Non-linear coil springs do exist but we failed to find one that met our required dimensions, stiffness response and adjustability. We knew a non-linear response could be partially achieved from a linear spring by playing with geometry, but that in order to do so to our requirements we had to introduce an extra mechanism. We were able to achieve this with a special rotating cam assembly. An adjustable control rod allows the end user to easily change the force curve to their liking, specifically the rate of progression or initial force lead-in (more pronounced at the beginning of pedal travel) can be precisely adjusted as desired.

Those who prefer a softer initial brake pedal, with more travel, can enjoy the same pedals as those who might prefer a harder initial response. It’s worth mentioning that this relates to the shape of the force response, and isn’t to be confused with preload. Of course, preload will also be adjustable on all three pedals. Finally, we’ll also provide the option to choose between two different physical springs, to further expand the available pedal stiffnesses and ultimate peak forces. Speaking of which, in the softest configuration, you can expect a decent amount of travel from as little as 20kg, all the way up to 120kg of pedal force with the harder spring. All three pedals will have fully adjustable travel, stiffness, tilt angle and pedal height.

With regards to the clutch pedal, we’re mounting the load cell in an unusual orientation in order to achieve a regressive pedal feel akin to the feeling of a diaphragm spring giving way against a clutch pressure plate in a real car. All three pedals will utilise a custom cnc-machined aluminium spring support, complete with ball bearings for free rotation, that also acts as a bushing for the aligning rod inside the spring. This component allows us to reduce the complexity and size of the design for all three pedals, while ensuring the smoothest possible operation.

Many real world racecars utilise hydraulics for all three pedals, and we will be offering hydraulic dampers to emulate the feeling that this results in. Of course, there will be adjustability for these, and the exact damper design is still a work in progress, with our main aim being minimal free play / movement.

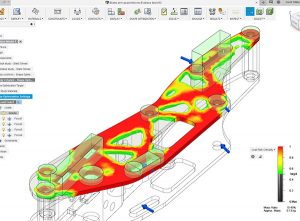
In order to ensure an efficient use of material that copes with the intense forces our pedals may be subjected to, we’ve employed the use of finite element analysis (FEA) and material simulation for our laser-cut and cnc-machined stainless steel parts. This has allowed us to optimise the shape of weight saving cutouts without compromising on strength and stiffness, all the while offering a functional but aesthetically pleasing minimalist appearance.

We understand that many users have unique and varied rigs or cockpits out there, and we’ve tried to consider various different mounting scenarios to ensure compatibility with existing mounting plates and offerings currently out there. Currently we don’t have a pedal plate or footrest of our own yet, but the pedals are very easy to mount to the popular 80/20 style aluminium profile, without a need for a foot / heel rest, and this is exactly how we had them mounted at the recent SimRacing Expo.

We’re more excited than ever to deliver our first units of VRS Directforce Pro Pedals to you all as soon as we can, and are working hard to progress to production as soon as possible. Until then, stay tuned for further updates! To get latest news on VRS DirectForce Pro, follow our Facebook page, or register to our hardware mailing list here.

P.S. For those of you who missed us at the Expo, you can check our pedals out in an interview we had with Leon from The Sim Channel over on youtube:

6.2: The truth about consistency

Sure, it’s all well and good being a driver capable of superfast laptimes, but what if your main competition has a slower pace over a single lap, yet can (for whatever reason) better maintain a faster average laptime over a race distance than you?

When most of us think about what it means to be consistent, we think about hitting our brake markers within a few metres, lap after lap. We imagine apexing in exactly the same spots in all corners, lap after lap. Ultimately, we think about setting the same laptimes to within a few tenths or even hundredths, lap after lap. But is this really what it means to be consistent?

I guess you could certainly call this a form of consistency, but I don’t believe it to be a very useful and achievable way to look at what is in reality actually a mostly different story.

I believe the key is not, as many will tell you, an ability to closely replicate the exact same inputs in every lap. While this may be an end result of being a consistent driver, simply being repeatable is NOT actually the true origin of what makes a top level driver consistent.

True consistency

True consistency comes from being adaptable. From being willing to make small adjustments lap after lap, either on-the-fly during a corner, or during the following lap. Simply sticking to an identical “routine” each lap, with no flexibility for adjusting brake points, turn-in points, and apexes may well result in short term consistency, but in the long term – over a stint for example – it’s unlikely to be effective.

Tyres wear, fuel burns off, traffic forces you offline, and even the track conditions evolve. The only way repeatability could ever be a reliable method for consistency, is if you were driving so far below the limit that the variables beyond your control never changed the response from your car. However, most of us wish to shape their driving over a single lap to run the car as close to the limit as possible, so we can set the best possible laptimes.

So what might happen to a driver who started a race, initially driving very close to the limit, with the goal of maintaining the same references, inputs, and ultimately laptimes as their “ideal” lap?

Well firstly, it’s likely that the track conditions at the start of the race don’t exactly match those during which the driver established their references and markers for the fastest possible laps in practice. It’s also highly likely that their tyres would quickly lose grip over the first few laps as the pressures increase and the compound settles. It’s also likely that the balance and handling of the car will change over the course of the race as the fuel burns off and a whole host of other variables come into play. Is it then realistic to expect the driver to maintain the same laptimes throughout the race? Instead, it wouldn’t be surprising to see some strong opening laps slowly and steadily deteriorate, with more frequent and more severe mistakes as time went on and no recovery in sight.

Being adaptable

So what does it mean to be adaptable? We know that the “limit”, for instance the fastest route through a series of corners in any given moment, isn’t a stationary target. It is however a physical target we can aim for, and subsequently assess how close we are to in each corner we drive. Think of the limit as your ultimate reference for shaping your driving.

The truth is, the closer you are to the limit, the easier it is to be consistent. If you’re constantly receiving various streams of feedback from the car which indicate a close proximity under or over the limit, it’s much easier to make continuous fine adjustments to your driving in an effort to zone in on the fastest possible laptimes throughout the entire race.

Consider asking an established fast driver, someone known for speed and consistency to deliberately drive exactly five seconds off the pace of their personal best in strictly controlled, static track conditions. To make things more representative, they’re not given any form of live feedback to indicate laptimes until after they’ve finished the stint.

How do you think they’d perform? Would they at the very least be able to repeat laptimes to within a few tenths of a second like they manage with ease when permitted to drive as fast as possible?

The answer is almost definitely no, not a chance! Instead you’ll see huge variation, not only in overall laptimes, but also in brake points, apexes, pedal inputs, lines etc.

When you drive so far below the limit that you never experience any signs of being near to or exceeding it, you lose your ultimate reference for driving fast laptimes. Without that, consistency is an infinitely more difficult goal to achieve.

Developing a feel for the limit

Fortunately, there are many feedback cues from which we can use to gauge our proximity to the limit at any given moment when driving. Of course, in a simulator, we lack a feeling for physical movement and a general seat-of-the-pants sense for the limit like we would have to an extent in a real car.

However, it’s still possible to sense the limit even in a simulator through a combination of visual, aural and even tactile cues through force-feedback.

Firstly, let’s expand on what it really means to drive at the limit. We know that you have to drive at the limit in order to navigate a car through a series of corners as fast as physically possible, so in that sense the limit is the fastest possible speed on the most effective racing line. The maximum speed in a corner is dictated by the total grip available from the tyres for a given vehicle mass as well as the radius of racing line used in that moment. As the driver, it’s our job to try and use as much of the grip available at all times in order to follow the optimal racing line at the highest speed with the inputs available to us.

Your eyes receive information relaying the position of the car in physical space around the track at all times. It’s this visual feedback from which most of your driving input revolves around. When the car is running wide or understeering, you sense less rotation in the form of reduced horizontal movement from the circuit outside your car across your display device. In a similar vein, if you’re oversteering you sense more rotational movement. Both these things are examples of being at or exceeding the limit. In your mind’s eye you should have developed visualisation for where the car should be at all times for the optimum racing line, and you can compare this to what your eyes actually see at any point during the lap.

In addition to the obvious visual feedback the sim provides, it’s also possible to sense how close you are to the limit of grip by listening to the sound of the tyres. Tyres produce their maximum grip when sliding slightly (typically 5-10% slip), and begin to produce an audible screeching noise when doing so. If you can only hear a subtle scrubbing sound, it usually means there’s more grip still available, while if they’re excessively screeching, you’ve typically exceeded maximum grip which eventually results in an overheated tyre with less grip.

Finally, modern force-feedback wheels – especially direct drive – offer high fidelity feedback representing the forces at the steering column of the car. This provides both a centering force, useful for catching oversteer when quick countersteering is required, and also steering weight, effectively corresponding to the load and grip through both front tyres. When turning into a corner, FFB load increases up until maximum grip where it peaks, making it easier to sense how hard to steer to exploit the most grip without overworking the tyres more than necessary which would ultimately result in slower laptimes.

Putting it into practice

Firstly, when approaching any given corner, you should always have a plan for how to best execute your driving at or near the limit.

This plan can be formed from any one of many possible key thoughts you may need, and could include:

  • A braking marker or reference you wish to brake near to
  • An ideal apex point, or any other physical reference on-track relating to your driving inputs
  • An adjustment to your “typical” approach to the corner, for example “turn-in later”
  • A specific technique you wish to emphasize, such as “brake hard and bleed off slowly” or “be patient on the throttle”

Of course, the best way to come up with an appropriate plan is to use some form of telemetry or driving analysis such as is offered on VRS to identify opportunities for improvement in comparison to a faster lap. If you’re looking for personal feedback or guidance, it might be worthwhile to request some coaching from any of our world class coaches to help identify areas for improvement along with any questions you may have.

With repeated use of tools such as the driving analyser over time, you should find that some of the opportunities you’d previously required the analyser to spot are now observable to you in the moment, while actually driving the car. Familiar patterns should emerge more clearly as your awareness builds and develops. If you’ve spent enough time learning what it is you’re supposed to look for, this almost becomes second nature to you. It becomes internalised.

We know that the secret to true consistency is being adaptable. Initially this might be identifying a small “mistake”, such as running wide of the apex due to insufficient trail braking and consciously reminding yourself to trail brake more on the following lap to allow you to carry the same entry speed but with improved rotation, hitting the apex and ultimately improving your performance through the corner in comparison to your previous effort

The best drivers in the world do this extremely well, and it is the primary reason why they’re so consistent. By being aware of and constantly monitoring their driving on the fly, in the moment, they’re often able to make split second adjustments to their driving to refocus themselves and their car back onto the limit. One such example would be responding to having a tyre lock up under braking by releasing the pedal slightly, and adjusting their line for a later apex. They may lose time in the middle of the corner, but it’s possible for a better exit to result which ultimately limits the damage of their error.

During a stint, this needs to be your mindset for each and every corner of each and every lap. You must monitor your driving, and in particular your proximity to the limit. You must be willing to exceed the limit at times – especially early on with practice – in order to experience it as your reference for the fastest possible lap as often as possible. From there you can then reduce the margin of error either under or over the limit in any given moment to ultimately hone in on the elusive “perfect” lap. When you’re willing to constantly monitor and adapt your driving in this way, changing grip levels and conditions during your stint will prove routine for you to deal with, and allow you to extract the most from the car on any given day, in any given circumstance.
6.1: “I will never be as fast as those guys”

This sentiment was recently shared by a VRS user. They are not alone in feeling this way! So we decided it’s worthwhile to blog about it. Here’s the quote that many will probably relate to:
“Well, setup still helps extract the most you can. Not everybody is capable of being as good of a driver. It’s just a fact of life that some of us can drive better than others. I know I will never be as fast as those guys, no matter how much I practice, no matter how much I learn to refine my technique. I’m still limited by my own innate abilities. The fact that my own limitations are preventing me from driving as quickly and consistently as other people doesn’t mean I should stop bothering to tweak the car to extract more performance from it and make it behave how I would prefer it to behave. So, yes, there is a lot of potential in improving your own driving. But that doesn’t make the car irrelevant. As much as I can improve my own driving techniques, I’m still limited by the fact that I can’t hit the braking point at exactly 53.5 m every single time within a few centimeters. Nor can I execute that brake pedal movement as smoothly or as accurately as they can. So no matter how much I know I should be braking at that point, my own error margin dictates that I try to brake at the 55 m mark as closely as I can, because braking at 53.5 m results in an error too often. And the error is more costly than braking slightly earlier, and I can consistently do that practically every time. Just as a made-up example with made up numbers.”

“So, I’ll continue trying to drive as well as I can, and improve anything I can attempt to improve, while also trying to set the car up as well as I can for how I drive the thing. That’s all any of us can do.”

“Different driving styles often mean different setup choice, too, don’t forget.”

I agree with most of the above, and I certainly agree that we shouldn’t assume the data pack setups are perfect because they aren’t. It’s also true that each of us are at a different level in terms of skill and driving style, and therefore sometimes a tweaked setup can be faster for different drivers.

However!

I don’t agree that you have a lesser innate ability than someone who is currently faster than you. It’s certainly possible that is true but how could you ever know? Having an open mind about the potential of your own abilities is a huge factor in really taking your driving to the next level. The moment you resign yourself to believing you’ll “never” reach that level is when you guarantee it being the case.

Is Person X capable of reaching the level of Martin Krönke? The popular answer is of course “no, don’t be ridiculous”. But how could anyone ever know that? Nobody can know that. If Person X believes the answer is no, then they’re 100% guaranteed to fail. They might improve a little, but they’re certainly not going to reach their maximum potential. None of us know what our maximum potential is, and that’s why it’s fundamental to anyone who wants to reach the top level in any sport that they are open to the possibility that they have what it takes to be the best.

The brain is an insanely complex thing, it’s impossible to know what its upper limit for learning is. Some of us learn slowly, some of us learn quickly, but very very few people ever reach their maximum potential, and a large reason for that is because it’s a long and difficult process, which requires 1000’s of hours of hard work with countless challenges and setbacks to overcome.

This is precisely why the popular answer to the earlier question is “no, don’t be ridiculous”. Improving your skill can be a difficult, painful process and most people will quit along the way. It’s much easier to sit back and make excuses for yourself, and convince yourself that you were just wasting your time because you’d never ever reach that level. So when someone comes out and makes a bold claim about where they want to be in a few years time, most of us will ridicule that person, whom we consider to be on a similar level as us in order to feel better about ourselves and our own abilities.

I would personally say that the most important thing someone can do is to have the assumption that they possess the fundamental, innate talent and ability inside themselves waiting to be fully exploited. At the very least, this is something that a person should be open to the possibility of.

I believe there are also many misconceptions about what makes a faster driver faster. You may believe it’s because they have a better ability to be accurate and repeatable with their inputs, and brake “at exactly 53.5 m every single time within a few centimeters”. This is simply not true, at least for the most part.

If you did a study on a driver who had done 200 laps of practice and was one second off the pace of another driver who had done 100 laps, it’s extremely likely that the first driver would be more consistent and accurate with each subsequent lap they drive. After all, they’ve had more laps to cement their “muscle memory” for how to drive the lap, making it easier to repeat. The first driver then isn’t slower because they’re less able to repeatedly hit the same braking point lap after lap. Instead, they’re slower because they’re consistently driving less effective lines, hitting sub-optimal brake points, and repeating bad driving techniques, unaware of what they might be doing wrong.

The fastest drivers in the world aren’t perfect. They’re certainly not able to brake “at exactly 53.5 m every single time within a few centimeters”. No one can. So what separates them from everyone else? The single biggest thing which separates the best from the rest is to identify something which can be performed better.

When Martin Krönke drives at a circuit, there are two separate entities at play in his brain. His subconscious mind drives the car. This entity requires very little energy and resource, and has very fast reaction speeds. His conscious mind on the other hand, which has access to all the knowledge and experience he has accumulated over many years, is much slower at functioning but performs an observational, critical role. His conscious mind is trying to spot even the tiniest mistakes which may be being made while driving on track. If a mistake or improvement opportunity is identified, his conscious mind communicates this to his subconscious, and makes sure that a corrective action is implemented next time around. Not a single lap passes by for the likes of Martin where he hasn’t noticed something he could have improved. Anyone who tells you that they drove a perfect lap is either lying or deluded.

Reaching this level takes years of effort. You may not at first be aware of a mistake or improvement opportunity on track, while driving. This is where using the driving analyser out of the car on Virtual Racing School comes in. By comparing your driving against that of a coach driven data pack, you can easily identify areas where you can improve. The more deliberate, methodical analysis you do of your own driving in comparison to the best drivers, the more patterns you’ll recognise, and the greater your collection of knowledge will be for identifying mistakes as they happen while driving on circuit.

Up to you

The software we build and the content we create are merely tools to help you on your path. The most important ingredient is you!

3.8: Practising efficiently: Setting targets & tracking performance

Welcome to the final segment in this four-part series on how to practice efficiently. In this article we will look at the benefits of setting targets for yourself and monitoring your performance.
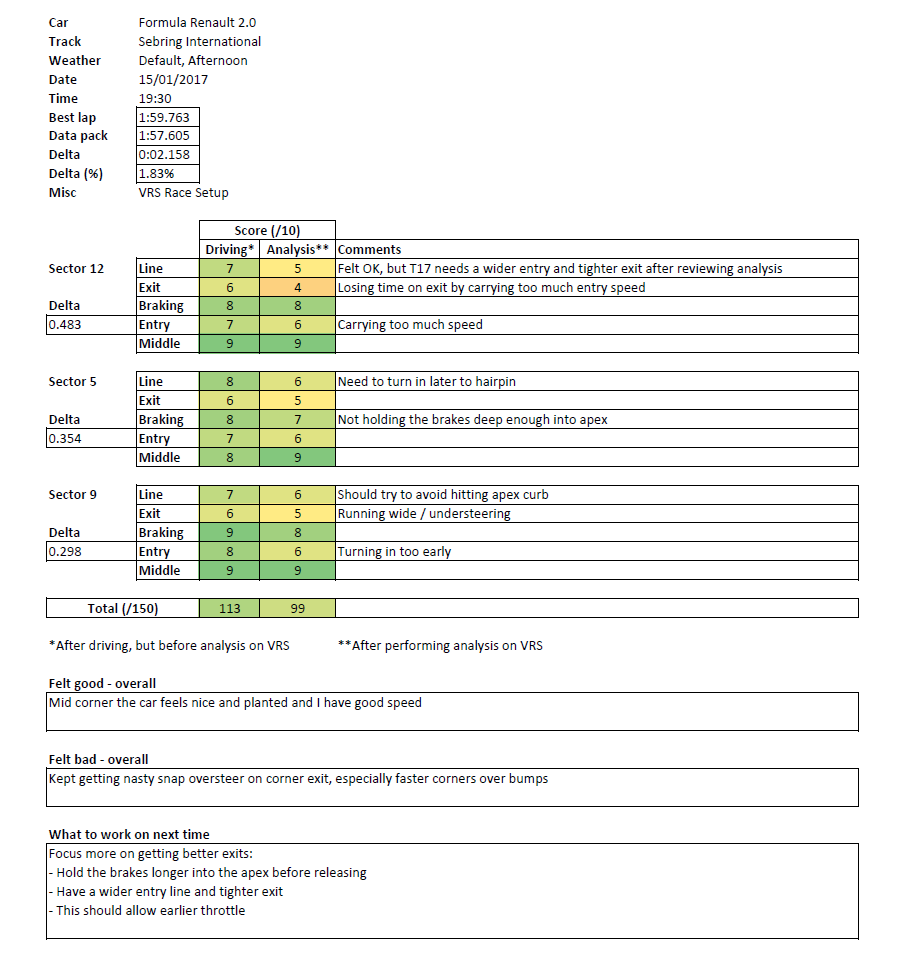
We’ve already discussed the importance of self-analysis in detail, and it’s an excellent idea to make notes during your practice sessions, so you don’t forget things and can give yourself clearly defined targets to work towards. Ideally you should be keeping a log of your progress in various areas, be it braking, concentration, smoothness etc. Perhaps having a rating from 1-10 for how satisfied you are in each area with some optional comments would make sense. This way you could also track your daily / weekly / monthly progress. You could even make reference to specific telemetry session laps and replays you may have saved.

Beginners vs advanced drivers

The types of goals and targets you should be giving yourself will vary based on your current experience and skill level. For beginner and intermediate level drivers, your focus should be on more of a driving fundamentals, objective approach. This means choosing categories such as braking points, braking consistency, apex speed, exit speed, line, for which to evaluate your performance.

As your driving becomes more advanced through experience with self-evaluation and analysis, the aforementioned categories should no longer be something you have to consciously focus on in order to understand where you can reduce your laptime. Your focus should instead shift to more abstract goals and targets, such as your breathing, concentration level and vision. We will cover these specific topics in future articles.

Your first self-assessment

Let’s start from the beginning. Before you’ve carried out any kind of analysis on your driving, it is not sensible to give yourself any targets. It is, however, a good idea to have an evaluation form with a list of performance criteria for which you can rate yourself on after your session. We have provided a template for you:

Self-assessment

Here we have divided up the driving components for each of the top three auto-generated sectors from VRS, which usually represents a single corner per sector. They are ordered to match the display of opportunities vs target on VRS, where the first one presents the biggest time opportunity to make up and so on.

Each component has a score out of 10 which you give yourself, based on how the session felt. Next to that is the same score, but this time it’s based on what you’ve seen in your driving having carried out some analysis using the tools on VRS. Additionally, each criterion has a field for entering any comments you feel are worth mentioning.

From this information, you should be able to narrow down a few targets to give yourself to work on for your next session, as shown in the example. We recommend keeping this list fairly short so you’re not overloading your brain with thoughts the next time you drive. In the example provided I’ve actually chosen just one target to focus on, which is to have a better exit, and I’ve broken it down into some important and related points.

The immediate benefits of documenting your practice like this are that it provides you with a clearer understanding for where you’re performing badly, and what you should be concentrating your efforts on. Any time you feel like you’re getting lost, or driving without intention, you can just refer yourself back to the notes you’ve given yourself and get back on track.

This document is just an example and a recommendation. By all means feel free to come up with your own version. More advanced drivers may find more value in scoring themselves with different or additional criteria, such as breathing or concentration as touched upon earlier. You might perhaps wish to create a new document for evaluating your performance over a full week, or even a month if you feel like you’ll get better value from doing so.

Tracking progress

Another benefit from recording and logging your performance, especially over longer periods for which you’ve completed many sessions and carried out many self-evaluations, is the ability to track your long term progress in great detail.

A good way of achieving this is with an additional, separate log, or spreadsheet. Input your scores and time deltas from each session. By tracking your performance over time, you are able to see the exact rate of improvement in specific areas. You will easily be able to identify trends without having to make guesses. Perhaps your corner exit scores are still showing continuous improvement, but your braking scores have been stagnant and need some more work?

If you find that you’ve plateaued in a specific area and you’re still not happy with your performance, it is often a good idea to shift your focus away from that and onto something else. Relentlessly working on the same thing without seeing any further gains is sure to ruin your motivation and may even push you towards giving up altogether.

You can also log your race performances in the same way, but include additional variables which may influence your scoring, such as weather, time of day, strength of field. Races also provide many other stats on which to measure yourself including finishing position, incident count, iRating change, SR change. It may even be beneficial to have separate weekly, monthly and even yearly logs which may all identify different patterns.

Up to you

Not everyone will benefit from tracking their driving data in such detail. Some may have limited time available, with other priorities, while others simply want to have fun without expectations. This is perfectly OK! If, however, you are someone who is determined to improve and are willing to go the extra mile to succeed, closely monitoring your performance so you know how best to take the most productive action going forward is sure to help you!

3.7: Practising efficiently: Experimentation

In the previous article, we discussed how to analyse your driving. We also discussed how, as you become more experienced with driving and analysis, your intuition for what you should and shouldn’t do will develop. This time, we’ll focus on experimentation.

Experimentation is a great method for unlocking potential improvements, because while you may reach a very high level of consistency in your driving, you may also be unaware of further opportunities to improve your laptimes.

Try new lines, new braking points, try being more aggressive with the wheel. It really doesn’t matter what you change, as long as you’re conscious of doing it, and are paying close attention to the effect it has. The result can of course be seen in telemetry, but if you’re using the live delta in the sim (tab key to toggle), you can have instant feedback on how much time you’re gaining / losing versus your best lap or sector up until that point.

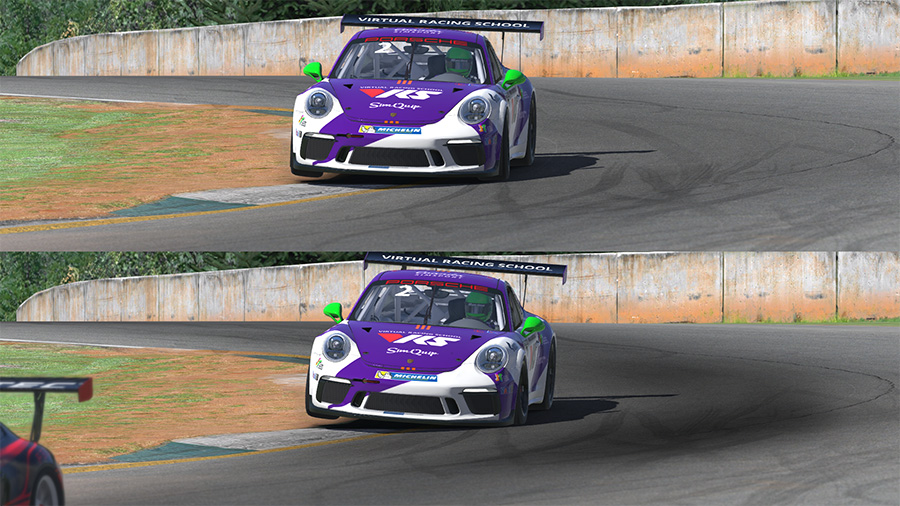
Let’s take a look at an example of two different laps in the HPD driven by myself at Le Mans, driven in the same practice session. We’re looking at the first chicane along the Mulsanne straight. The blue trace is an early lap, and the purple trace was driven later, and is 0.193 seconds faster through this sector.

Tele Le Mans
We can see on the bottom chart that in the early lap I was choosing to brake very late, optimising my entry into this complex. For several laps I continued like this, until my laptimes started to plateau. It wasn’t until I decided to experiment with braking earlier and a different line, that I realised how much time I was losing down the following straight by not prioritising my exit.

Line Le Mans 1
By braking earlier I was losing a tenth on entry, but I was able to carry a tighter line through the first half of the chicane, therefore opening up the second half and allowing a wider radius through the exit with an earlier throttle application. Even though it originally felt like I was optimising this corner by braking late, it actually proved quicker overall to brake earlier, sacrificing speed into the corner, then gaining it back on the long straight that follows.

Weather conditions

iRacing allows for variation in the weather conditions (temperature, humidity, wind, etc.) for each session you drive in. In the respective series schedule you can see the time of day (morning / afternoon / late afternoon) used for each week, and our datapacks on VRS match this with the addition of always running with default weather settings. When testing offline, it’s possible to control the precise conditions which you wish to use, and it’s highly recommended to stick to the same weather for each practice session you do if possible. This way you can be sure when you’re gaining or losing time between sessions that it’s because of changes in your driving or setup, not due to weather conditions.


With this said, the weather for the majority of series in iRacing is variable, and it can therefore be useful to practise in different conditions to prepare yourself for whatever is thrown your way, especially if you feel you’ve reached your peak in specific weather. Just remember to be aware of the influence this can have on the speed and handling of the car. Colder temperatures are usually faster, with hotter temperatures reducing grip and making it easier to reach the limit of the tyres. The weather of your session is also logged in the VRS software.

You can turn this into a deliberate exercise to help develop a better feel for the grip available going forward. Ultimately, this is what can prepare people to drive at their maximum whatever race weather they encounter. It’s common to first attempt the same driving in different weather conditions, using your previous references and markers. Going from default weather to a hotter track may suddenly feel very difficult as the car can no longer decelerate enough from the same braking point. On the other hand, you may find you can brake at the same point and achieve the same laptimes, which would mean you were driving below the limit in default weather. Similarly, switching to colder weather doesn’t guarantee faster laptimes if you’re not exploiting the extra grip. However, once your driving style is adjusted, you can then re-attempt this on a warmer track and discover laptime in areas you weren’t previously exploiting fully.

It’s worth noting that track temperature affects different cars differently, and doesn’t just affect grip levels. The balance of the car can also change, for instance more understeer on corner entry. Wind speed and direction, along with many other weather variables alter how fast you arrive at various braking zones and can hinder or assist cornering in specific directions. Learning to adapt to these changes will improve your overall ability as a driver at getting the most from the car at any given moment.

Setup experimentation

The same principle applies to setups as well. You can all the knowledge in the world about vehicle dynamics, but unless you try things out, you’ll never produce the most optimised setups. Of course having the theory is important and can help you make educated guesses, but the most productive method for setup creation is still trial and error. Once you feel you can lap as consistently as possible, try making one or two setup adjustments. Avoid making too many changes at once, as this can make it difficult to understand which adjustment is producing the biggest handling or performance change. Observe the effects of each change, before experimenting on new setup parameters.

Experimentation can be used effectively to learn and understand the result each adjustment has on vehicle handling and performance for a specific car. Initially it’s a good idea to explore a full range of settings, especially in an unfamiliar car. Once you’ve gained this base-level knowledge, you can then go about experimenting with more intelligent prediction and focus, with the goal of not only extracting the most performance for a particular circuit, but also making the car behave to your personal preference. Without first putting in the effort to understand each adjustment on its own, it’s much harder to build setups in the future without wasting a large amount of time essentially making guesses in the dark.

Save setups regularly; use new names if you wish to retain previous versions, and make notes! iRacing provides a note taking page for each setup you produce, so take advantage of it. VRS also provides the ability to store setups for each stint you drive on the online app, and also highlight the differences between them.

Up to you

Next time you head out on track to practise, make sure you allocate some time to analyse your driving, before attempting to apply a slightly altered approach based on what you may or may not have observed!

We’ll be back shortly with 3.8: Practising efficiently: Setting targets & tracking performance.

3.6: Practising efficiently: Analysing

video-analyserIn the previous article, 3.5: Self-analysis, we highlighted the importance of allocating practice time for analysis and critical reflection, rather than just spending all your time mindlessly driving on track. In this article, we focus on the methods you can use.

Prioritising your focus

Finding the optimal racing line on the track is usually your first priority. You should address each corner or sequence on it’s own, unless it’s influenced by another in which case you should review the sequence as one. An example of this are the Esses at Suzuka.

When studying telemetry or replays, the priority for speed should be on the exit of the corner, then the entry, and finally mid-corner. First optimise your exit, because most time can be gained here, not just in the corner but also during a full throttle section (such as a long straight) that follows. If you’ve done that, analyse your entry, and finally your mid-corner performance. We rank mid-corner as the lowest priority, because you spend the least amount of time in this phase, and often it will benefit your overall laptime to sacrifice mid-corner speed for a faster entry and exit.

Replays

iRacing provides a versatile replay system that can be used to analyse yourself as well as faster drivers. It’s very difficult (especially as a beginner) to memorise your driving with reasonable accuracy. The replay system allows you to rewind to any moment, or any lap. It also allows fine control over playback speed, and a huge variety of cameras and viewpoints. This essentially allows you to review your driving from a third person perspective, from outside the car, so you can better observe what you’ve been doing.

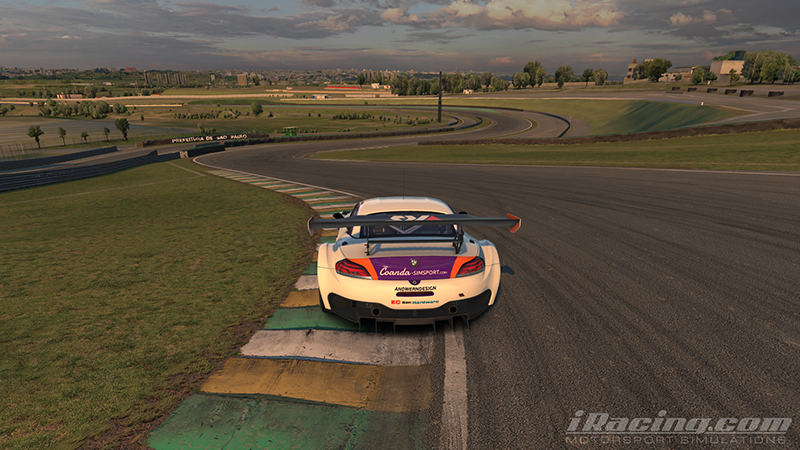
Making use of the different viewpoints is useful. For instance, switch to the chase camera to better understand the braking point relative to a marker on circuit, or see exactly how much curb you’ve used at the apex. It’s also helpful to slow down corners to observe in finer detail what happens very quickly in real-time. While you do this, you can still see all your own inputs, and you can then observe the response from your car in order to understand how effective your driving style is, and spot opportunities for improvement. Perhaps you’ve realised you’re turning in too aggressively which is provoking oversteer. Or, maybe you’ve made a more obvious mistake and simply wish to understand how your inputs may have caused it.

chase

In addition, the simulation allows for the cutting and saving of replays to your computer, making it possible to save and load a lap from a faster driver, who may have been using a different line or braking point to achieve better laptimes.

Telemetry

While the replay system is great, it has many limitations in comparison with telemetry, which can reveal much more information for analysis that your eyes would otherwise miss. For this purpose, telemetry uses live input and vast onboard sensor data from the car which is then displayed through the use of charts and other graphics. It also allows data from two separate laps to be compared, and their differences to be analysed in detail.

While there are many telemetry applications available for use today, most are unintuitive and complicated to use. The VRS software is easy to use and entirely browser-based, and comes with automated logging. Within VRS, the differences between two laps are highlighted in terms of racing line, driving speed and driving inputs, even those differences that would otherwise be impossible to discern from a replay. In addition, with the VRS video analyzer you can look at telemetry and a replay at the same time, in-sync, giving you a visual reference for whatever trace you’re analysing.

Using telemetry for efficient analysis: A case study

Racing line

The driven line is a result of not just steering input, but also braking, throttle and even gear selection. When it comes to telemetry analysis, we shouldn’t isolate one input trace without looking at the others.

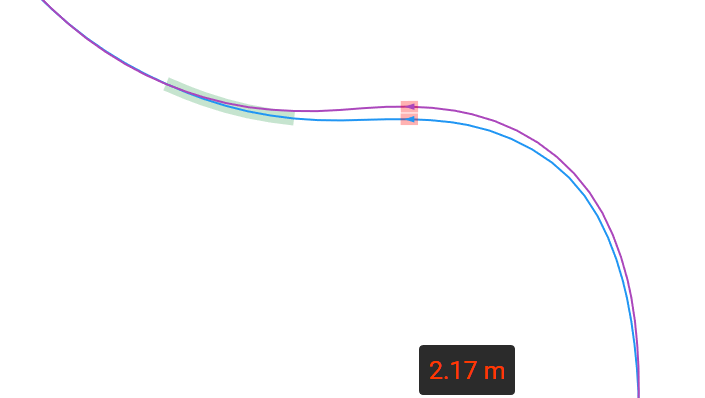
With that said, let’s have a look at an example in the VRS software. I’ve chosen to compare a student’s lap with the best lap from the Blancpain Sprint Series data pack at Circuit Gilles Villeneuve, with the Audi R8 GT3. We’ll be focussing on corners six and seven: The sequence known as Pont de la Concorde.

The data for both laps is as follows (data pack is the blue trace, while the student’s is purple).

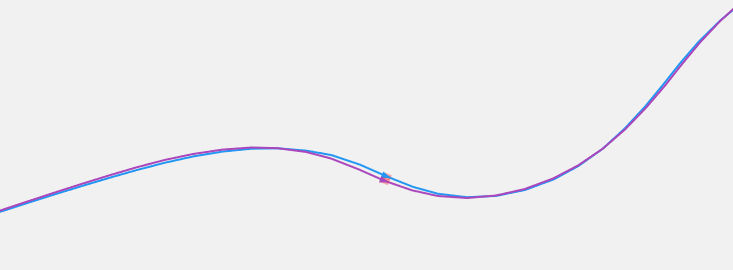
line-montreal

While the entrance, initially, is similar, we can see that the student runs much deeper in-between the two corners – there is a 2.17 metre distance between the two lines at the cursor.

Exit

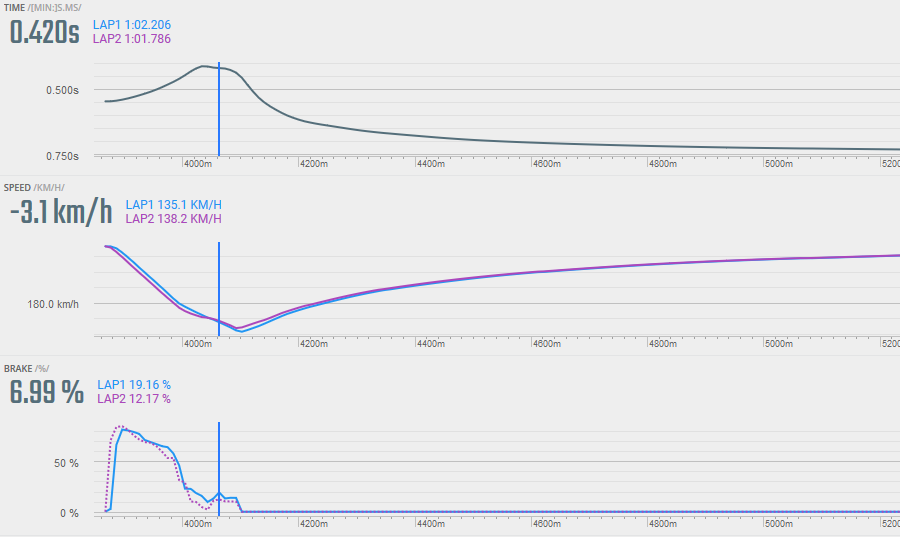
If we look at the time delta (upper graph below), it’s possible to see that most of the time is lost through the apex and exit of the next corner. We can also see why this is the case by looking at the speed traces (lower graph below). The student has a drop in speed into the apex of turn 7, which is carried through to the exit (circled in red).

delta

When we look at the throttle and brake traces below (the dark red line is the data pack), we can see that the student has a much bigger lift (for a distance of 27 metres on track), which results in the loss of speed on the exit. This lift is the result of running wide before turn seven, requiring a tighter radius (see racing line) in the green shaded area, and therefore a drop in speed is necessary.

pedals

Entry

We have to look at the entry to turn six if we want to fully understand why the student has run too deep before turn seven. Initially the coach actually brakes later than the student, and gains a small advantage. Near the end of the braking zone however, the student bleeds off the brakes much more, briefly regaining some of the lost advantage into the corner.

Mid-Corner

As a result of bleeding off the brakes more than the coach, the student actually carries more speed into the corner, and it’s precisely this which causes them to run much deeper mid-corner, resulting in the time loss as explained earlier. It would pay off here to sacrifice some mid-corner speed at the apex, get on throttle sooner and take a line better suited for a faster exit.

Monitoring yourself while driving

As you spend more time out of the car studying replays and telemetry, you’ll begin to build an intuition for how your inputs on track relate to what you see when you carry out analysis. For example, if you’ve previously discovered that you’re losing time against a data pack as a result of braking too late, you may have changed your braking reference so you avoid losing time by braking a little earlier. It’s not hard to imagine that you’d now have a better awareness while driving for when you’ve braked too late and to be able to predict afterward how that would have looked in telemetry.

Over repeated sessions of driving-analysis-driving-analysis, you’ll become better at building this self-awareness for how your inputs on track affect your speed, lines and ultimately laptime, without needing to keep referring to telemetry for clarification. The best sim-racers in the world drive mostly at a subconscious level, which frees up their conscious mind to perform in-the-moment analysis as they drive, to which their subconscious can respond with any necessary corrections almost immediately.

iRacing also features a live delta bar on-screen which can be toggled while driving. This gives you immediate feedback on how much behind or ahead of your reference lap (which can be a sector by sector optimal or best continuous lap) you are in the present moment. This is a very useful form of live telemetry which can further enhance your ability to self-analyse in-the-moment.

delta-display

Up to you

Be sure to load datapack telemetry on the VRS app if it exists for the car / track combo you wish to race (if not, you can book a coaching session, too). Compare your own driving to that of one of our coaches. You’ll find areas where you’re losing out and you may even find things you’re doing better! Otherwise, compare your slow and fast laps against each other to learn from your own driving.

We’ll be back with 3.7 shortly!

3.5: Practising efficiently: Self-analysis

aaaIn this four-part series, we shall take an in-depth look at how to practise your sim-racing with the best possible time and energy efficiency. In this first article, we’ll be looking at self-analysis and reflection.

In today’s world most of us lead busy lives, and as such, time and energy are at a premium and become valuable resources. It’s therefore very important that we practise with the highest efficiency so we’re not wasting our time, and the practice we do is helping us progress as much as possible. This philosophy still applies even if you in fact do have ample free time, as seeing visible progress helps you stay motivated.

With this in mind, it’s important to recognise that practice shouldn’t consist entirely of driving, but should instead be enriched with self-analysis and reflection.

Self-analysis

While track time is essential, brainlessly driving around a circuit would not be productive. An example of self-analysis is studying telemetry in the VRS software, such as comparing your braking points against a teammate. Another example is studying a replay, looking back at your own driving to spot mistakes, or looking at laps from faster drivers to see how their lines are different. Self-analysis also includes identifying opportunities for setup improvements, or even having an awareness to monitor your own driving as you’re driving the car.

As you become more aware of what you’re doing wrong on track, you’ll notice more and more opportunities for improvement in your driving. Therefore, review what you’re doing and give yourself well defined targets to work towards. If you’re not doing this, it’s very easy to fall into a comfortable pattern of driving with time ticking and laps accumulating, possibly cementing bad habits such as bad techniques, references, lines and ultimately slow lap times. These will only more difficult to unlearn later on.

The best sim-racers on the planet never simply drive around a circuit aimlessly and without any awareness for what they’re doing. They constantly monitor themselves at an almost third person perspective, while their subconscious brain drives the car. Any mistakes or opportunities for improvement are immediately recognised and consciously acted upon, in order to either limit the damage from an error (no matter how small), or to shave off some more lap time next time by.

This self-awareness takes years to develop, and for the beginner it’s necessary to follow more deliberate methods of analysis, often outside of the car with telemetry before this intuitive sense of awareness develops. Even at an expert level, it’s important to look at telemetry to confirm or disprove what you believe is happening to your car and laptime.

The ideal ratio between driving and analysing

There isn’t a rule for this as it will vary from person to person, changing with different levels of skill, experience and familiarity with the current car and track combination. For a beginner we’d recommend a greater focus on analysis, as it’s important to get the fundamentals correct as early as possible. A good ratio would be to spend a third of your time analysing.

A more experienced driver might be more productive having a greater proportion of time spent doing laps, since they have extra mental capacity available for on-track analysis while driving, and they can often accurately predict what they might see in telemetry as a result of experience with it from previous sessions of analysis. For them, a reasonable ratio may be ninety percent of the time on track and ten percent of time spent on analysis out of the car.

Of course, we don’t recommend getting hung up on sticking to such a precise target. The key here is the importance of practising efficiently and being aware of what you do, more than just doing laps around the circuit, killing time. The rate of improvement should play a strong role here though. If you’re still improving quickly, finding decent amounts of time on track while driving, then it makes sense to continue doing that. If on the other hand, your performance has plateaued – even if this happens early on – it then makes more sense to review things and dive into telemetry, your replay files or compare yourself against VRS datapacks.

Scheduling practice

Back in section 2.3: Practising, we looked at how best to schedule your practice, and how it’s optimal to practise regularly, but to avoid excessively long sessions. It’s best to have some analysis in each session, after you’ve been in the car. It’s then a good idea to go straight back into the car to make practical sense of any targets for improvement you’ve set for yourself, and to put the things you’ve learned into practice.

Up to you

Try to cement this method of practising, and create a habit out of doing so. In the next article, we go more in-depth on how to analyse.

3.4: Fundamentals: Braking technique

Having learned about the traction circle, the optimal racing line, and car control, the next chapter in this series looks at braking technique. Your brakes serve two purposes. The first is pretty obvious: to slow the car down. The second is more subtle, which is that brakes offer a method of controlling weight transfer and balance from corner entry to apex.

Straight line threshold braking
To brake as late as possible, you want to reduce the time spent slowing the car to a minimum. Achieving this requires you to exploit nearly 100% of the available grip from the tires in a straight line. This is known as threshold braking. It’s the brake pressure required to reach the point at which the tires are just on the edge of locking up, and no more.

We’ll divide braking technique up into non-downforce cars, such as the Mazda MX-5, Skip Barber, Porsche/RUF and Lotus 49, and downforce cars, such as the Formula Renault 2.0, the HPD, and the McLaren MP4-30. Even if you drive a downforce car, read the non-downforce section first.

Non-downforce cars
Don’t be afraid to brake too hard when you first hit the pedal from high speed. This is when the wheels have the most energy and are least likely to lock up. From this moment on, reaching threshold braking is a case of delicate modulation, and very much a feel thing, requiring practice.

With the above in mind, there are a couple of sources for feedback which can help out in the “feel” department. Firstly it’s a matter of listening to the tires, or in the case of open wheelers, visually seeing them lock up. It’s also possible (but more difficult) to feel changes in load through force feedback and rpm changes in the case of rear locking. Learn how the tires sound just before they lock up, and avoid braking harder than that (to help, you can raise the tire volume in the options menu). The required pressure will be consistent and repeatable regardless of speed assuming tire wear is discounted and the circuit is flat. This is therefore something which can be trained into your muscle memory over repetition. It’ll be obvious in iRacing when you’ve locked up, the tires will screech, the car won’t turn in the case of a front lock up, and you may see visible smoke.

VRS app telemetry braking trace before T5 at Okayama in the MX-5:braking trace - T5 Okayama

Downforce cars
Fundamentally the same rules apply to downforce cars, but it’s key to understand that the level of grip is speed-dependent. At high speed the car will produce more downforce and therefore the tires will have more grip when compared to travelling at low speed. When you start braking therefore, your speed is obviously greater than when you finish, and the grip level in turn decreases as you continue to brake. This of course means the required threshold braking pressure will decrease in connection with your speed.

How this typically works in practice: Slam the brakes to reach threshold braking quickly, then “bleed” off the brakes at the same rate as the car slows down and the downforce comes off.

Turn 1 at COTA with Martin Krönke in the MP4-30:
braking trace - T1 at COTA

A common mistake in racing downforce cars is not braking hard enough initially. Drivers tend to brake with an initial force which causes the tyres lock up at the end of the braking zone, failing to take full advantage of the extra grip early on.

ABS
Many modern race cars such as the GT3 class now feature driver aids such as traction control and ABS. Whilst ABS prevents locking of the wheels under heavy braking – especially when turning at the same time – it shouldn’t be relied on. Correctly carried out threshold braking is still more efficient, as ABS tends to work in a pulsating manner meaning the tyres lock up very briefly, reducing the braking performance and causing additional tire wear and heat. However, threshold braking is much easier to achieve in ABS equipped cars, as you get additional feedback – when engaged the ABS causes significant vibration which can be felt through the wheel with force feedback. Reduce brake pressure so you only have a subtle hint of this.

Understanding threshold braking while steering
Braking is further complicated when turning into a corner, and if you refer back to article 3.1 “The traction circle” you will know that in order to stay within the limits of the available grip at the tyres, you must reduce brake pressure as you steer, and eventually come off them at the point at which 100% of available lateral grip is being exploited (typically the apex of a corner).

Trail braking
The earlier paragraph is often termed “trail braking”, and is why you’ll see a fast driver bleed off the brakes as they turn into a corner even in cars without downforce. Proper trail braking technique however takes this a step further, and involves continuing to hold onto the brake pedal very deep into corners, typically right up to the moment at which the driver starts to apply throttle. This form of trail braking isn’t so much used to slow the car down but instead as a control method to maintain load on the front tires and reduce understeer from corner entry to apex. You can see evidence of this in Martin’s telemetry from the trace earlier in this article in his reluctance to fully release the brake pedal.

Here we can see David trail braking into T1 at Zolder with the BMW Z4. We have divided the braking phases as shown:
braking trace - T1 at Zolder

A: Threshold braking – bleeding off with downforce level
B: Exploiting the traction circle – reducing brake pressure with increasing steering angle
C: Trail braking – continuing to hold the brakes at 5-10% until applying exit throttle

Up to you:
These techniques will take a lot of practice and repetition before they start to become natural, and initially you may be worse off. Focus on one technique at a time and refer back to the VRS app for telemetry to review your efforts.