 Welcome to season two of the VRS Academy — let’s dive into racing on a more technical level. We’ll start off with the traction circle, which is a key element used to understand the grip available from the tyres.
Back in article 2.4 Driving basics, we summarised how the optimal lap is a combination of carrying the maximum speed on the best racing line. The best drivers can achieve this by understanding how to fully exploit the grip available at all times during a lap.
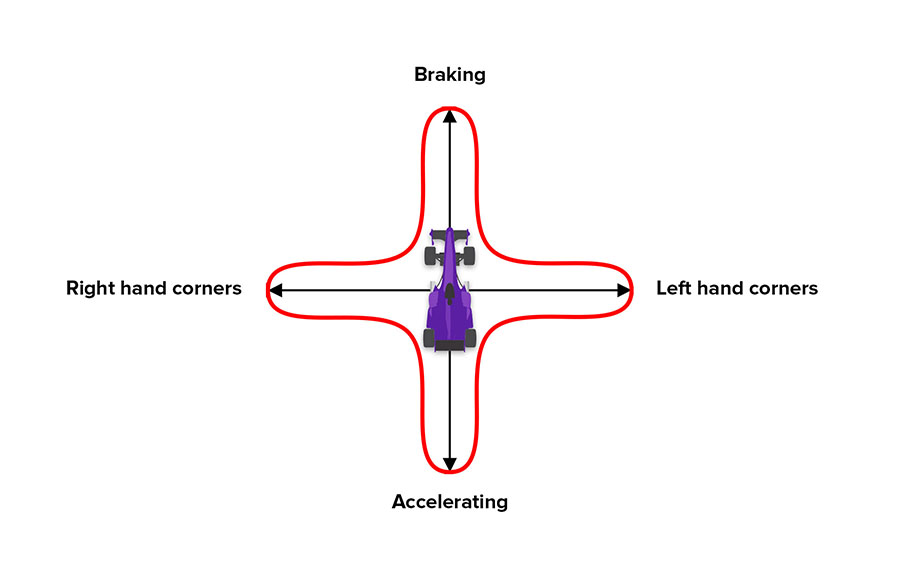
The traction circle
Tyres are responsible for providing a connection between the car and tarmac, and it’s through this connection that the driver is able to accelerate, brake and corner. The most important thing to recognise is that there is a finite limit to the amount of grip or force which can be produced in any direction.
To define this, we can visualise a diagram called the traction circle.

The axes represent g-forces experienced in the car as a result of tyre grip in a single direction. At rest and when coasting in a straight line, the resultant forces are effectively zero and thus we are in the centre of the traction circle. During acceleration, the tyres produce grip in a forward direction, translating into a rearward g-force and propelling us along, whilst the opposite happens under braking when the tyres produce rearward grip, slowing us down. It’s a similar story when cornering, and this is when we see the tyres produce lateral (side) forces.
The limit of force the tyres can produce is defined by the red circle in the diagram which represents 100% of grip available. It is the goal of a racing driver to operate as close to this as possible, but to never attempt to go beyond it.
Looking at the circle, it’s very easy to understand that wheelspin in a Formula 1 car is caused by reaching the red line in the acceleration direction. It’s also easy to see how braking too hard would cause the wheels to lock up trying to exceed the red line, and finally obvious to visualise how going too fast for a given corner would cause us to demand more than 100% from the tyres in a lateral direction and cause understeer or a slide.
It’s more difficult however to understand when on track how the combined relationship between braking or acceleration, and cornering at the same time works, and this is where the traction circle helps us.
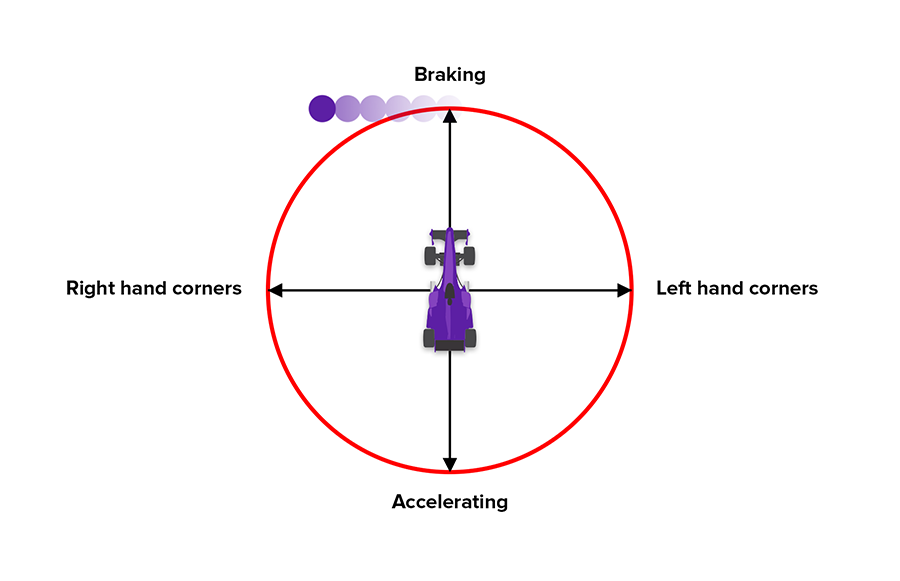
Using the full traction circle in all directions
Again back in 2.4 Driving basics, we recommended that the beginner driver entirely separates their braking, steering and throttle inputs. Whilst this is a good approach for the novice, it is clear that this driving style does not fully exploit the full limits of the traction circle and the diagram instead will look more like the following.
We can see here that the driver reaches the outer limit under braking, but then comes off the brake fully before then steering, once again reaching the outer limit but this time laterally.
A driver can better exploit the grip available at the tyres by combining braking, steering and acceleration, however first picture the following scenario. You’re approaching a right-hand corner, and you’re braking to 100% of the available grip, on the edge of the circle. You begin to turn into the corner whilst maintaining the same brake pressure, the front tyres then lock up and you immediately begin to run wide.
Looking at the diagram, we can see that since you were already on the red line in the braking direction, as soon as you turned the wheel you tried to demand some lateral force from the tyres, which would put your car outside the circle (if it were possible).
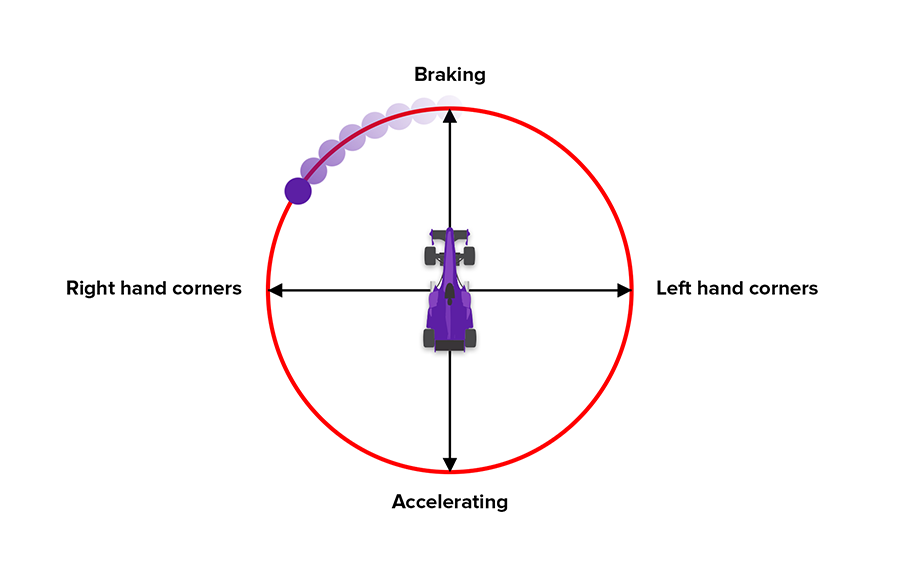
The correct technique is to reduce braking pressure as you begin to steer, so that you remain inside the outer extent of the red line. As you reach the apex (middle) of the corner, you should be using 100% of the lateral grip available with little to no pedal input. From this point onwards you can feed in the throttle so you remain on the outer circle up until you reach full throttle (and are no longer limited by the grip available).
Using telemetry within the VRS software
The driving analyzer on the app includes a traction circle which can be displayed by choosing the “driving style” tab, which reveals the following diagram:

This diagram represents “g force” in the direction in which the driver feels it. Braking is at the top, acceleration at the bottom and lateral g force at the sides. The above data is from turn 4 at Okayama with the MX-5, and we can see that the full extent of the grip available is well used throughout braking, transitioning to cornering, and finally acceleration – until full throttle. The MX-5 only has 2 driven wheels and isn’t very powerful which is why the car has so much more braking potential when compared to acceleration.
Up to you
Continue reading with 3.2, where we explain the ideal racing line, which you can combine with your knowledge of the traction circle!