 After the tyre pressures, which we handled in 5.2, another significant setting to tweak on the Skip Barber is the anti-roll bar (ARB) in the rear. First of all, you need to understand what an ARB is and what it does to the car.
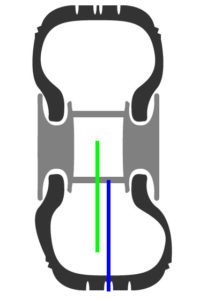
The red component in the illustration below is an anti-roll bar, which nearly every racing car has on its rear and/or front axles. The ARB connects the suspension elements of two wheels on the same axle. As a result, as soon as one wheel moves up or down, the other wheel is forced to follow that motion. However, the ARB is essentially a torsion spring which stores some of the energy when twisted, so not the entire movement of one tire is transferred to the other.
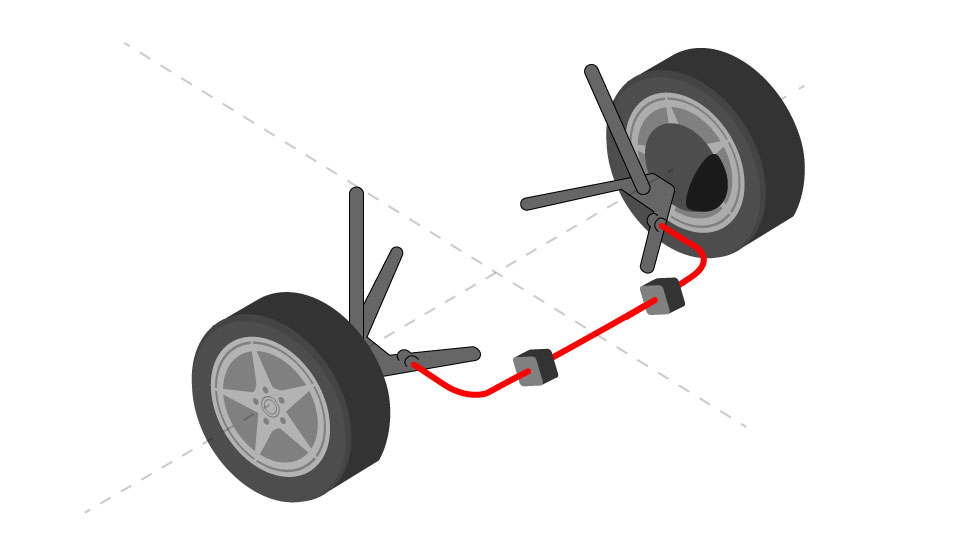
To give an example of an ARB’s importance: When a car without an ARB installed goes through a fast right-hand corner, the inertia forces the car to lean to the left side, which is on the outside of the corner. This is because the mass of the chassis is not willing to change direction, while the tyres that grip to the surface are. Relative to the chassis, the left tyres move upwards, the right tyres move downwards, causing body roll. Try to visualise this in your mind.
- The main purpose of the ARB is to change the roll stiffness of the axle it’s installed on, which has two important implications:
The more horizontal a car goes through a corner, the better the chassis is at creating downforce. We’ll cover this in a later article, since here we’re covering the low downforce Skip Barber car. - The ratio of roll stiffness between the front and rear axles affect the balance of the car, especially its tendency to under- or oversteer. Unlike downforce, this is highly relevant for the Skippy.
To understand how balance is affected, we need to understand that as vertical load on a tyre is increased, the coefficient of friction of that tyre decreases. You still get more grip, but proportionally less. This is known as load sensitivity.
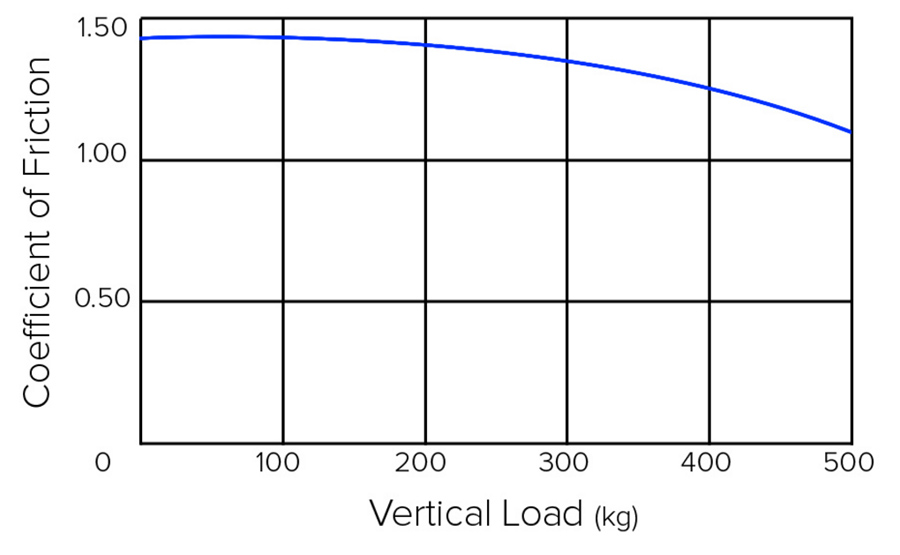
Let’s work through an example, using the chart above. At 400 kg of vertical load on a tyre, the coefficient of friction is 1.25. By multiplying the two numbers, you get the amount of friction force provided by the tyre:
400 x 1.25 = 500 kg (single tyre)
If we have a perfectly balanced axle where each wheel is loaded with 400 kg, the total available grip at that axle is:
(400 x 1.25) + (400 x 1.25) = 1000 kg (axle)
Cornering causes lateral (left/right) load transfer at each axle. Vertical load will increase on the outside tires and will decrease on the inside tires. Continuing our example, let’s assume that due to lateral load transfer the vertical load on the left tyre becomes 500 kg, while the load on the right side becomes 300 kg. The coefficient on the left tyre decreases from 1.25 to 1.11, while on the right tyre it increases from 1.25 to 1.35.
500 kg x 1.11 =550 kg (left tyre)
300 kg x 1.35 = 405 kg (right tyre)
550 kg + 405 kg = 955 kg (axle)
So while the total load on the axle remains the same (800kg), the total available grip is now only 955 kg. Just when you need grip the most!
Now we understand how an axle can lose grip under cornering, and is this precisely what causes handling issues. When the available grip of the rear tyres is exceeded first, the car goes into oversteer; when the grip of the front tyres is exceeded first, the car goes into understeer. An ARB can balance this out.
Using the ARB to balance the car
A softer ARB causes less lateral load transfer on its axle, compared to a stiffer ARB. This can improve the balance of the car, and increase overall grip on the axle as shown in the earlier example. The ARB stiffness can also determine the lateral load transfer between the front and rear axles, even if a car only has one ARB, like the Skippy, which only has one on the rear.
A stiffer rear ARB causes more of the lateral load transfer to be distributed to the rear axle. Softer rear ARB means more of the lateral load transfer is distributed to the front axle. A stiffer rear ARB thus reduce available grip at the back while increasing it at the front, hence, making the car more oversteery and less understeery. Conversely, softening the rear ARB increases available grip at the back while decreasing it at the front, hence, making the car less oversteery and more understeery.
Controlling how much lateral load is transferred on the front versus rear axle is a balancing act, to optimise how much grip is available at each axle. Tuning the rear ARB on the Skip Barber car is mostly a question of driver preference: If you find the car too unstable for your liking, you can try reducing rear ARB stiffness. If you find the car unwilling to turn, you can try stiffening the rear ARB.
It’s important to note that tuning the ARB will only make a difference if you are utilizing the traction circle, as explained in 3.1. If you ask too much of the car (overall G’s), the ARB won’t help. If you ask too little, you won’t notice any difference in handling.
Up to you
Get the Skip Barber out for a spin, and see if you can adjust the ARB to your liking! See if you feel the effect of it, and try to visualise the forces working on the car as you go through the corners.
For further explanations on the matter of ARBs, please see the more advanced chapters of this guide, which we’ll publish soon.
 One of the few setup options available to the Skip Barber car is the pressure in the tyres. It’s also one of the most important things to get right on every single car. To find the ideal tyre pressure, it’s important to know what to look out for.
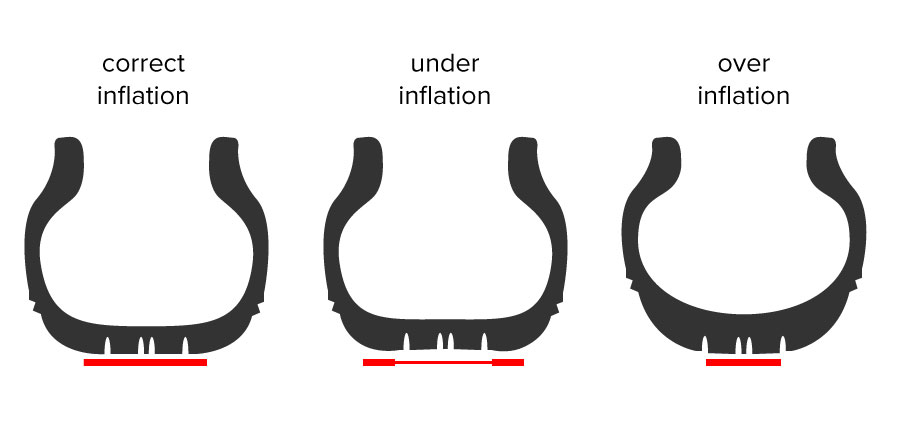
 Moreover, lower tyre pressures also affect the lateral stiffness, and when running very low pressures, it’s possible that the middle of the tyre is no longer at the centre of the rim while cornering. It can cause the sidewalls of the tyres to nearly fold. This is also not ideal (see image).