A top quality direct drive sim racing wheel,  such as the VRS DirectForce Pro, is very responsive, powerful, and fun to drive. Out of the box, the default settings will give you great feeling force feedback (FFB), but for the best experience it is important to use the wheel tool to configure your VRS DirectForce Pro to your specific game, car, and preferences. We’ll cover the main things to adjust using iRacing as the example platform, but these points will be relevant in every sim racing game.
Before getting into the in-game settings, make sure you have the VRS Wheel Tool installed, available here.
General In-Game Settings
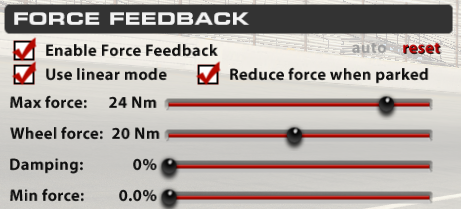
Ideally, for a given race car, everyone with a VRS DirectForce Pro should run the same in-game settings and do their preference adjustments in the Wheel Tool. In-sim force feedback strength is the main thing to focus on and tune within the iRacing settings, and we’ll explain this later. For iRacing settings, if you see a “Strength” label instead of a “Max force” label under Options -> Force Feedback, click on the label and it will change to “Max Force” measured in Nm. We will ideally change that setting for each car (explained in the next section). “Wheel Force” should be set to 20Nm, though not consequential as that’s only used by iRacing’s FFB auto-adjustment feature, which you won’t need if you use our recommended “Max Force” settings. You can play with damping if you’d like, but we recommend using the Wheel Tool damping, so iRacing damping should generally be set to 0%. Min Force absolutely should be set to 0% though. Check “Enable Force Feedback”, “Use linear mode”, and “Reduce force when parked”.
Force Feedback Strength
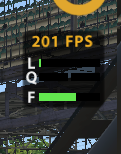 First, we need to explain FFB clipping. In iRacing, hit F (by default) to bring up telemetry of your force feedback. Here we can see the F bar, showing the current FFB output to the VRS DirectForce Pro Wheel Base controller. The “clipping point” is when the F bar turns red and is maxed out, which means the force feedback can’t go any higher. Clipping is undesirable under normal driving conditions, so you need a high enough clipping point. However, setting the clip point too high results in a weaker overall FFB strength.
There are two main ways to adjust raw force feedback strength. The first is with the VRS wheel tool, and the second is through the in-game settings. Going over the wheel tool first, the Max Force slider will determine the maximum torque the motor will output. This is useful to adjust because most FFB forces are well below the maximum output of the game and motor. We are suggesting two different ways to adjust your force feedback strength per car:
Option 1: “Set and forget” the Wheel Tool Max Force, and adjust the in-game Max Force for each car. We recommend you start with the default of 50% Max Force in the Wheel Tool until you get used to the wheel. Most of our testers and even pro sim racers use 40% to 60% max force. From there, you can adjust in-game force to your liking, but make sure the F bar doesn’t reach the clipping point (doesn’t get red under grippy driving conditions). This method has the advantage of not having to save and reload profiles for each car in the VRS Wheel Tool, and it will work just fine, however there are two potential drawbacks, especially at Wheel Tool Max Forces above 50%: Crashes and heavy curb hits could be very strong, and the overall FFB resolution could be slightly reduced over the operating range. If you want to find the optimal “clipping point” and maximize the effective resolution of the FFB signal from the sim, consider the second option.
Option 2: Find the optimal in-sim max force for each car, then adjust the Wheel Tool max force for each car to your preference. Hit F to bring up the F bar in iRacing. We want to adjust the in-game Max Force so that the F bar only clips yellow or red over the heaviest curb hits and during wall impacts, but stays green (hanging around 40-70% force) during normal cornering. To more precisely calibrate the FFB Max Force for a car, you should be doing laps in the most grippy conditions possible: cool track temperatures, high track rubber, and non-worn tires. You should also pick a track that loads up the tires well with e.g. high speed essess, heavy braking zones and some jarring curbs. Combined with the grippy weather and track conditions, you’ll get an extreme case of FFB workload. If you have a Competitive VRS subscription, analyzing a lap of telemetry in the “advanced mode” on the FFB tab will tell you exactly the in-game setting you should select in Nm. The guidance is to configure the sim to only clip 2% of the samples from the high end of the force in the extreme grip lap test.

Here are a few example iRacing Max Force settings we’ve tested for as of June 2020. Remember you can click “Max Force” in the iRacing options to change to a Nm readout. Please note that car setup, steering ratio, track grip, and iRacing physics updates can change the best setting for each car, so only use these as a starting point/reference:
- Mazda MX5: 14 Nm
- Porsche 911 GT3 Cup (991): 20 Nm
- McLaren MP4-12C GT3: 24 Nm
- Ferrari 488 GT3: 30 Nm
- BMW Z4 GT3: 21 Nm
- Mercedes AMG GT3: 31 Nm
- Ferrari 488 GTE: 33 Nm
- Porsche 911 RSR: 26 Nm
- BMW M8 GTE: 47 Nm
- Formula Renault 3.5: 33 Nm
- Formula Renault 2.0: 19 Nm
- Dallara F3: 32 Nm
- NASCAR Cup: 26 Nm
- NASCAR Xfinity: 27 Nm
- NASCAR Truck: 21 Nm
If you drive multiple cars, you should check “use custom controls for this car” to adjust each car individually. From there, it’s as simple as finding the overall wheel strength you like, and tune to that with the Max Force slider in the Wheel Tool. Generally, most of our testers liked 40% to 60% max force if they followed the above process for setting proper in-game FFB. The max force you end up choosing is completely up to you! Try to start weaker and slowly build up as you feel more comfortable with the direct drive forces. Keep in mind that the motor is very strong, so take it slow to avoid injuring yourself! Eventually you’ll find a point that “feels right” by being strong enough that you feel every detail you need, without overpowering your grip or overly tiring your arms after a long stint.
There are benefits of running a lot of force. As an example, the self-aligning torque of the wheels helps you catch oversteer without you doing much. The more force you run, the more this effect is pronounced. However, this does not mean you should run as much as possible at all times. You should be comfortable with the setting – your arms should not hurt while driving and you shouldn’t run forces that could impose risks on your health. If the maximum you can take ends up being only 10Nm (50%) instead of 20Nm (100%) that is fine, it won’t mean you’re not taking advantage of your DD wheel.
Once you have your settings for each car and are happy with the overall force, set it and forget it! Generally you shouldn’t adjust for different tracks or for different weather conditions for a given car, because you want to be able to feel the differences in grip level of the track surface. Our World Championship VRS Coaches use this mindset, and say it only takes one trip through Turn 1 of any track to know exactly how much grip the track and tire has, allowing them to push all-out at the start of every stint.
Wheel Tool Settings and Filters
There are a few settings with sliders in the Wheel Tool which you can adjust to achieve the “feel” in the wheel that you want. The Wheel Tool comes preloaded with a default configuration that should feel great, but you may want to play with the settings to find what you like best. Any time you make a change, make sure to hit “Save Settings” to apply and persist the change(s).
Calibrate the center of the wheel by turning your steering wheel until it’s perfectly centered and click “Center”. Degrees of rotation are up to your preference, but most sim racers use the standard 900 degrees, which is a full turn and a quarter to the left and right. The wheel has “end stops” that will resist wheel movement past the maximum degrees of rotation.
Smoothing takes the “raw” FFB signal that the sim sends to the controller, and filters it to make it smoother. Otherwise, the FFB can feel “notchy”, especially with iRacing’s 60hz refresh rate. To feel the raw signal, try 0 smoothing (most people don’t like this). The motor can achieve the command from the sim within 1-2ms but a new command is issued once every 16ms (at 60Hz update rate). Without additional filtering/smoothing, you’d feel the steps the motor makes every 16ms. More smoothing means less “notchiness”, but with the downside of a delay when the full force feedback command from the sim is achieved. Some people like the more notchy response because the wheel feels more “alive”, while others prefer the smoother feel, which is closer to what real cars feel like. Generally try to run the lowest Smoothing value you can without feeling too much notchiness. Most Pro sim racers prefer 1 or 2 smoothing on iRacing.
Damper, Friction, Inertia, Spring have an associated drop-down menu, which allows you to select if you want the device to configure the listed effects, the game, or a combination of both. Most of the time you’d probably want to stick to Device Effect Only.
Damping is a force that acts against the current rotation of the wheel, and is stronger for quicker rotation. Damping is used mostly to reduce oscillations from the game’s FFB. The downside to high damping that the will becomes less responsive to driver inputs and to sim commands. Lower damping is generally recommended, but a small amount is good for reducing oscillations. Our pro drivers prefer 10% to 20% damping.
Friction and inertia will be implemented at a later date.
Spring is a force acting to center the wheel. It’s a linear spring, so you’ll experience more centering force the further the wheel is turned. Generally we don’t recommend using this setting in iRacing (leave it at 0), but it may is useful in other games or for racers who prefer weak FFB.
Non-linearity is a FFB technique used with lower-end wheels. Weak FFB forces from the game are amplified, and strong forces are a bit “compressed” to allow you to feel some more FFB detail on the weak-end without clipping on the strong-end. We’ve included non-linearity as an option on our system to accommodate users who would prefer soft FFB (e.g. less than 50% Max Force) without losing out on the small FFB details. It’s also an option to try for racing games which seem to be lacking detail on the low end. Generally for most sim racing titles, set non-linearity to 0 (completely linear). Higher values will amplify low-end forces more.
Saving/Loading Settings and Profiles
The Wheel Tool allows you to easily save and load your settings to the firmware, as well as save profiles for different cars or games to reload later. To save your current settings, hit “Save Settings”. If you made changes to the sliders without saving but want to return to the last loaded settings configuration, hit “Reload Settings”. Factory Default will return the settings to what they were when you bought the wheel base. You can hit “Add Profile” to create a new profile with the currently selected settings. Use the dropdown menu to select another profile. Hit “Save Settings” to apply the settings to the wheel.
Loading Firmware
If you need to load new firmware or reload an old one, hit “Enter Bootloader”, then open the firmware file. The device will restart back into the main firmware after a firmware update.
Other Settings
The Encoder and Debug tabs are for developer use only and can be ignored.